11-May-2023
.
Admin
Hi Dev,
In this tutorial, we will create a simple Like/Dislike system using Laravel 10. The Like/Dislike system is a popular feature in many web applications, and it allows users to express their opinions on content such as posts, comments, and images. With Laravel's built-in relationships and polymorphic associations, creating a Like/Dislike system is relatively easy. We will create a migration for the likes and dislikes table, define the relationships in the models, and create a trait that can be used to add liking and disliking functionality to any model.
We'll start by creating a migration for the likes and dislikes table and defining relationships between models. Then, we'll create a trait for liking and disliking, and implement the functionality in our sample blog application. You can extend and customize this code to fit your specific needs.
This article will give you simple Laravel 10 Like Dislike System Using Ajax Example
Step 1: Download Laravel
Let us begin the tutorial by installing a new laravel application. if you have already created the project, then skip following step.
composer create-project laravel/laravel example-app
Step 2: Install laravel-follow Package
Now we require to install laravel-follow package for like unlike system, that way we can use it's method. So Open your terminal and run bellow command.
composer require overtrue/laravel-follow
Now open config/app.php file and add service provider and aliase.
config/app.php
'providers' => [

    ....

    Overtrue\LaravelFollow\FollowServiceProvider::class,

],
After that we need to run migration configure file that we it will automatic generate migrations. so let's run.
php artisan vendor:publish --provider='Overtrue\LaravelFollow\FollowServiceProvider' --tag="migrations"
Then just migrate it by using following command:
php artisan migrate
Step 3: Create Authentication
In this step we require to create authentication of Laravel 5.6, so laravel provide artisan command to create authentication that way we don't require to create route and controller for login and registration. so run bellow command:
php artisan make:auth
Step 4: Create Dummy Posts
now in this step we need to create posts table and create model with seeds for dummy records. so let's create posts table using following command:
php artisan make:migration create_posts_table
now add 'title' field on posts table:
database/migrations/CreatePostsTable.php
<?php


use Illuminate\Support\Facades\Schema;
use Illuminate\Database\Schema\Blueprint;
use Illuminate\Database\Migrations\Migration;


class CreatePostsTable extends Migration
{
    /**
     * Run the migrations.
     *
     * @return void
     */
    public function up()
    {
        Schema::create('posts', function (Blueprint $table) {
            $table->increments('id');
            $table->string('title');
            $table->timestamps();
        });
    }


    /**
     * Reverse the migrations.
     *
     * @return void
     */
    public function down()
    {
        Schema::dropIfExists('posts');
    }
}
Then just migrate it by using following command:
php artisan migrate
After this we need to create model for posts table by following path.
App/Post.php
<?php

namespace App;

use Overtrue\LaravelFollow\Traits\CanBeLiked;
use Illuminate\Database\Eloquent\Model;

class Post extends Model
{
    use CanBeLiked;

    protected $fillable = ['title'];
}
Now we require to create some dummy posts data on database table so create laravel seed using bellow command:
php artisan make:seeder CreateDummyPost
Now let's update CreateDummyPost seeds like as bellow:
database/seeds/CreateDummyPost.php
<?php

use Illuminate\Database\Seeder;
use App\Post;

class CreateDummyPost extends Seeder
{
    /**
     * Run the database seeds.
     *
     * @return void
     */
    public function run()
    {
        $posts = ['Nicesnippets.com', 'Webprofile.me', 'HDTuto.com', 'Nicesnippets.com'];

        foreach ($posts as $key => $value) {
            Post::create(['title'=>$value]);
        }
    }
}
Run seeder using this command:
php artisan db:seed --class=CreateDummyPost
Step 5: Update User Model
here we need to update User model. we need to use CanLike facade in User model. So let's update as bellow code.
App/User.php
<?php


namespace App;


use Overtrue\LaravelFollow\Traits\CanLike;
use Illuminate\Notifications\Notifiable;
use Illuminate\Foundation\Auth\User as Authenticatable;


class User extends Authenticatable
{
    use CanLike, Notifiable ;


    /**
     * The attributes that are mass assignable.
     *
     * @var array
     */
    protected $fillable = [
        'name', 'email', 'password',
    ];


    /**
     * The attributes that should be hidden for arrays.
     *
     * @var array
     */
    protected $hidden = [
        'password', 'remember_token',
    ];
}
Step 6: Create Routes
In this step, we will create routes for like unlike system. So we require to create following route in web.php file.
routes/web.php
Route::get('/', function () {
    return view('welcome');
});

Auth::routes();

Route::get('/home', 'HomeController@index')->name('home');

Route::get('posts', 'HomeController@posts')->name('posts');
Route::post('ajaxRequest', 'HomeController@ajaxRequest')->name('ajaxRequest');
Step 7: Add Controller Method
now in HomeController, we will add two new method posts() and ajaxRequest(). so let's see HomeController like as bellow:
app/Http/HomeController.php
<?php

namespace App\Http\Controllers;

use Illuminate\Http\Request;
use App\Post;
use App\User;

class HomeController extends Controller
{
    /**
     * Create a new controller instance.
     *
     * @return void
     */
    public function __construct()
    {
        $this->middleware('auth');
    }

    /**
     * Show the application dashboard.
     *
     * @return \Illuminate\Http\Response
     */
    public function index()
    {
        return view('home');
    }

    /**
     * Show the application dashboard.
     *
     * @return \Illuminate\Http\Response
     */
    public function posts()
    {
        $posts = Post::get();
        return view('posts', compact('posts'));
    }

    /**
     * Show the application dashboard.
     *
     * @return \Illuminate\Http\Response
     */
    public function ajaxRequest(Request $request){

        $post = Post::find($request->id);
        $response = auth()->user()->toggleLike($post);

        return response()->json(['success'=>$response]);
    }
}
Step 8: Create Blade files and CSS File
Now in this file we will create posts.blade.php file and custom.css file. So let's create both files.
resources/views/posts.blade.php
@extends('layouts.app')
@section('content')
<link rel="stylesheet" type="text/css" href="https://maxcdn.bootstrapcdn.com/bootstrap/3.3.7/css/bootstrap.min.css">
<link rel="stylesheet" type="text/css" href="https://maxcdn.bootstrapcdn.com/font-awesome/4.7.0/css/font-awesome.min.css">
<script src="https://cdnjs.cloudflare.com/ajax/libs/jquery/3.2.1/jquery.min.js"></script>
<meta name="csrf-token" content="{{ csrf_token() }}" />
<link href="{{ asset('css/custom.css') }}" rel="stylesheet">
<div class="container">
<div class="row justify-content-center">
<div class="col-md-12">
<div class="card">
<div class="card-header">Posts</div>
<div class="card-body">
@if($posts->count())
@foreach($posts as $post)
<article class="col-xs-12 col-sm-6 col-md-3">
<div class="panel panel-info" data-id="{{ $post->id }}">
<div class="panel-body">
<a href="https://Nicesnippets.com/upload/Nicesnippets.png" title="Nature Portfolio" data-title="Amazing Nature" data-footer="The beauty of nature" data-type="image" data-toggle="lightbox">
<img src="https://Nicesnippets.com/upload/Nicesnippets.png" alt="Nature Portfolio" />
<span class="overlay"><i class="fa fa-search"></i></span>
</a>
</div>
<div class="panel-footer">
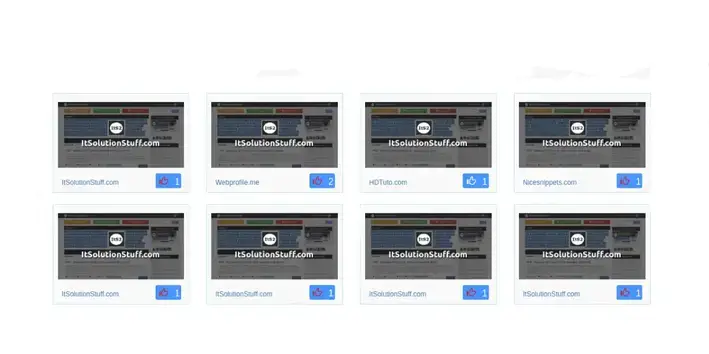
<h4><a href="#" title="Nature Portfolio">{{ $post->title }}</a></h4>
<span class="pull-right">
<span class="like-btn">
<i id="like{{$post->id}}" class="glyphicon glyphicon-thumbs-up {{ auth()->user()->hasLiked($post) ? 'like-post' : '' }}"></i> <div id="like{{$post->id}}-bs3">{{ $post->likers()->get()->count() }}</div>
</span>
</span>
</div>
</div>
</article>
@endforeach
@endif
</div>
</div>
</div>
</div>
</div>
<script type="text/javascript">
$(document).ready(function() {
$.ajaxSetup({
headers: {
'X-CSRF-TOKEN': $('meta[name="csrf-token"]').attr('content')
}
});
$('i.glyphicon-thumbs-up, i.glyphicon-thumbs-down').click(function(){
var id = $(this).parents(".panel").data('id');
var c = $('#'+this.id+'-bs3').html();
var cObjId = this.id;
var cObj = $(this);
$.ajax({
type:'POST',
url:'/ajaxRequest',
data:{id:id},
success:function(data){
if(jQuery.isEmptyObject(data.success.attached)){
$('#'+cObjId+'-bs3').html(parseInt(c)-1);
$(cObj).removeClass("like-post");
}else{
$('#'+cObjId+'-bs3').html(parseInt(c)+1);
$(cObj).addClass("like-post");
}
}
});
});
$(document).delegate('*[data-toggle="lightbox"]', 'click', function(event) {
event.preventDefault();
$(this).ekkoLightbox();
});
});
</script>
@endsection
publis/css/custom.css
.panel {
  position: relative;
  overflow: hidden;
  display: block;
  border-radius: 0 !important;
}
.panel-body {
  width: 100%;
  height: 100%;
  padding: 15px 8px;
  float: left;
  overflow: hidden;
  position: relative;
  text-align: center;
  cursor: default;
}
.panel-body .overlay {
  position: absolute;
  overflow: hidden;
  width: 80%;
  height: 80%;
  left: 10%;
  top: 10%;
  border-bottom: 1px solid #FFF;
  border-top: 1px solid #FFF;
  -webkit-transition: opacity 0.35s, -webkit-transform 0.35s;
  transition: opacity 0.35s, transform 0.35s;
  -webkit-transform: scale(0,1);
  -ms-transform: scale(0,1);
  transform: scale(0,1);
}
.panel-body .overlay i{
  opacity: 0;
}
.panel-body a:hover .overlay {
  opacity: 1;
  filter: alpha(opacity=100);
  -webkit-transform: scale(1);
  -ms-transform: scale(1);
  transform: scale(1);
}
.panel-body a:hover img {
  filter: brightness(0.6);
  -webkit-filter: brightness(0.6);
}
.like-btn{
  background: #3399ff none repeat scroll 0 0;
  border-radius: 3px;
  color: white;
  padding: 7px 3px 3px 7px;
  margin-right: 5px;
  margin-top: -5px;
}
.like-btn i,.dislike-btn i{
  color: white;
}
.dislike-btn{
  background: #FA4E69 none repeat scroll 0 0;
  border-radius: 3px;
  color: white;
  padding: 7px 5px 3px 3px;
  margin-top: -5px;
}
h2 {
  padding: 15px;
  font-family: calibri;
  display: inline-block;
}
.panel .panel-body a {
  overflow: hidden;
}
.panel .panel-body a img {
  display: block;
  margin: 0;
  width: 100%;
  height: auto;
}
.panel .panel-body a:hover span.overlay {
  display: block;
  visibility: visible;
  opacity: 0.55;
  -moz-opacity: 0.55;
  -webkit-opacity: 0.55;
}
.panel .panel-body a:hover span.overlay i {
  position: absolute;
  top: 45%;
  left: 0%;
  width: 100%;
  font-size: 2.25em;
  color: #fff !important;
  text-align: center;
  opacity: 1;
  -moz-opacity: 1;
  -webkit-opacity: 1;
}
.panel .panel-footer {
  padding: 8px !important;
  background-color: #f9f9f9 !important;
  border:0px;
}
.panel .panel-footer h4 {
  display: inline;
  font: 400 normal 1.125em "Roboto",Arial,Verdana,sans-serif;
  color: #34495e margin: 0 !important;
  padding: 0 !important;
  font-size: 12px;
}
.panel .panel-footer h4 a{
  padding: 4px 7px;
  text-decoration: none;
}
.panel .panel-footer h4 a:hover{
  background-color: #69a8d4;
  color: white;
  border-radius: 2px;
  transition: all 0.4s;
}
.panel .panel-footer i.glyphicon {
  display: inline;
  font-size: 1.125em;
  cursor: pointer;
  padding-right: 7px;
}
.panel .panel-footer i.glyphicon-thumbs-down {
  color: #e74c3c;
  padding-left: 5px;
  padding-right: 5px;
}
.panel .panel-footer div {
  width: 15px;
  display: inline;
  font: 300 normal 1.125em "Roboto",Arial,Verdana,sans-serif;
  color: white !important;
  text-align: center;
  background-color: transparent !important;
  border: none !important;
}
.like-post{
  color: #e21309 !important;
}
Now you are ready to run full example.
You can also download full source code of this example.
You can also download full source code of this example.
Preview:
I hope it can help you...
#Laravel 10
