01-May-2023
.
Admin
Hi dev,
This article will go over some of the most significant Laravel 10 send notification examples. I'd like to provide a laravel 10 notification example. You will be shown an example of a laravel 10 mail notice. If you're looking for a Laravel 10 send notification example, you've come to the correct spot.
Laravel notifications are a powerful feature of the Laravel PHP framework that allows you to deliver alerts to your users via email, SMS, Slack, and other channels.
Notifications in Laravel are implemented using a notification class that extends the Illuminate\Notifications\Notification class. Within the notification class, you can define the content and format of the notification, as well as the channel or channels that the notification should be sent through.
Laravel includes a number of built-in notification channels, including mail for sending email alerts, database for storing messages in a database, and broadcast for broadcasting notifications over web sockets. You can also construct custom channels to send notifications via other channels.
In this example, we will create simple BirthdayWish notification and send to user on his bithday. so, let's follow the following step to make it done this simple example.
Step 1: Install Laravel
This step is not required; however, if you have not created the laravel app, then you may go ahead and execute the below command:
composer create-project laravel/laravel example-app
Step 2: Create Migration
here, we will create new migration for adding new column birthdate in users table. so let's run bellow command:
php artisan make:migration add_birthdate_column
After this command you will find one file in following path "database/migrations" and you have to put bellow code in your migration file for create products table.
<?php

use Illuminate\Database\Migrations\Migration;
use Illuminate\Database\Schema\Blueprint;
use Illuminate\Support\Facades\Schema;

return new class extends Migration
{
    /**
     * Run the migrations.
     *
     * @return void
     */
    public function up()
    {
        Schema::table('users', function (Blueprint $table) {
            $table->date('birthdate')->nullable();
        });
    }
    /**
     * Reverse the migrations.
     *
     * @return void
     */
    public function down()
    {

    }
};
Now you have to run this migration by following command:
php artisan migrate
Step 3: Update Model
In this step, we will add "birthdate" column in $fillable array.
Make sure you use Notifiable class form Illuminate\Notifications\Notifiable.
let's copy below code and paste it.
app/Models/User.php
<?php

namespace App\Models;

use Illuminate\Contracts\Auth\MustVerifyEmail;
use Illuminate\Database\Eloquent\Factories\HasFactory;
use Illuminate\Foundation\Auth\User as Authenticatable;
use Illuminate\Notifications\Notifiable;
use Laravel\Sanctum\HasApiTokens;

class User extends Authenticatable
{
    use HasApiTokens, HasFactory, Notifiable;

    /**
     * The attributes that are mass assignable.
     *
     * @var array

     */
    protected $fillable = [
        'name',
        'email',
        'password',
        'birthdate'
    ];

    /**
     * The attributes that should be hidden for serialization.
     *
     * @var array

     */
    protected $hidden = [
        'password',
        'remember_token',
    ];

    /**
     * The attributes that should be cast.
     *
     * @var array

     */
    protected $casts = [
        'email_verified_at' => 'datetime',
    ];
}
Step 4: Create Notification
In this step, we need to create "Notification" by using laravel artisan command, so let's run bellow command, we will create BirthdayWish notification class.
php artisan make:notification BirthdayWish
now you can see new folder will create as "Notifications" in app folder. You need to make following changes as like bellow class.
app/Notifications/BirthdayWish.php
<?php

namespace App\Notifications;

use Illuminate\Bus\Queueable;
use Illuminate\Contracts\Queue\ShouldQueue;
use Illuminate\Notifications\Messages\MailMessage;
use Illuminate\Notifications\Notification;

class BirthdayWish extends Notification
{
    use Queueable;

    private $messages;

    /**
     * Create a new notification instance.
     */
    public function __construct($messages)
    {
        $this->messages = $messages;
    }

    /**
     * Get the notification's delivery channels.
     *
     * @return array

     */
    public function via(object $notifiable): array
    {
        return ['mail'];
    }

    /**
     * Get the mail representation of the notification.
     */
    public function toMail(object $notifiable): MailMessage
    {
        return (new MailMessage)
                    ->line($this->messages['hi'])
                    ->line($this->messages['wish'])
                    ->line('Thank you for using our application!');
    }

    /**
     * Get the array representation of the notification.
     *
     * @return array

     */
    public function toArray(object $notifiable): array
    {
        return [

        ];
    }
}
next, you have to add send mail configuration with mail driver, mail host, mail port, mail username, mail password so laravel will use those sender configuration for sending email. So you can simply add as like following.
.env
MAIL_MAILER=smtp
MAIL_HOST=smtp.gmail.com
MAIL_PORT=465
MAIL_USERNAME=mygoogle@gmail.com
MAIL_PASSWORD=rrnnucvnqlbsl
MAIL_ENCRYPTION=tls
MAIL_FROM_ADDRESS=mygoogle@gmail.com
MAIL_FROM_NAME="${APP_NAME}"
Step 5: Create Route
In this is step we need to create routes for sending notification to one user. so open your "routes/web.php" file and add following route.
routes/web.php
<?php

use Illuminate\Support\Facades\Route;

use App\Http\Controllers\UserController;

/*
|--------------------------------------------------------------------------
| Web Routes
|--------------------------------------------------------------------------
|
| Here is where you can register web routes for your application. These
| routes are loaded by the RouteServiceProvider within a group which
| contains the "web" middleware group. Now create something great!
|
*/

Route::get('user-notify', [UserController::class, 'index']);
Step 6: Create Controller
Here,we require to create new controller UserController with index method to send notification route. So let's put bellow code.
app/Http/Controllers/UserController.php
<?php
namespace App\Http\Controllers;
use Illuminate\Http\Request;
use App\Models\User;
use App\Notifications\BirthdayWish;
class UserController extends Controller
{
/**
* Display a listing of the resource.
*
* @return \Illuminate\Http\Response
*/
public function index(Request $request)
{
$user = User::find(1);
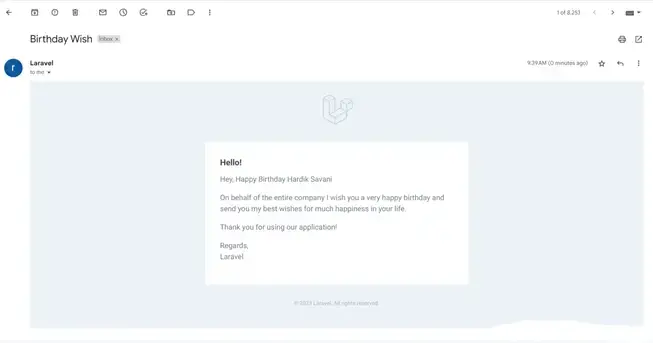
$messages["hi"] = "Hey, Happy Birthday {$user->name}";
$messages["wish"] = "On behalf of the entire company I wish you a very happy birthday and send you my best wishes for much happiness in your life.";
$user->notify(new BirthdayWish($messages));
dd('Done');
}
}
Run Laravel App:
All the required steps have been done, now you have to type the given below command and hit enter to run the Laravel app:
php artisan serve
Now, Go to your web browser, type the given URL and view the app output:
http://localhost:8000/user-notify
Output: You Email Look Like This
I hope it can help you...
#Laravel 10
