19-Aug-2021
.
Admin
Hi guys,
Today i will explained How to Import CSV File Data To MySQL Database in Codeigniter 4. This example is so easy to use in Codeigniter 4.
We are about to explain how to import data from an excel file to MySQL in CodeIgniter dynamically. We will share specific instructions that will help you quench your thirst to create a simple functionality to import CSV file to MySQL database Codeigniter.
So let's start to the example.
Step 1: Download Codeigniter Project
Codeigniter Project Project install in a two ways.
<?php
https://codeigniter.com/download
or
composer create-project codeigniter4/appstarter project_name
?>
Step 2: Configure Error Handling
Next, set display_errors to 1 in app/Config/Boot/production.php, it makes the error handling process profoundly facile.
ini_set('display_errors', '1');
Step 3: Generate User Table in Database
Then third step to generate a database table in your application database.
CREATE TABLE students (
    id int(11) NOT NULL AUTO_INCREMENT COMMENT 'Primary Key',
    name varchar(150) NOT NULL COMMENT 'Name',
    email varchar(255) NOT NULL COMMENT 'Email',
    phone varchar(250) NOT NULL COMMENT 'Phone',
    created_at varchar(20) NOT NULL COMMENT 'Date Created',
    PRIMARY KEY (id)
) ENGINE=InnoDB DEFAULT CHARSET=latin1 COMMENT='Student table' AUTO_INCREMENT=1;
Step 4: Connect To Database
Open the app/Config/Database.php, and insert database name, username and password into the file.
public $default = [
        'DSN'      => '',
        'hostname' => 'localhost',
        'username' => 'root',
        'password' => '',
        'database' => 'codeigniter_db',
        'DBDriver' => 'MySQLi',
        'DBPrefix' => '',
        'pConnect' => false,
        'DBDebug'  => (ENVIRONMENT !== 'development'),
        'cacheOn'  => false,
        'cacheDir' => '',
        'charset'  => 'utf8',
        'DBCollat' => 'utf8_general_ci',
        'swapPre'  => '',
        'encrypt'  => false,
        'compress' => false,
        'strictOn' => false,
        'failover' => [],
        'port'     => 3306,
    ];
Step 5: Create Sample CSV File
If you don’t have a CSV file, you can copy the following comma-separated code, paste it into the code editor and save the file with the .csv extension.
name, email, phone, created_at
Sam Coury, christine1998@yahoo.com, 772-267-3636, 2021-02-02
Chris Ellis, ellis@yahoo.com, 270-562-2304, 2020-03-03
Cameron Finley, cameron@rediff.com, 813-416-4979, 2019-01-05
Howard Schlueter, schlueter@gmail.com, 828-207-1592, 2018-05-02
Jordan Tafoya, annabell2001@hotmail.com, 512-596-3622, 2017-05-11
Step 6: Create Model
Then next step to create a StudentModel model in your CodeIgniter application.
app/Models/StudentModel.php
<?php
namespace App\Models;
use CodeIgniter\Database\ConnectionInterface;
use CodeIgniter\Model;

class StudentModel extends Model
{
    protected $table = 'students';
    protected $allowedFields = [
        'name',
        'email',
        'phone',
        'created_at'
    ];
}
Step 7: Set Up Controller
Create StudentController.php file in the app/Controllers directory, then insert the below code into the file.
app/Controllers/StudentController.php
<?php
namespace App\Controllers;
use CodeIgniter\Controller;
use CodeIgniter\HTTP\RequestInterface;
use App\Models\StudentModel;

class StudentController extends Controller
{
    public function index()
    {
        return view('index');
    }

    public function importCsvToDb()
    {
        $input = $this->validate([
            'file' => 'uploaded[file]|max_size[file,2048]|ext_in[file,csv],'
        ]);

        if (!$input) {
            $data['validation'] = $this->validator;
            return view('index', $data);
        }else{
            if($file = $this->request->getFile('file')) {
                if ($file->isValid() && ! $file->hasMoved()) {
                    $newName = $file->getRandomName();
                    $file->move('../public/csvfile', $newName);
                    $file = fopen("../public/csvfile/".$newName,"r");
                    $i = 0;
                    $numberOfFields = 4;

                    $csvArr = array();

                    while (($filedata = fgetcsv($file, 1000, ",")) !== FALSE) {
                        $num = count($filedata);
                        if($i > 0 && $num == $numberOfFields){
                            $csvArr[$i]['name'] = $filedata[0];
                            $csvArr[$i]['email'] = $filedata[1];
                            $csvArr[$i]['phone'] = $filedata[2];
                            $csvArr[$i]['created_at'] = $filedata[3];
                        }
                        $i++;
                    }
                    fclose($file);

                    $count = 0;
                    foreach($csvArr as $userdata){

                        $students = new StudentModel();
                        $findRecord = $students->where('email', $userdata['email'])->countAllResults();

                        if($findRecord == 0){
                            if($students->insert($userdata)){
                                $count++;
                            }
                        }
                    }
                    session()->setFlashdata('message', $count.' rows successfully added.');
                    session()->setFlashdata('alert-class', 'alert-success');
                }else{
                    session()->setFlashdata('message', 'CSV file coud not be imported.');
                    session()->setFlashdata('alert-class', 'alert-danger');
                }
            }else{
                session()->setFlashdata('message', 'CSV file coud not be imported.');
                session()->setFlashdata('alert-class', 'alert-danger');
            }
        }
        return redirect()->route('/');
    }
}
Step 8: Set Up Routes
app/Config/Routes.php
$routes->get('/', 'StudentController::index');
$routes->post('import-csv', 'StudentController::importCsvToDb');
Step 9: Create Codeigniter View File
Next to create a view file in your application under directiory;
app/View/index.php
<!DOCTYPE html>
<html lang="en">
<head>
    <meta charset="UTF-8">
    <meta name="description" content="The tiny framework with powerful features">
    <meta name="viewport" content="width=device-width, initial-scale=1.0">
    <title>Codeigniter 4 Import CSV File Data To MySQL Database Tutorial - Niceshippest.com</title>
    <link href="https://cdn.jsdelivr.net/npm/bootstrap@5.0.1/dist/css/bootstrap.min.css" rel="stylesheet">
    <style>
        .container {
            max-width: 500px;
        }
    </style>
</head>
<body>
    <div class="container mt-5">
        <div class="card">
            <div class="card-header text-center">
                <strong>Upload CSV File</strong>
            </div>
            <div class="card-body">
                <div class="mt-2">
                    <?php if (session()->has('message')){ ?>
                        <div class="alert <?=session()->getFlashdata('alert-class') ?>">
                            <?=session()->getFlashdata('message') ?>
                        </div>
                    <?php } ?>

                    <?php $validation = \Config\Services::validation(); ?>
                </div>
                <form action="<?=site_url('import-csv') ?>" method="post" enctype="multipart/form-data">
                    <div class="form-group mb-3">
                        <div class="mb-3">
                            <input type="file" name="file" class="form-control" id="file">
                        </div>
                    </div>
                    <div class="d-grid">
                        <input type="submit" name="submit" value="Upload" class="btn btn-dark" />
                    </div>
                </form>
            </div>
        </div>
    </div>
</body>
</html>
Step 10: Start CI Application
In this last step, you have to open the terminal, type command to run the application.
php spark serve
Then next run the url in your browser.
http://localhost:8080
Output
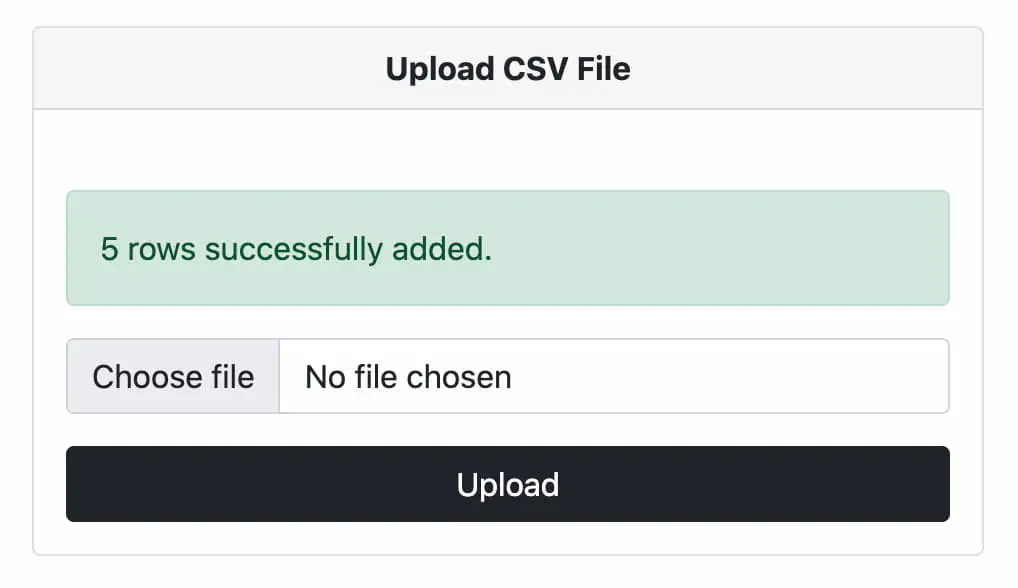
Now you can check your own.
I hope it can help you...
#Codeigniter 4
#Codeigniter
