10-Apr-2023
.
Admin

Hi Dev,
This article will give you example of Laravel 9 Follow Unfollow Example From Scratch. if you have question about User Follow System Laravel 9 Tutorial then I will give simple example with solution. This tutorial will give you simple example of Laravel 9 - Follow Unfollow System Example. I explained simply step by step How to create follow unfollow functionality in laravel 9?.
follow bellow step for follow and unfollow using single button with jquery & ajax by laravel 9 example.
laravel 9 follow and unfollow Code Example
Preview :
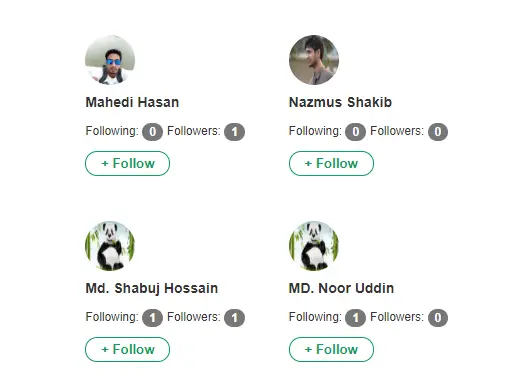
Just follow a few step and you will get layout like as bellow preview and also you can download script from bellow link.
Step 1: Download Laravel
Let us begin the tutorial by installing a new laravel application. if you have already created the project, then skip following step.
composer create-project laravel/laravel example-app
Step 2 : Install overtrue/laravel-follow Package
Now we need to install laravel-follow package for follow unfollow system. So Open your terminal and run the bellow command.
composer require overtrue/laravel-follow -vvv
Now open the config/app.php file and add service provider and alias.
config/app.php
'providers' => [

    Overtrue\LaravelFollow\FollowServiceProvider::class,

],
To publish the migrations file run bellow command
php artisan vendor:publish --provider='Overtrue\LaravelFollow\FollowServiceProvider' --tag="migrations"
As optional if you want to modify the default configuration, you can publish the configuration file:
php artisan vendor:publish --provider="Overtrue\LaravelFollow\FollowServiceProvider" --tag="config"
Then just migrate it by using the following command:
php artisan migrate
Step 3 : Create Authentication
In this step, we require to create authentication of Laravel 9, so laravel provides an artisan command to create authentication that way we don't require to create a route and controller for login and registration. so run bellow command:
php artisan make:auth
Step 4 : Create Dummy Users
In this step, we will create some dummy users for testing, so we will create dummy users using the formate factory. so run the below command:
php artisan tinker
factory(App\User::class, 100)->create();
Step 5 : Update User Model
here we need to update the User model. we need to use the CanLike trait in the User model. So let's update as bellow code.
App/User.php
namespace App;

use Illuminate\Notifications\Notifiable;
use Illuminate\Foundation\Auth\User as Authenticatable;
use Overtrue\LaravelFollow\Traits\CanFollow;
use Overtrue\LaravelFollow\Traits\CanBeFollowed;


class User extends Authenticatable
{
    use Notifiable, CanFollow, CanBeFollowed; //See we used CanFollow and CanBeFollowed Traits

    protected $fillable = [
        'name', 'email', 'password',
    ];

    protected $hidden = [
        'password', 'remember_token',
    ];
}
Step 6 : Add Routes
In this step, we will create routes for follow, unfollow system in Laravel. So we require to create the following route in the web.php file.
routes/web.php
Route::get('users', 'HomeController@users')->name('users');
Route::get('user/{id}', 'HomeController@user')->name('user.view');
Route::post('follow', 'HomeController@follwUserRequest')->name('follow');
Step 7 : Create Controller Method
now in HomeController, we will add three new method users(), user() and ajaxRequest(). so let's see HomeController like as bellow:
app/Http/HomeController.php
namespace App\Http\Controllers;

use Illuminate\Http\Request;
use App\User;


class HomeController extends Controller
{

    public function __construct()
    {
        $this->middleware('auth');
    }

    public function index()
    {
        return view('home');
    }

    public function users()
    {
        $users = User::get();
        return view('users', compact('users'));
    }

    public function user($id)
    {
        $user = User::find($id);
        return view('usersView', compact('user'));
    }

    public function follwUserRequest(Request $request){


        $user = User::find($request->user_id);
        $response = auth()->user()->toggleFollow($user);


        return response()->json(['success'=>$response]);
    }
}
Step 8 : Create Blade files and JS File
Now in this file, we will need to create userList.blade.php, users.blade.php, and usersView.blade.php files and custom.js file. So let's create both files.
resources/views/users.blade.php
@extends('layouts.app')

@section('content')
<script src="{{ asset('js/custom.js') }}" defer></script>

<div class="container">
    <div class="row justify-content-center">
        <div class="col-md-12">
            <div class="card">
                <div class="card-header">List of Users- Codechief.org</div>


                <div class="card-body">
                    <div class="row pl-5">
                        @include('userList', ['users'=>$users])
                    </div>
                </div>
            </div>
        </div>
    </div>
</div>
@endsection
resources/views/usersView.blade.php
@extends('layouts.app')

@section('content')
<script src="{{ asset('js/custom.js') }}" defer></script>

<div class="container">
    <div class="row justify-content-center">
        <div class="col-md-12">
            <div class="card">
                <div class="card-header">
                    {{ $user->name }}
                    <br/>
                    <small>
                        <strong>Website:</strong> Codechief.org,
                        <strong>Email: </strong>{{ $user->email }}
                    </small>
                </div>

                <div class="card-body">
                    <nav>
                      <div class="nav nav-tabs" id="nav-tab" role="tablist">
                        <a class="nav-item nav-link active" id="nav-home-tab" data-toggle="tab" href="#followers" role="tab" aria-controls="nav-home" aria-selected="true">Followers <span class="badge badge-primary">{{ $user->followers()->get()->count() }}</span></a>
                        <a class="nav-item nav-link" id="nav-profile-tab" data-toggle="tab" href="#following" role="tab" aria-controls="nav-profile" aria-selected="false">Following <span class="badge badge-primary">{{ $user->followings()->get()->count() }}</span></a>
                      </div>
                    </nav>
                    <div class="tab-content" id="nav-tabContent">
                      <div class="tab-pane fade show active" id="followers" role="tabpanel" aria-labelledby="nav-home-tab">
                        <div class="row pl-5">
                            @include('userList', ['users'=>$user->followers()->get()])
                        </div>
                      </div>
                      <div class="tab-pane fade" id="following" role="tabpanel" aria-labelledby="nav-profile-tab">
                        <div class="row pl-5">
                            @include('userList', ['users'=>$user->followings()->get()])
                        </div>
                      </div>
                    </div>
                </div>
            </div>
        </div>
    </div>
</div>
@endsection
resources/views/userList.blade.php
 @if($users->count())
    @foreach($users as $user)
        <div class="col-2 profile-box border p-1 rounded text-center bg-light mr-4 mt-3">
            <img src="https://www.codechief.org/user/img/user.jpg" style="height: 50px; width: 50px; border-radius: 50%;" class="img-responsive">
            <h5 class="m-0"><a href="{{ route('user.view', $user->id) }}"><strong>{{ $user->name }}</strong></a></h5>
            <p class="mb-2">
                <small>Following: <span class="badge badge-primary">{{ $user->followings()->get()->count() }}</span></small>
                <small>Followers: <span class="badge badge-primary tl-follower">{{ $user->followers()->get()->count() }}</span></small>
            </p>
            <button class="btn btn-info btn-sm action-follow" data-id="{{ $user->id }}"><strong>
            @if(auth()->user()->isFollowing($user))
                UnFollow
            @else
                Follow
            @endif
            </strong></button>
        </div>
    @endforeach
@endif
publis/js/custom.js
$(document).ready(function() {

    $.ajaxSetup({
        headers: {
            'X-CSRF-TOKEN': $('meta[name="csrf-token"]').attr('content')
        }
    });

    $('.action-follow').click(function(){
        var user_id = $(this).data('id');
        var cObj = $(this);
        var c = $(this).parent("div").find(".tl-follower").text();

        $.ajax({
           type:'POST',
           url:'/follow',
           data:{user_id:user_id},
           success:function(data){
              console.log(data.success);
              if(jQuery.isEmptyObject(data.success.attached)){
                cObj.find("strong").text("Follow");
                cObj.parent("div").find(".tl-follower").text(parseInt(c)-1);
              }else{
                cObj.find("strong").text("UnFollow");
                cObj.parent("div").find(".tl-follower").text(parseInt(c)+1);
              }
           }
        });
    });

});
It will help you...
#Laravel 9