22-Jun-2023
.
Admin

Hello Friends,
In this post, we will learn how to download and install Ubuntu. if you want to see an example of installing an Ubuntu desktop then you are in the right place. In this article, we will implement a how to install Ubuntu step by step. I explained simply step by step how to download and install linux in window pc.
Download and install Ubuntu 22.04 LTS. In this guide, we will learn how to install Ubuntu 22.04 LTS (Jammy Jellyfish) step by step, with screenshots.
Step 1: Download Ubuntu 22.04 ISO File
Visit the following link to download Ubuntu 22.04 LTS iso file from the Ubuntu official web portal; is as follows:
Step 2: Create Bootable Installation Media
Once the ISO file is downloaded to your system then burn it into a USB Stick and make it bootable.
To make a bootable USB drive, use the Startup Disk Creator tool:
1. In the Show Applications search dialog, type Startup Disk Creator.

If the tool is not installed, the Software Center offers the option to install it.
2. In the top pane, click Other. Browse and select the Ubuntu 22.04 .iso file.
3. In the bottom pane, select your USB drive.
4. Click Make Startup disk.

Step 3: Boot System with Bootable Installation Media
Reboot the target system on which we want to install Ubuntu 22.04. Go to its bios settings and change the boot medium from hard disk to USB drive.
When the system boots up with bootable media, we will get the following screen.

Try Install Ubuntu 22.04
Choose ‘Try or Install Ubuntu’ and hit enter.
In the next screen, click on ‘Install Ubuntu’

Choose Ubuntu Option during installation
Step 4: Choose Keyboard Layout
Choose your preferred keyboard layout and then click on ‘continue’

Keyboard Layout Ubuntu 22 04 Installation
Step 5: Prepare Installation
In this step, we must choose the installation type. There are two options, Normal and Minimal Installation. In Normal Installation, all GUI-related applications will be installed whereas in minimal only basic apps will be installed.

Installation-type-ubuntu-22-04-installation
Normal installation is the recommended one to get a better desktop experience. When you have an internet connection during the installation and want to install all updates & third-party graphics software and wifi drivers and additional media formats then you can choose both options else keep them as untick.

Other Options during ubuntu 22 0installation
Click on ‘Continue’ to proceed further
Step 6: Choose Installation Type
In this step, we will be prompted to choose the installation type. Here installation type means the partitioning scheme.
Following are two installation type:
If you are new to Ubuntu Linux, then it is recommended to go with the first option. In this guide, I will demonstrate how to create a custom partition scheme via the something else option.

Other Options during ubuntu 22 installation
Click on ‘Continue’ and then we will get the following screen,

Default Installation Type Info Ubuntu 22.04
As we can see, we have 40 GB disk space for Ubuntu 22.04 Installation. We are going to create the following partitions on it.
To start creating a partition, create an empty table.
Select the Device –> Click on ‘New Partition Table’
create empty partition table ubuntu 22 04 installation
Click on Continue,
Now Create our first partition as /boot of size 2 GB. Select the Free Space –> Click on + symbol

Boot Partition Creation During Ubuntu 22 04 Installation
Click on OK.
Similarly Create /home and / partition of size 26 GB & 10 GB respectively.

home partition creation during ubuntu 22 04 installattion

Slash root partition creation ubuntu 22 04
Click on ‘OK’
Finally create our last partition as a swap of size 2 GB.

Swap Partition Creation Ubuntu 22 04 Installation
Click on Ok to finish the partition creation.
Note: If you are using a GPT disk then you must create an EFI partition of size between 100 – 250 MB and reserved bios boot area of at least 1MB.
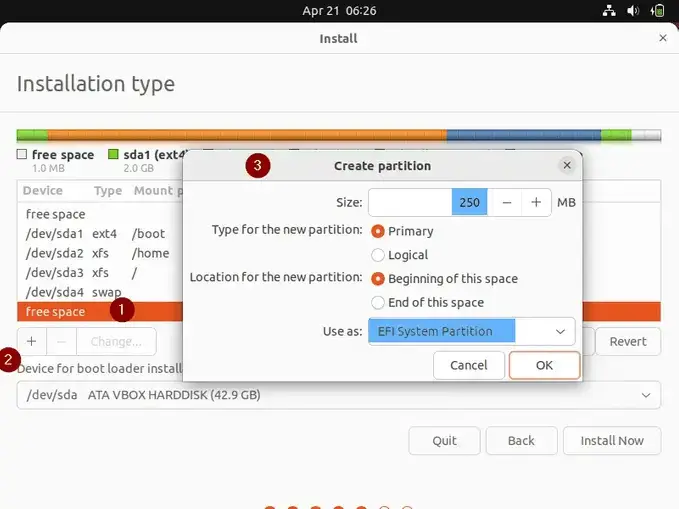
EFI Partition Ubuntu 22 04 Installation

Reserved Bios boot area ubuntu 22 04 installation
Once you are done with the partition scheme, click on the ‘Install Now’ option in the following screen to proceed further with installation

Choose Install Now Ubuntu 22 04 Installation
In the next screen, choose ‘Continue’ to write changes to the disk.

Write Changes disk ubuntu 22 04 installation
Step 7: Choose Your Preferred Location
Select the location as per your current region, it will configure the time zone accordingly.

Write Changes disk ubuntu 22 04 installation
Step 8: Create User and Set Host name
In this step, specify the local username and its password. We would be using this user after OS installation. Also, specify the hostname of your system.

Create User Set Host Name Ubuntu 22 04 Installation 768x576_LI
Click on Continue to proceed further with installation
Step 9: Ubuntu 22.04 Installation Started
As we see in the following window, the installation has started, and it is in progress.

Ubuntu 22 04 Installation Progress
Once the installation is completed, we will be prompted to reboot the system.

Restart System After Ubuntu 22 04 Installation
Click on ‘Restart Now’ to reboot the system. Also don’t forget to change the boot medium from USB to hard disk from bios settings.
Step 10: Login Screen after Ubuntu 22.04 Installation
When the system boots up after reboot, we will get the following login screen.

Login Screen After Ubuntu 22 04 Installation
Use the same user’s credentials that we have created during the installation and hit enter,

About System Info After Ubuntu 22 04 Installation
I hope it can help you...
#Ubuntu