20-Apr-2023
.
Admin
Hi dev,
We'll show you how to crop an image before uploading in Laravel 10 in this little tutorial. Let's talk about laravel 10's use of cropper js to crop images before uploading. We'll demonstrate how to crop an image in Laravel 10 in this tutorial. You can crop an image before uploading it in Laravel 10 using this example.
An easy-to-use, customizable interface is provided by the open-source JavaScript tool known as Cropper.js, which enables users to crop photos. Developers may quickly add image cropping capabilities to their web apps using Cropper.js. Cropping photographs to certain sizes or aspect ratios, zooming in and out of images, rotating images, and cropping images using various shapes like rectangles, circles, and ellipses are just a few of the capabilities that Cropper.js offers.
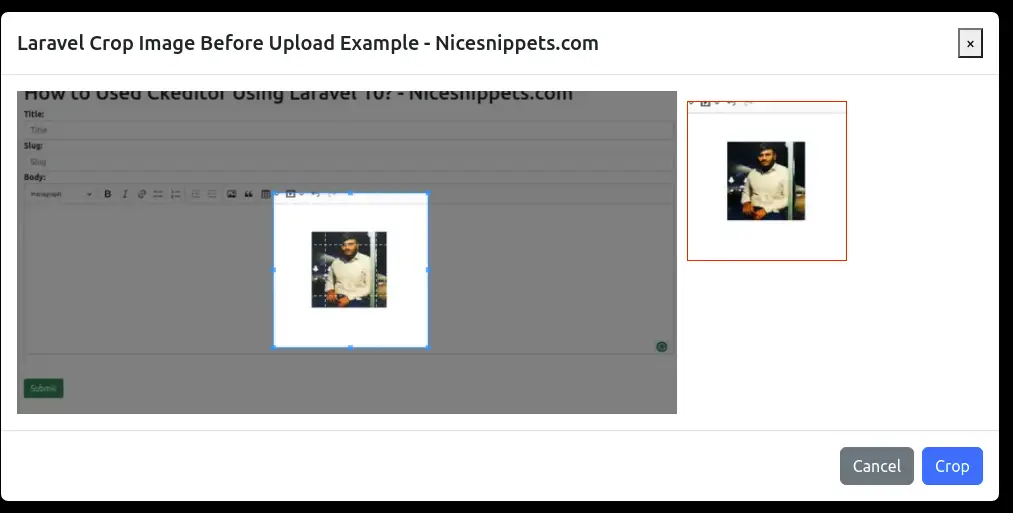
In this example, we will create media table with name column. then we will create simple form with image upload, after choose image modal will open with cropper js plugin and you can crop it and save it. after save we will store image in folder and database.
So, let's see the simple step to done this example.
Step 1: Install Laravel
first of all, we need to get a fresh Laravel version application using the bellow command, So open your terminal OR command prompt and run the bellow command:
composer create-project laravel/laravel example-app
Step 2: Create Migration and Model
Here, we need to create a database migration for the files table and also we will create a model for the files table.
php artisan make:migration create_media_table
Migration:
<?php

use Illuminate\Database\Migrations\Migration;
use Illuminate\Database\Schema\Blueprint;
use Illuminate\Support\Facades\Schema;

return new class extends Migration
{
    /**
     * Run the migrations.
     */
    public function up(): void
    {
        Schema::create('media', function (Blueprint $table) {
            $table->id();
            $table->string('name');
            $table->timestamps();
        });
    }

    /**
     * Reverse the migrations.
     */
    public function down(): void
    {
        Schema::dropIfExists('media');
    }
};
php artisan migrate
now we will create Media model by using following command:
php artisan make:model Media
App/Models/Media.php
<?php

namespace App\Models;

use Illuminate\Database\Eloquent\Factories\HasFactory;
use Illuminate\Database\Eloquent\Model;

class Media extends Model
{
    use HasFactory;

    protected $fillable = [
        'name'
    ];
}
Step 3: Create Controller
In this step, we will create new CropImageController for store image. in this controller we will add two method call index() and store(). so let's create new controller by following command.
php artisan make:controller CropImageController
Next, let's update the following code to that file.
Make Sure you have uploads folder in public folder with permission. we are going to store image on that folder so.
app/Http/Controllers/CropImageController.php
<?php

namespace App\Http\Controllers;

use Illuminate\Http\Request;
use Illuminate\View\View;
use Illuminate\Http\RedirectResponse;
use App\Models\Media;

class CropImageController extends Controller
{
    /**
     * Show the application dashboard.
     *
     * @return \Illuminate\Http\Response
     */
    public function index(): View
    {
        return view('cromImage');
    }

    /**
     * Show the application dashboard.
     *
     * @return \Illuminate\Http\Response
     */
    public function store(Request $request): RedirectResponse
    {
        $validatedData = $request->validate([
                'image_base64' => 'required',
            ]);

        $input['name'] = $this->storeBase64($request->image_base64);
        Media::create($input);

        return back()->with('success', 'Image uploaded successfully.');
    }
    /**
     * Write code on Method
     *
     * @return response()
     */
    private function storeBase64($imageBase64)
    {
        list($type, $imageBase64) = explode(';', $imageBase64);
        list(, $imageBase64)      = explode(',', $imageBase64);
        $imageBase64 = base64_decode($imageBase64);
        $imageName= time().'.png';
        $path = public_path() . "/uploads/" . $imageName;

        file_put_contents($path, $imageBase64);

        return $imageName;
    }
}
Step 4: Create Routes
Furthermore, open routes/web.php file and add the routes to manage GET and POST requests for call view and store image.
routes/web.php
<?php

use Illuminate\Support\Facades\Route;

use App\Http\Controllers\CropImageController;

/*
|--------------------------------------------------------------------------
| Web Routes
|--------------------------------------------------------------------------
|
| Here is where you can register web routes for your application. These
| routes are loaded by the RouteServiceProvider within a group which
| contains the "web" middleware group. Now create something great!
|
*/

Route::get('crop-image-upload', [CropImageController::class, 'index']);
Route::post('crop-image-upload', [CropImageController::class, 'store'])->name('crop.image.upload.store');
Step 5: Create Blade File
now here we will create cromImage.blade.php file and here we will create bootstrap simple form with cropper.js for crop image. So, let's create following file:
resources/views/cromImage.blade.php
<!DOCTYPE html>
<html>
<head>
    <title>Laravel Crop Image Before Upload Example - Nicesnippets.com</title>
    <meta name="_token" content="{{ csrf_token() }}">
    <link rel="stylesheet" href="https://cdnjs.cloudflare.com/ajax/libs/bootstrap/5.2.3/css/bootstrap.min.css" />
    <link rel="stylesheet" href="https://cdnjs.cloudflare.com/ajax/libs/cropperjs/1.5.6/cropper.css"/>
    <script src="https://cdnjs.cloudflare.com/ajax/libs/jquery/3.4.1/jquery.js"></script>
    <script src="https://cdnjs.cloudflare.com/ajax/libs/popper.js/1.14.3/umd/popper.min.js"></script>
    <script src="https://cdnjs.cloudflare.com/ajax/libs/bootstrap/5.2.3/js/bootstrap.min.js"></script>
    <script src="https://cdnjs.cloudflare.com/ajax/libs/cropperjs/1.5.6/cropper.js"></script>
</head>
<style type="text/css">
    body{
        background: #f7fbf8;
    }
    h1{
        font-weight: bold;
        font-size:23px;
    }
    img {
        display: block;
        max-width: 100%;
    }
    .preview {
        text-align: center;
        overflow: hidden;
        width: 160px;
        height: 160px;
        margin: 10px;
        border: 1px solid red;
    }
    input{
        margin-top:40px;
    }
    .section{
        margin-top:150px;
        background:#fff;
        padding:50px 30px;
    }
    .modal-lg{
        max-width: 1000px !important;
    }
</style>
<body>

    <div class="container">
        <div class="row">
            <div class="col-md-8 offset-md-2 section text-center">
                <h1>Laravel Crop Image Before Upload Example - Nicesnippets.com</h1>
                <form action="{{ route('crop.image.upload.store') }}" method="POST">
                    @csrf
                    <input type="file" name="image" class="image">
                    <input type="hidden" name="image_base64">
                    <img src="" style="width: 200px;display: none;" class="show-image">

                    <br/>
                    <button class="btn btn-success">Submit</button>
                </form>
            </div>
        </div>
    </div>

    <div class="modal fade" id="modal" tabindex="-1" role="dialog" aria-labelledby="modalLabel" aria-hidden="true">
        <div class="modal-dialog modal-lg" role="document">
            <div class="modal-content">
                <div class="modal-header">
                    <h5 class="modal-title" id="modalLabel">Laravel Crop Image Before Upload Example - ItSolutionStuff.com</h5>
                    <button type="button" class="close" data-dismiss="modal" aria-label="Close">
                    <span aria-hidden="true">×</span>
                    </button>
                </div>
                <div class="modal-body">
                    <div class="img-container">
                        <div class="row">
                            <div class="col-md-8">
                                <img id="image" src="https://avatars0.githubusercontent.com/u/3456749">
                            </div>
                            <div class="col-md-4">
                                <div class="preview"></div>
                            </div>
                        </div>
                    </div>
                </div>
                <div class="modal-footer">
                    <button type="button" class="btn btn-secondary" data-dismiss="modal">Cancel</button>
                    <button type="button" class="btn btn-primary" id="crop">Crop</button>
                </div>
            </div>
        </div>
    </div>

    <script>
        var $modal = $('#modal');
        var image = document.getElementById('image');
        var cropper;

        /*------------------------------------------
        --------------------------------------------
        Image Change Event
        --------------------------------------------
        --------------------------------------------*/
        $("body").on("change", ".image", function(e){
            var files = e.target.files;
            var done = function (url) {
                image.src = url;
                $modal.modal('show');
            };

            var reader;
            var file;
            var url;

            if (files && files.length > 0) {
                file = files[0];

                if (URL) {
                    done(URL.createObjectURL(file));
                } else if (FileReader) {
                    reader = new FileReader();
                    reader.onload = function (e) {
                        done(reader.result);
                    };
                reader.readAsDataURL(file);
                }
            }
        });

        /*------------------------------------------
        --------------------------------------------
        Show Model Event
        --------------------------------------------
        --------------------------------------------*/
        $modal.on('shown.bs.modal', function () {
            cropper = new Cropper(image, {
                aspectRatio: 1,
                viewMode: 3,
                preview: '.preview'
            });
        }).on('hidden.bs.modal', function () {
            cropper.destroy();
            cropper = null;
        });

        /*------------------------------------------
        --------------------------------------------
        Crop Button Click Event
        --------------------------------------------
        --------------------------------------------*/
        $("#crop").click(function(){
            canvas = cropper.getCroppedCanvas({
                width: 160,
                height: 160,
            });

            canvas.toBlob(function(blob) {
                url = URL.createObjectURL(blob);
                var reader = new FileReader();
                reader.readAsDataURL(blob);
                reader.onloadend = function() {
                    var base64data = reader.result;
                    $("input[name='image_base64']").val(base64data);
                    $(".show-image").show();
                    $(".show-image").attr("src",base64data);
                    $("#modal").modal('toggle');
                }
            });
        });

    </script>
</body>
</html>
Run Laravel App:
All the required steps have been done, now you have to type the given below command and hit enter to run the Laravel app:
php artisan serve
Now, Go to your web browser, type the given URL and view the app output:
http://localhost:8000/crop-image-upload
Output:
I hope it can help you...
#Laravel 10