24-Aug-2022
.
Admin

Hi friends,
This article will provide an example of node js form validation example. I’m going to show you how to make form validation in node js. This tutorial will give you a simple example of nodejs form validation. In this article, we will implement a node.js form validation example.
In this blog post, we will understand how to use the express-validator module to make the input validation from the server side. You will do so by completing a demo application that takes in user input and validates/sanitizes it using this library. Express Validator is a set of Express. js middleware that wraps validator. js, a library that provides validator and sanitizer functions. I will show you a simple example step-by-step explain.
let's see below simple example with output:
Step 1: Install Node JS
This step create express input validation project folder for by running the below command.
mkdir express-node-form-validation
Get inside the project directory.
cd express-node-form-validation
Step 2: Run command to create package.json:
npm init
Then now install nodemon module with --save-dev attribute for development purpose. This module takes care the server restarting process.
npm install nodemon --save-dev
Step 3: Install Express Validator Package
This step install following module from npm to build express and node app.
npm install body-parser cookie-parser cors express-session --save
Then after install implement input validation we need to install express and express-validator modules.
npm install express express-validator --save
Now see here is the final package.json file.
{
  "name": "validation",
  "version": "1.0.0",
  "description": "Node JS Form Validation Example Tutorial",
  "main": "app.js",
  "scripts": {
    "test": "node app.js"
  },
  "author": "piyush kamani",
  "license": "ISC",
  "devDependencies": {
    "nodemon": "^2.0.19"
  },
  "dependencies": {
    "body-parser": "^1.20.0",
    "cookie-parser": "^1.4.6",
    "cors": "^2.8.5",
    "express": "^4.18.1",
    "express-hbs": "^2.4.0",
    "express-session": "^1.17.3",
    "express-validator": "^6.14.2"
  }
}
Step 4: Create app.js file
Here in this file we will keep node server settings.
Now, go to app.js file and include the following code in it.
app.js
const express = require('express');
const bodyParser = require('body-parser');
const cors = require('cors');
const cookieParser = require('cookie-parser');
const session = require('express-session');

// Express settings
const app = express();
app.use(bodyParser.json());
app.use(bodyParser.urlencoded({
    extended: false
}));
app.use(cors());

app.use(cookieParser());
app.use(session({
    secret: 'positronx',
    saveUninitialized: false,
    resave: false
}));

// Define PORT
const port = process.env.PORT || 8000;
const server = app.listen(port, () => {
    console.log('Connected to port ' + port)
})
Step 5: Set Up Express Handlebars View Engine
we need to install express-hbs module, It’s a handlbars templating view engine.
Run below command to install the module.
npm install express-hbs --save
Then after create views folder inside the express input validation project folder.
Create partials folder within the views folder, following will be the folder architecture views/partials.
Step 6: Create user.hbs file
view/partials/user.hbs
<html lang="en">
<head>
    <title>Node JS Express Form Data Validation - Nicesnippets.com</title>
    <link href="https://cdn.jsdelivr.net/npm/bootstrap@5.1.3/dist/css/bootstrap.min.css" rel="stylesheet">
</head>
<body>
    <div class="container">
        <div class="row justify-content-center">

            <div class="col-md-8 text-center mt-5 mb-3">
                <h3>Node JS Express Form Data Validation - Nicesnippets.com</h3>
            </div>

            <div class="col-md-8">

                <form method="post" action="/user/create-user">

                    <div class="form-group">
                        <label>Name:</label>
                        <input type="text" class="form-control" name="name" />
                    </div>

                    <div class="form-group mt-2">
                        <label>Email:</label>
                        <input type="text" class="form-control" name="email" />
                    </div>

                    <div class="form-group mt-2">
                        <label>Password:</label>
                        <input type="password" class="form-control" name="password" />
                    </div>

                    <div class="form-group mt-2">
                        <label>Confirm Password:</label>
                        <input type="password" class="form-control" name="confirm_password" />
                    </div>

                    <div class="form-group mt-3">
                        <button type="submit" class="btn btn-success btn-block">Create</button>
                    </div>

                </form>

            </div>
        </div>
    </div>
</body>
</html>
Then add express handlebars view engine settings in app.js file.
// app.js
const hbs = require('express-hbs');

// Render View
app.engine('hbs', hbs.express4({
    partialsDir: __dirname + '/views/partials'
}));
app.set('view engine', 'hbs');
app.set('views', __dirname + '/views/partials');
Run following URL and check the form in the browser:
http://localhost:8000/user
npm start
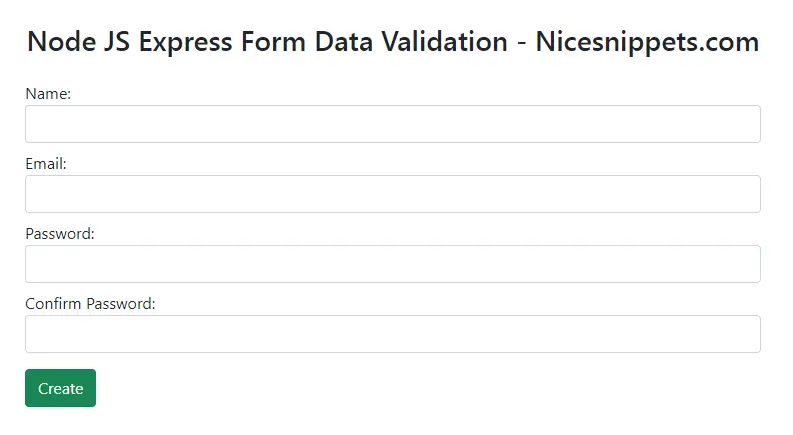
Form View:
Step 7: Implement Input Validation in Express Routes
In this step is create express routers to make the POST and GET requests using Express.js.
Create routes folder and create user.routes.js file inside paste the code.
routes/user.routes.js
const express = require("express");
const session = require('express-session');
const router = express.Router();
const { check, validationResult } = require('express-validator');

router.post('/create-user',
    [
        check('name')
            .not()
            .isEmpty()
            .withMessage('Name is required'),
        check('email', 'Email is required')
            .isEmail(),
        check('password', 'Password is requried')
            .isLength({ min: 1 })
            .custom((val, { req, loc, path }) => {
                if (val !== req.body.confirm_password) {
                    throw new Error("Passwords don't match");
                } else {
                    return value;
                }
            }),
    ], (req, res) => {
        var errors = validationResult(req).array();
        if (errors) {
            req.session.errors = errors;
            req.session.success = false;
            res.redirect('/user');
        } else {
            req.session.success = true;
            res.redirect('/user');
        }
    });
router.get('/', function (req, res) {
    res.render('user', {
        success: req.session.success,
        errors: req.session.errors
    });
    req.session.errors = null;
});

module.exports = router;
Then go to app.js and add the express user router.
app.js
// User router
const user = require('./routes/user.routes');

// Initiate API
app.use('/user', user)
Step 8: Show Server-Side Validation Errors in Node App
Open your user.hbs add the following code in it.
view/partials/user.hbs
<html lang="en">
<head>
    <title>Node JS Express Form Data Validation - Nicesnippets.com</title>
    <link href="https://cdn.jsdelivr.net/npm/bootstrap@5.1.3/dist/css/bootstrap.min.css" rel="stylesheet">
</head>
<body>
    <div class="container">
        <div class="row justify-content-center">

            <div class="col-md-8 text-center mt-5 mb-3">
                <h3>Node JS Express Form Data Validation - Nicesnippets.com</h3>
            </div>

            <div class="col-md-8">

                {{# if errors }}
                    {{# each errors }}
                        <p class="alert alert-danger">{{ this.msg }}</p>
                    {{/each}}
                {{/if}}

                <form method="post" action="/user/create-user">

                    <div class="form-group">
                        <label>Name:</label>
                        <input type="text" class="form-control" name="name" />
                    </div>

                    <div class="form-group mt-2">
                        <label>Email:</label>
                        <input type="text" class="form-control" name="email" />
                    </div>

                    <div class="form-group mt-2">
                        <label>Password:</label>
                        <input type="password" class="form-control" name="password" />
                    </div>

                    <div class="form-group mt-2">
                        <label>Confirm Password:</label>
                        <input type="password" class="form-control" name="confirm_password" />
                    </div>

                    <div class="form-group mt-3">
                        <button type="submit" class="btn btn-success btn-block">Create</button>
                    </div>

                </form>

            </div>
        </div>
    </div>
</body>
</html>
Step 9: Run following Command Node App:
node app.js
Run following URL and check the form in the browser:
http://localhost:8000/user
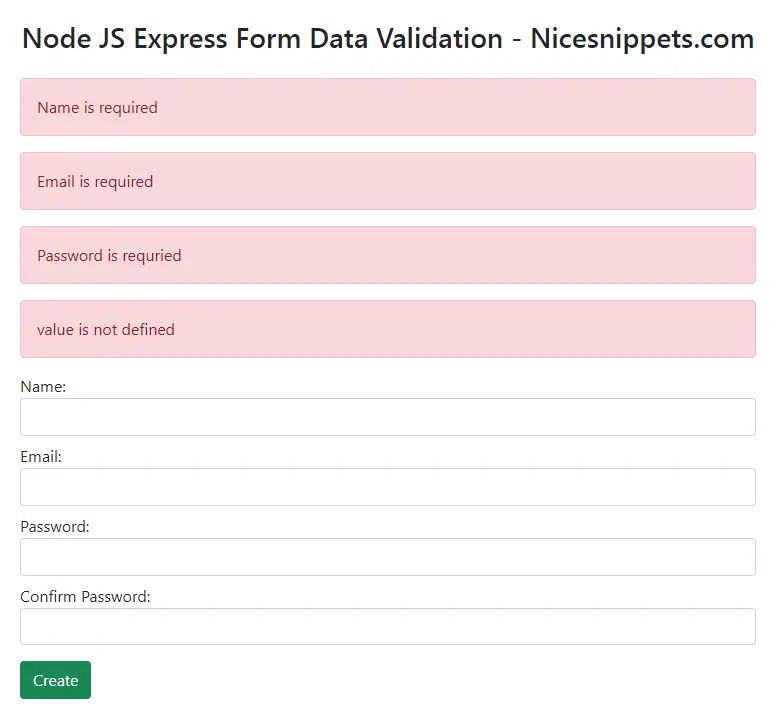
Error Form View:
Output:
I hope it can help you...
#Node JS
