13-Sep-2022
.
Admin
Hi Friends,
This article will provide an example of node js express crud tutorial mysql. We will use node.js express mysql crud example. you can see the nodejs mysql crud example. you will learn express js mysql crud example.
In this example node js express CRUD (Create, Read, Update, Delete) with mysql. We will use mysql database with node js to perform the insert update delete read operation. We will show you step by step how to can do crud operation in node js with mysql database by using the node express module.
This node js tutorial help to learn how to listing table, add a record, edit the record and delete the record from the MySQL database. We will be using EJS as templating engine.
So, let's start the step-by-step procedure to create the CRUD application with output:
Step 1: Install Node JS
This step is not required; however, if you have not created the node js app, then you may go ahead and execute the below command:
mkdir crud-node
cd crud-node

npm init
Step 2: Install Express & express-validator
Express is a minimal and flexible Node.js web application framework that provides a robust set of features for web and mobile applications
Install Express Framework module following command:
npm install express -save
express-validator is a set of express.js middlewares that wraps validator.js validator and sanitizer functions.
Install `express-validator` module following command:
npm install express-validator -save
Step 3: Install body-parser module & method-override
Parse incoming request bodies in a middleware before your handlers, available under the req.body property.
This module is used to read HTTP POST data. It’s an express middleware that reads form’s input and store it as javascript object.
npm install body-parser -save
method-override module let us use HTTP verbs such as PUT or DELETE in places where they are not supported.
This module provides different ways of overriding like overriding using header, overriding using query value, or through custom logic. In this CRUD application, we will be using the custom logic of overriding.
npm install method-override -save
Step 4: Install cookie-parser & express-session modules & EJS templating engine
This module use Flash messages stored in session. So, we also have to install and use cookie-parser & session modules.
npm install cookie-parser -save
npm install express-session -save
EJS is a simple templating language which is used to generate HTML markup with plain JavaScript
This step is using call EJS file to html template.
npm install ejs -save
Step 5: Install MySQL module & express-myconnection & Database
This step is Install MySQL module with the following command:
npm install mysql -save
This module Express middleware to provide consistent API for MySQL connection.
It can auto close/release mysql connection. Using this module, the connection can be accessed anywhere in the router.
npm install express-myconnection -save
We will now create a new MySQL database. Let us name the database ‘node-crud’.
create database node-crud;
Then we will create a new table in the database ‘node-crud’. Let us name the table as ‘products’.
use node-crud;

CREATE TABLE products (
id int(11) NOT NULL auto_increment,
name varchar(100) NOT NULL,
price varchar(10) NOT NULL,
detail varchar(100) NOT NULL,
PRIMARY KEY (id)
);
Step 6: Create config.js File
Create a `config.js` file in your project root folder. This file basically contains your database credentials.
config.js
var config = {
    database: {
        host:     'localhost',  // database host
        user:     'root',       // your database username
        password: '',           // your database password
        port:     8000,         // default MySQL port
        db:       'node-crud'   // your database name
    },
    server: {
        host: '127.0.0.1',
        port: '8000'
    }
}

module.exports = config
Step 7: Create app.js File
Create `app.js` in your project root folder. In this file, we load all the modules that we installed in the above steps.
app.js
var express = require('express')
var app = express()
var mysql = require('mysql')

/**
 * This middleware provides a consistent API
 * for MySQL connections during request/response life cycle
 */
var myConnection  = require('express-myconnection')
/**
 * Store database credentials in a separate config.js file
 * Load the file/module and its values
 */

var config = require('./config')

var dbOptions = {
    host:     config.database.host,
    user:     config.database.user,
    password: config.database.password,
    port:     config.database.port,
    database: config.database.db
}

/**
 * 3 strategies can be used
 * single: Creates a single database connection that is never closed.
 * pool: Creates pool of connections. Connection is auto-release when response ends.
 * request: Creates new connection per new request. The connection is auto close when the response ends.
 */

app.use(myConnection(mysql, dbOptions, 'pool'))

/**
 * setting up the templating view engine
 */
app.set('view engine', 'ejs')

/**
 * import routes/index.js
 * import routes/products.js
 */
// var index = require('./routes/index')
var products = require('./routes/product')

/**
 * Express Validator Middleware for Form Validation
 */
var expressValidator = require('express-validator')
app.use(expressValidator())

/**
 * body-parser module is used to read HTTP POST data
 * it's an express middleware that reads the form's input
 * and store it as a javascript object
 */
var bodyParser = require('body-parser')
/**
 * bodyParser.urlencoded() parses the text as URL encoded data
 * (which is how browsers tend to send form data from regular forms set to POST)
 * and exposes the resulting object (containing the keys and values) on req. body.
 */
app.use(bodyParser.urlencoded({ extended: true }))
app.use(bodyParser.json())

/**
 * This module let us use HTTP verbs such as PUT or DELETE
 * in places where they are not supported
 */
var methodOverride = require('method-override')

/**
 * using custom logic to override method
 *
 * there are other ways of overriding as well
 * like using header & using query value
 */
app.use(methodOverride(function (req, res) {
    if (req.body && typeof req.body === 'object' && '_method' in req.body) {
        // look in urlencoded POST bodies and delete it
        var method = req.body._method
        delete req.body._method
        return method
    }
}))

/**
 * This module shows flash messages
 * generally used to show success or error messages
 *
 * Flash messages are stored in session
 * So, we also have to install and use
 * cookie-parser & session modules
 */
var flash = require('express-flash')
var cookieParser = require('cookie-parser');
var session = require('express-session');

app.use(cookieParser('keyboard cat'))
app.use(session({
    secret: 'keyboard cat',
    resave: false,
    saveUninitialized: true,
    cookie: { maxAge: 60000 }
}))
app.use(flash())

// app.use('/', index)
app.use('/products', products)

app.listen(8000, function(){
    console.log('Server running at port 8000: http://127.0.0.1:8000')
})
Step 8: Create Route File
As you can see above app.js code, we have loaded one local files/modules: routes/product.js. These files contains code to show content of products page.
`routes/product.js` is responsible for handling CRUD operations like adding, editing, deleting and viewing products from database.
Database queries, form validation and template rendering is done here.
routes/product.js
var express = require('express')
var app = express()
var db = require('../lib/db');
var mysql = require('mysql');

//create connection database
var connection = mysql.createConnection({
    host     : 'localhost',
    user     : 'root',
    password : '',
    database : 'node-crud'
});

//create connection
connection.connect();

// List Product
app.get('/', function(req, res, next) {

    // select query get data product list
    selectQuery = "SELECT * FROM products ORDER BY id DESC";

    connection.query(selectQuery, function(error,data){

        //if(err) throw err
        if (error) {
            req.flash('error', error)
            res.render('product/list', {
                title: 'Product List',
                data: ''
            })
        } else {
            // render to views/product/list.ejs template file
            res.render('product/list', {
                title: 'Product List',
                data: data
            })
        }
    })
})

// Add Product Form
app.get('/add', function(req, res, next){
    // render to views/product/add.ejs
    res.render('product/add', {
        title: 'Add New Product',
        name: '',
        price: '',
        detail: ''
    })
})

// Add Product Data
app.post("/add", function(req, res, next){

    // add validation
    req.assert('name', 'Name field is required').notEmpty()      //Validate name
    req.assert('price', 'Price field is required').notEmpty()    //Validate price
    req.assert('detail', 'Detail field is required').notEmpty()  //Validate detail

    var errors = req.validationErrors()

    if(errors){

        var error_msg = ''

        errors.forEach(function(error) {
            error_msg += error.msg + '<br>'
        })

        req.flash('error', error_msg)

        /**
         * Using req.body.name
         * because req.param('name') is deprecated
         */
        res.render('product/add', {
            title: 'Add New Product',
            name: req.body.name,
            price: req.body.price,
            detail: req.body.detail
        })
    }else{
        //get data in form
        var name = req.body.name;
        var price = req.body.price;
        var detail = req.body.detail;

        // insert query get data product
        insertQuery = `INSERT INTO products (name,price,detail) VALUES ("${name}", "${price}", "${detail}")`;

        connection.query(insertQuery, function(error,result){

            req.flash('success', 'Product add successfully!')
            // redirect to product list page
            res.redirect('/products')

        });
    }
});

// Edit Product
app.get('/edit/(:id)', function(req, res, next){

    // get id product
    var id = req.params.id;

    //select query select data edit form
    var selectQuery = `SELECT * FROM products WHERE id = "${id}"`;

    connection.query(selectQuery, function(error, data){

        // render to views/product/edit.ejs template file
        res.render('product/edit', {
            title: 'Edit Product',
            //data: rows[0],
            id: data[0].id,
            name: data[0].name,
            price: data[0].price,
            detail: data[0].detail
        })

    });

});

// Update Product
app.post('/edit/(:id)', function(req, res, next){

    // get id product
    var id = req.params.id;

    // add validation
    req.assert('name', 'Name field is required').notEmpty()      //Validate name
    req.assert('price', 'Price field is required').notEmpty()    //Validate price
    req.assert('detail', 'Detail field is required').notEmpty()  //Validate detail

    var errors = req.validationErrors()

    if(errors){

        var error_msg = ''

        errors.forEach(function(error) {
            error_msg += error.msg + '<br>'
        })

        req.flash('error', error_msg)

        /**
         * Using req.body.name
         * because req.param('name') is deprecated
         */
        res.render('product/edit', {
            title: 'Add New Product',
            id: id,
            name: req.body.name,
            price: req.body.price,
            detail: req.body.detail
        })

    }else{

        // get data product
        var id = req.params.id;
        var name = req.body.name;
        var price = req.body.price;
        var detail = req.body.detail;

        // update query product update
        var updateQuery = `UPDATE products SET name = "${name}", price = "${price}", detail = "${detail}" WHERE id = "${id}"`;

        connection.query(updateQuery, function(error,result){

            req.flash('success', 'Product update successfully!')
            // redirect to products list page
            res.redirect('/products')
        });
    }

})

// Delete Product
app.delete('/delete/(:id)', function(req, res, next) {

    // get id product data
    var id = req.params.id;

    // delete query product delete
    deleteQuery = `DELETE FROM products WHERE id = "${id}"`;

    connection.query(deleteQuery, function(error,data){
        //if(err) throw err
        if (error) {
            req.flash('error', error)
            // redirect to products list page
            res.redirect('/products')
        } else {
            req.flash('success', 'Product deleted successfully!')
            // redirect to products list page
            res.redirect('/products')
        }
    })
})

module.exports = app
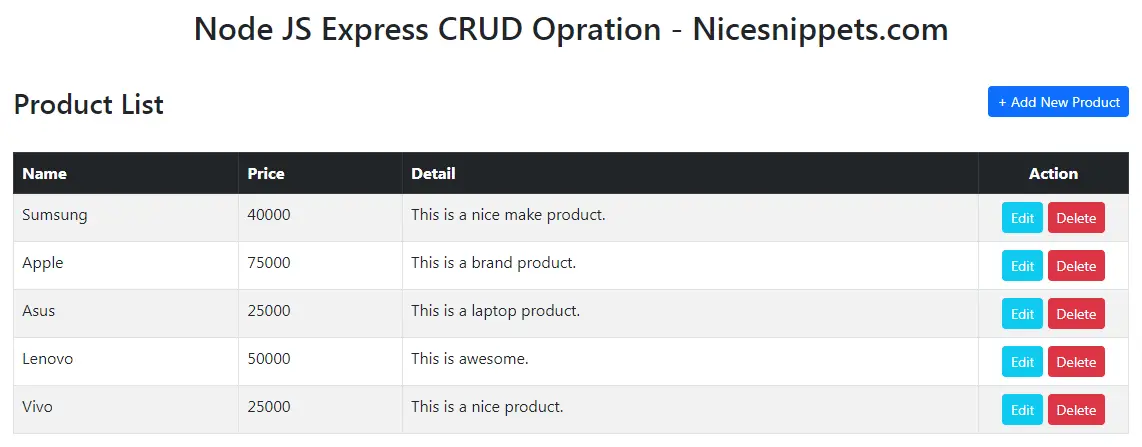
Step 9: Create List File
In this step `routes/product.js` file, there are different functions to add, edit, delete and view data.
The first one is to show the list of products. This uses `views/product/list.ejs` template file to show the list of products.
views/product/list.ejs
<!DOCTYPE html>
<html>
<head>
    <meta charset="utf-8">
    <meta name="viewport" content="width=device-width, initial-scale=1">
    <title>Product List</title>
    <link href="https://cdn.jsdelivr.net/npm/bootstrap@5.2.0/dist/css/bootstrap.min.css" rel="stylesheet">
    <script src="https://ajax.googleapis.com/ajax/libs/jquery/3.6.0/jquery.min.js"></script>
</head>
<body>

<div class="container">>

    <div class="row mt-5">
        <div class="col-lg-12 col-md-12 text-center">
            <h2>Node JS Express CRUD Opration - Nicesnippets.com</h2>
        </div>
    </div>

    <div class="row mt-3">
        <!-- heading -->
        <div class="col-lg-6 col-md-6 pt-3">
            <h3>Product List</h3>
        </div>

        <div class="col-lg-6 col-md-6 text-end pt-3">
            <a href="/products/add" class="btn btn-primary btn-sm">+ Add New Product</a>
        </div>
    </div>

    <div class="row">
        <!-- alert message -->
        <div class="col-lg-12 col-md-12 mt-2">
            <% if (messages.error) { %>
                <div class="alert alert-danger alert-dismissible fade show" role="alert">
                    <%- messages.error %>
                    <button type="button" class="btn-close" data-bs-dismiss="alert" aria-label="Close"></button>
                </div>
            <% } %>

            <% if (messages.success) { %>
                <div class="alert alert-success alert-dismissible fade show" role="alert">
                    <strong>Success!</strong> <%- messages.success %>
                    <button type="button" class="btn-close" data-bs-dismiss="alert" aria-label="Close"></button>
                </div>
            <% } %>
        </div>

        <!-- print data -->
        <div class="col-lg-12 col-md-12 mt-3">
            <table class="table table-bordered table-hover table-striped">
                <thead class="table-dark">
                    <tr>
                        <th>Name</th>
                        <th>Price</th>
                        <th>Detail</th>
                        <th width="150" class="text-center">Action</th>
                    </tr>
                </thead>
                <!->
                    Using FOREACH LOOP for the product array
                -->
                <% if (data) { %>
                    <% data.forEach(function(product){ %>
                        <tr>
                            <td><%= product.name %></td>
                            <td><%= product.price %></td>
                            <td><%= product.detail %></td>
                            <td class="text-center">
                                <a href='/products/edit/<%= product.id %>' class="btn btn-info text-white btn-sm inline-block">Edit</a>                            >
                                <form method="post" action="/products/delete/<%= product.id %>" class="d-inline-block">
                                    <input type="submit" name="delete" value='Delete' class="btn btn-danger btn-sm" onClick="return confirm('Are you sure you want to delete?')" />
                                    <input type="hidden" name="_method" value="DELETE" />
                                </form>
                            </td>
                        </tr>
                    <% }) %>
                <% } %>
            </table>
        </div>
    </div>
</div>

</body>
</html>
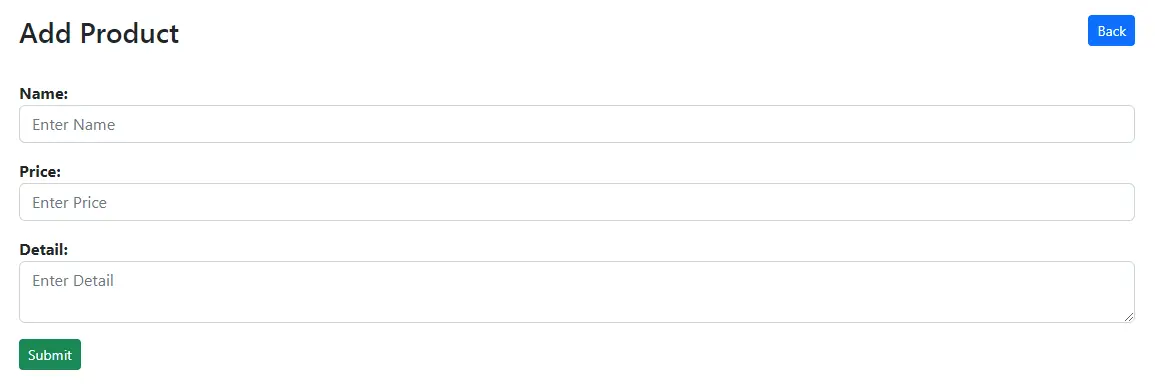
Step 10: Add New Product Form
views/product/add.ejs
<!DOCTYPE html>
<html>
<head>
    <meta charset="utf-8">
    <meta name="viewport" content="width=device-width, initial-scale=1">
    <title>Add Product</title>
    <link href="https://cdn.jsdelivr.net/npm/bootstrap@5.2.0/dist/css/bootstrap.min.css" rel="stylesheet">
</head>
<body>

<div class="container">>

    <div class="row mt-5">
        <!-- heading -->
        <div class="col-lg-6 col-md-6 pt-3">
            <h3>Add Product</h3>
        </div>

        <div class="col-lg-6 col-md-6 text-end pt-3">
            <a href="/products" class="btn btn-primary btn-sm">Back</a>
        </div>
    </div>

    <div class="row">
        <!-- alert message -->
        <div class="col-lg-12 col-md-12 mt-2">
            <% if (messages.error) { %>
                <div class="alert alert-danger alert-dismissible fade show" role="alert">
                    <%- messages.error %>
                    <button type="button" class="btn-close" data-bs-dismiss="alert" aria-label="Close"></button>
                </div>
            <% } %>
        </div>

        <!-- add data form -->
        <div class="col-lg-12 col-md-12">
            <form action="/products/add" method="post" name="form1">
                <div class="row">
                    <div class="col-lg-12">
                        <div class="form-group mt-3">
                            <strong>Name:</strong>
                            <input type="text" name="name" id="name" value="<%= name %>" class="form-control" placeholder="Enter Name">
                        </div>
                    </div>
                    <div class="col-lg-12">
                        <div class="form-group mt-3">
                            <strong>Price:</strong>
                            <input type="text" name="price" value="<%= price %>" class="form-control" placeholder="Enter Price">
                        </div>
                    </div>
                    <div class="col-lg-12">
                        <div class="form-group mt-3">
                            <strong>Detail:</strong>
                            <textarea type="text" name="detail" value="<%= detail %>" class="form-control" placeholder="Enter Detail"></textarea>
                        </div>
                    </div>
                    <div class="col-lg-12">
                        <div class="form-group mt-3">
                            <input type="submit" name="Submit" value="Submit" class="btn btn-success btn-sm">
                        </div>
                    </div>
                </div>
            </form>
        </div>
    </div>

</div>

</body>
</html>
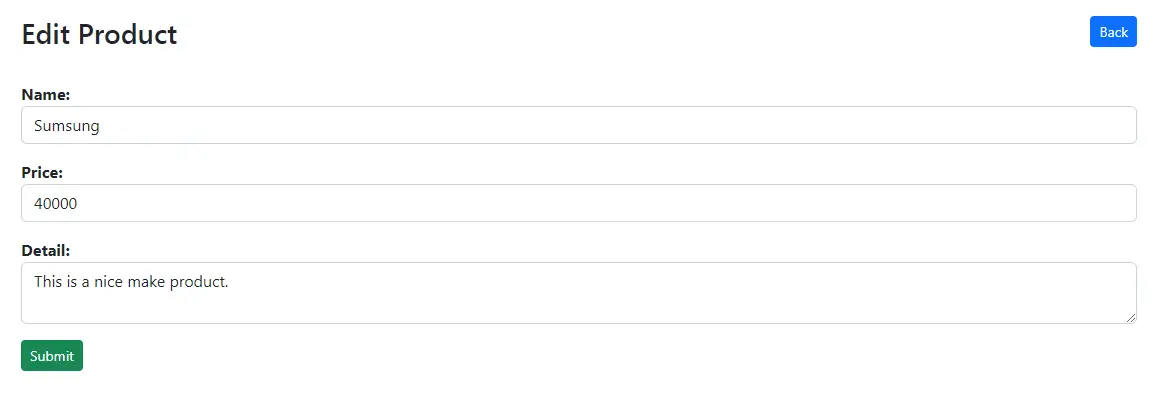
Step 11: Edit Product Form
views/product/edit.ejs
<!DOCTYPE html>
<html>
<head>
    <meta charset="utf-8">
    <meta name="viewport" content="width=device-width, initial-scale=1">
    <title>Edit Product</title>
    <link href="https://cdn.jsdelivr.net/npm/bootstrap@5.2.0/dist/css/bootstrap.min.css" rel="stylesheet">
</head>
<body>

<div class="container">>

    <div class="row mt-5">
        <!-- heading -->
        <div class="col-lg-6 col-md-6 pt-3">
            <h3>Edit Product</h3>
        </div>

        <div class="col-lg-6 col-md-6 text-end pt-3">
            <a href="/products" class="btn btn-primary btn-sm">Back</a>
        </div>
    </div>

    <div class="row">
        <!-- alert message -->
        <div class="col-lg-12 col-md-12 mt-2">
            <% if (messages.error) { %>
                <div class="alert alert-danger alert-dismissible fade show" role="alert">
                    <%- messages.error %>
                    <button type="button" class="btn-close" data-bs-dismiss="alert" aria-label="Close"></button>
                </div>
            <% } %>
        </div>

        <!-- add data form -->
        <div class="col-lg-12 col-md-12">
            <form action="/products/edit/<%= id %>" method="POST" name="form1">
                <div class="row">
                    <div class="col-lg-12">
                        <div class="form-group mt-3">
                            <strong>Name:</strong>
                            <input type="text" name="name" id="name" value="<%= name %>" class="form-control">
                        </div>
                    </div>
                    <div class="col-lg-12">
                        <div class="form-group mt-3">
                            <strong>Price:</strong>
                            <input type="text" name="price" value="<%= price %>" class="form-control">
                        </div>
                    </div>
                    <div class="col-lg-12">
                        <div class="form-group mt-3">
                            <strong>Detail:</strong>
                            <textarea type="text" name="detail" value="<%= detail %>" class="form-control"><%= detail %></textarea>
                        </div>
                    </div>
                    <div class="col-lg-12">
                        <div class="form-group mt-3">
                            <input type="submit" class="btn btn-success btn-sm">
                        </div>
                    </div>
                </div>
            </form>
        </div>
    </div>
</div>

</body>
</html>
As you see in `app.js` code, our server runs on port 8000.
Run Node App
All the required steps have been done, now you have to type the given below command and hit enter to run the Node app:
node app.js
Now, Go to your web browser, type the given URL and view the app output:
http://localhost:8000/products
Output View:
1). Product List View:

2). Product Add View:
3). Product Edit View:
I hope it can help you...
#Node.js Express
#Node JS