10-Apr-2023
.
Admin
Hi Guys,
In this tutorial, I want to share about how to integrating our Laravel App with Stripe. We know that stripe is the best way to create a payment gateway system.
Stripe is a very popular and secure internet payment gateway company which helps to accept payment worldwide. Stripe provide really nice development interface to start and you don’t have to pay subscription charges to learn it provides free developer account, before starting to code in your app.
Here I will give you full example for laravel 8 stripe payment gateway integration tutorial So let's follow bellow step by step.
Step 1 : Install Laravel 8
In the first step, we need to get fresh laravel 8 version application So let's open terminal and run bellow command to install fresh laravel project.
composer create-project --prefer-dist laravel/laravel blog
Step 2 : Database Configuration
In second step, we will make database Configuration for example database name, username, password etc. So lets open .env file and fill all deatils like as bellow:
.env
DB_CONNECTION=mysql
DB_HOST=127.0.0.1
DB_PORT=3306
DB_DATABASE=here your database name(blog)
DB_USERNAME=here database username(root)
DB_PASSWORD=here database password(root)
Step 3: Install stripe-php Package
In this step we need to install stripe-php via the Composer package manager, so one your terminal and fire bellow command:
composer require cartalyst/stripe-laravel
Then configure stripe package in app.php, which is located inside config directory:
'providers' => [
 ..........
 Cartalyst\Stripe\Laravel\StripeServiceProvider::class
],

'aliases' => [
 ..........
 'Stripe' => Cartalyst\Stripe\Laravel\Facades\Stripe::class
],
Step 4: Set Stripe API Key and SECRET
STRIPE_KEY=pk_test_xxxxxxxxxxxxxxxxxxx
STRIPE_SECRET=sk_test_xxxxxxxxxxxxxx
Next step, you need to set up the Stripe API key, to do this open or create the config/services.php file, and add or update the 'stripe' array:
'stripe' => [
     'secret' => env('STRIPE_SECRET'),
 ],
Step 5: Creating Payment Model & Migration
In step, run the following command on terminal to create model and migration file by using the following command:
php artisan make:model Payment -m
/database/migrations/create_payments_table.php
public function up()
{
    Schema::create('payments', function (Blueprint $table) {
        $table->id();
        $table->string('s_payment_id'); // stripe payment id
        $table->string('user_id');
        $table->string('product_id');
        $table->string('amount');
        $table->timestamps();
    });
}
Now, open again your terminal and type the following command on cmd to create tables into your selected database:
php artisan migrate
Step 6: Create Routes
In step, open your web.php file, which is located inside routes directory. Then add the following routes into web.php file:
use App\Http\Controllers\StripePaymentController;

Route::get('stripe', [StripePaymentController::class, 'index']);
Route::post('payment-process', [StripePaymentController::class, 'process']);
Step 7: Create Controller File
In step , create stripe payment controller by using the following command:
php artisan make:controller StripePaymentController
app/Http/Controllers/StripePaymentController
<?php

namespace App\Http\Controllers;

use Illuminate\Http\Request;
use App\Models\Payment;
use Stripe;

class StripePaymentController extends Controller
{
    public function index()
    {
       return view('stripe');
    }

    public function process(Request $request)
    {
  		\Log::info($request->all());
        $stripe = Stripe::charges()->create([
            'source' => $request->get('tokenId'),
            'currency' => 'USD',
            'amount' => $request->get('amount') * 100
        ]);

        return $stripe;
    }
}
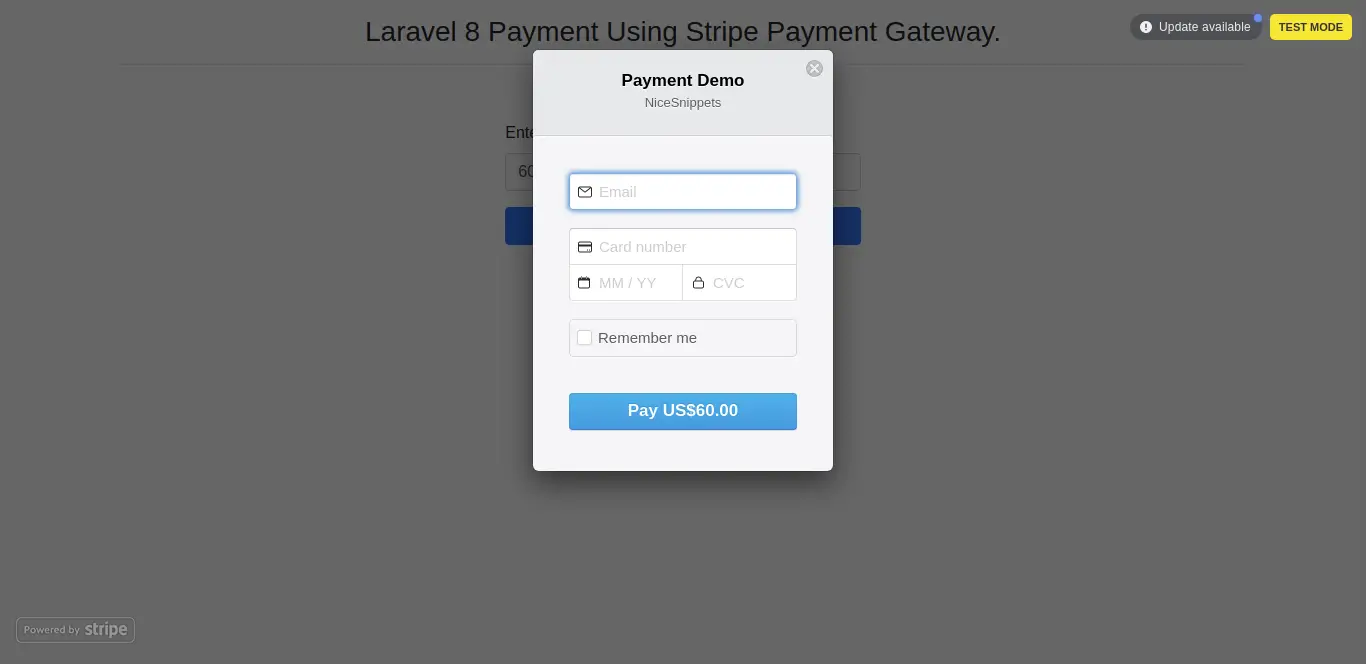
Step 8: Create Blade File
In Last step, let's create stripe.blade.php(resources/views/stripe.blade.php) for layout and write code of jquery to get token from stripe here and put following code:
resources/views/stripe.blade.php
<!DOCTYPE html>
<html>
   <head>
      <meta charset="UTF-8">
      <meta name="viewport" content="width=device-width, initial-scale=1.0">
      <meta http-equiv="X-UA-Compatible" content="ie=edge">
      <title>Laravel 8 Stripe Payment Gateway Integration Example - Nicesnippest.com</title>
      <meta name="csrf-token" content="{{ csrf_token() }}">
      <link rel="stylesheet" href="https://stackpath.bootstrapcdn.com/bootstrap/4.5.2/css/bootstrap.min.css">
      <script src="https://code.jquery.com/jquery-3.4.1.min.js"></script>
      <style>
         .container{
         padding: 0.5%;
         }
      </style>
   </head>
   <body>
      <div class="container">
         <div class="row">
            <div class="col-md-12 mt-2 mb-2">
               <h3 class="text-center">Laravel 8 Payment Using Stripe Payment Gateway.</h3><hr>
            </div>
            <div class="col-md-12 mt-2 mb-2">
               <pre id="res_token"></pre>
            </div>
         </div>
         <div class="row">
            <div class="col-md-4 offset-md-4">

                <div class="form-group">
                  <label class="label">Enter Amount</label>
                  <input type="text" name="amount" class="form-control amount">
                </div>
                <button type="button" class="btn btn-primary btn-block">Pay</button>
            </div>
         </div>
      </div>
<script src = "https://checkout.stripe.com/checkout.js" > </script>
<script type = "text/javascript">
    $(document).ready(function() {
        $.ajaxSetup({
            headers: {
                'X-CSRF-TOKEN': $('meta[name="csrf-token"]').attr('content')
            }
        });
    });

$('.btn-block').click(function() {
  var amount = $('.amount').val();
  var handler = StripeCheckout.configure({
      key: 'pk_test_5f6jfFP2ZV5U9TXQYG0vtqFJ00eFVWNoRX', // your publisher key id
      locale: 'auto',
      token: function(token) {
          // You can access the token ID with `token.id`.
          // Get the token ID to your server-side code for use.
          $('#res_token').html(JSON.stringify(token));
          $.ajax({
              url: '{{ url("payment-process") }}',
              method: 'post',
              data: {
                  tokenId: token.id,
                  amount: amount
              },
              success: (response) => {
                  console.log(response)
              },
              error: (error) => {
                  console.log(error);
                  alert('Oops! Something went wrong')
              }
          })
      }
  });
  handler.open({
      name: 'Payment Demo',
      description: 'NiceSnippets',
      amount: amount * 100
  });
})

</script>
</body>
</html>
Now you can run using bellow command:
php artisan serve
Open bellow URL:
http://localhost:8000/stripe
Now you can check with following card details:
Name: Test
Number: 4242 4242 4242 4242
CSV: 123
Expiration Month: Any Future Month
Expiration Year: Any Future Year
It will help you...
#Laravel 8
