08-Jan-2024
.
Admin
Hello Dev,
Today, I would like to show you how to use the sweet alert message box in Laravel 10. you'll learn how to use sweet alert in Laravel. - laracasts. if you have a question about how to make an alert with sweetalert in Laravel then I will give a simple example with a solution. you'll learn how to show notifications using sweet alert in Laravel 10.
Sweet Alert is an easy-to-use jQuery library that allows us to generate beautiful alert messages. Sweet Alert provides a good layout and the best way to display a message box. You can also use SweetAlert for confirmation before deletion. A few days ago, I posted about confirming before deleting. You can read it here: 'Laravel 5 - Confirmation before deleting a record from the database example.' As you can see in the article, we can simply implement Sweet Alert instead of using Bootstrap confirmation.
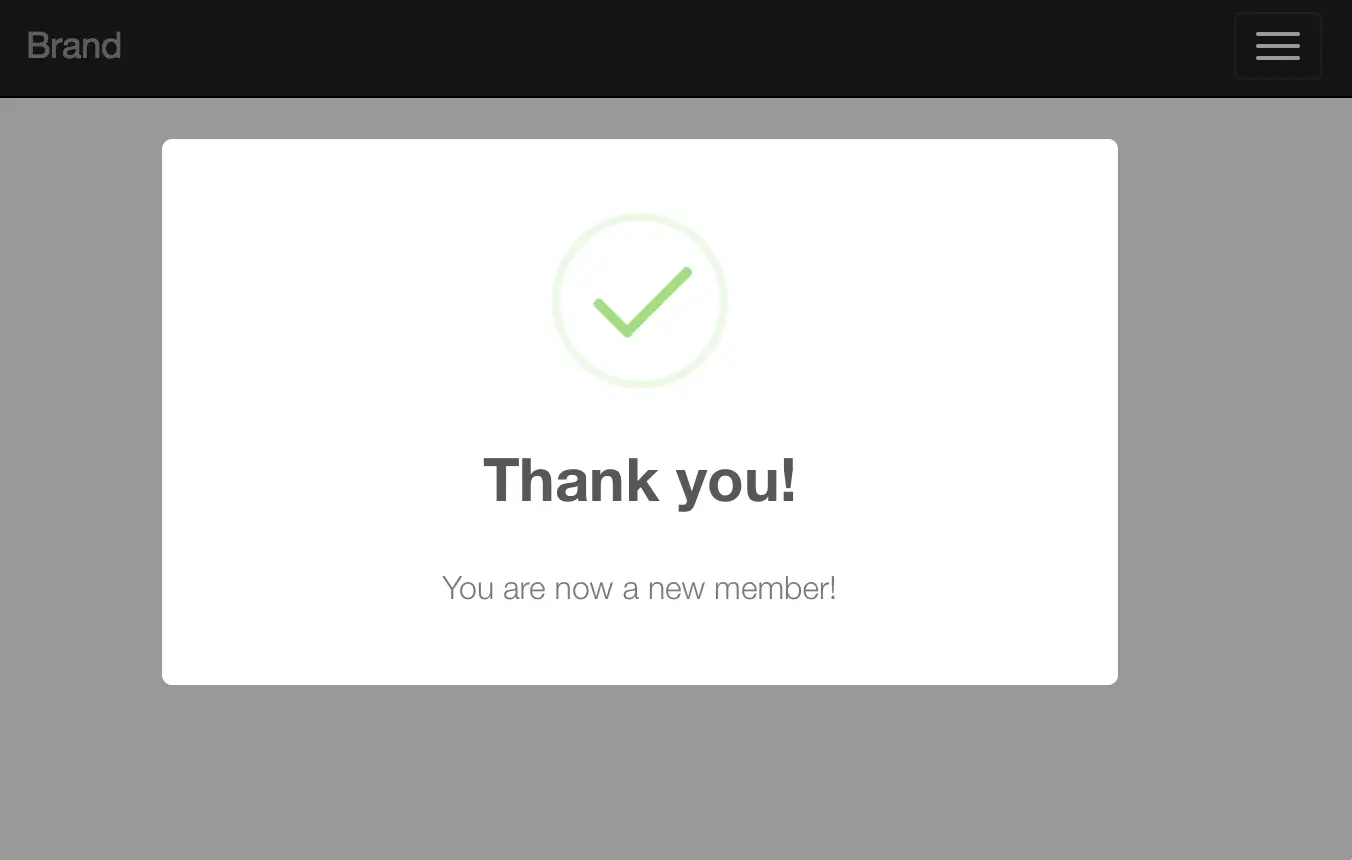
In this example, I will demonstrate how to install the 'uxweb/sweet-alert' package. After installation, I will create a new route with arguments such as success, basic, message, info, error, and warning. Subsequently, I will develop a new method in the controller and create a corresponding view to render the Sweet Alert prompt box. Let's follow the steps outlined below. Once all the steps are completed, you will encounter a prompt box similar to the one shown in the screenshot below.
Preview
Step 1: Install uxweb/sweet-alert Package
Here, we will install the 'uxweb/sweet-alert' Composer package so that we can easily use its methods for flash messages. Let's run the command below.
composer require uxweb/sweet-alert
After successfully installing the package, open the config/app.php file and add the service provider and alias.
config/app.php
'providers' => [

    ....

    UxWeb\SweetAlert\SweetAlertServiceProvider::class,

],

'aliases' => [

    ....

    'Alert' => UxWeb\SweetAlert\SweetAlert::class,

]
As you can see above, I added the 'Alert' facade. Although it's not required for this example, I included it for demonstration purposes.
Step 2: Add Route
In this step, we need to create a route for testing with an argument. Open your routes/web.php file and add the following route.
routes/web.php
Route::get('my-notification/{type}', 'HomeController@myNotification');
Step 3: Add Controller Method
Here, we will add a new method called myNotification() in the HomeController. In this method, I use alert() for the flash message. Let's add the following method to your home controller.
app/Http/Controllers/HomeController.php
namespace App\Http\Controllers;

use Illuminate\Http\Request;

class HomeController extends Controller
{
    /**
     * Create a new controller instance.
     *
     * @return view
     */
    public function myNotification($type)
    {
        switch ($type) {
            case 'message':
                alert()->message('Sweet Alert with message.');
                break;
            case 'basic':
                alert()->basic('Sweet Alert with basic.','Basic');
                break;
            case 'info':
                alert()->info('Sweet Alert with info.');
                break;
            case 'success':
                alert()->success('Sweet Alert with success.','Welcome to Nicesnippets.com')->autoclose(3500);
                break;
            case 'error':
                alert()->error('Sweet Alert with error.');
                break;
            case 'warning':
                alert()->warning('Sweet Alert with warning.');
                break;
            default:
                # code...
                break;
        }
        return view('my-notification');
    }
}
Step 4: Add Blade File
Finally, we need to create the 'my-notification.blade.php' file. In this file, I will write the code on how to use the SweetAlert package. Let's create the blade file and include the code.
resources/views/my-notification.blade.php
<!DOCTYPE html>
<html>
<head>
    <title>Laravel Sweet Alert Notification</title>
    <link rel="stylesheet" href="http://demo.Nicesnippets.com/plugin/bootstrap-3.min.css">
    <script src="http://demo.Nicesnippets.com/plugin/jquery.js"></script>
    <link rel="stylesheet" href="https://cdnjs.cloudflare.com/ajax/libs/sweetalert/1.1.3/sweetalert.min.css" />
    <script src="https://cdnjs.cloudflare.com/ajax/libs/sweetalert/1.1.3/sweetalert.min.js"></script>
</head>
<body>

<h1 class="text-center">Laravel Sweet Alert Notification</h1>
@include('sweet::alert')

</body>
</html>
Now we are ready to run our example so run the bellow command quickly run.
php artisan serve
Now you can open bellow URL on your browser.
http://localhost:8000/my-notification/success

http://localhost:8000/my-notification/basic

http://localhost:8000/my-notification/message
I hope it can help you...
#Laravel 10
