04-Apr-2023
.
Admin
Hi Guys,
This article will provide example of react native dropdown example. this example will help you how to use dropdown in react native. you can understand a concept of how to create dropdown in react native. if you have question about dropdown example in react native then I will give simple example with solution. Follow bellow tutorial step of how to implement dropdown in react native.
In this example I will create a dropdown. I will first create an object to render data in the dropdown. Then I will use the dropdown component. This component will store the object in data props. after then drowdown component listing a data.
Let's start following example:
Step 1: Download Project
In the first step run the following command to create a project.
expo init ExampleApp
Step 2: Installation and Setup
First, you need to install them in your project:
npm install react-native-element-dropdown --save
You install vector icons to set the icon in the Dropdown:
npm i react-native-vector-icons
you have use any bundled Icon:
import this:
import AntDesign from 'react-native-vector-icons/AntDesign';
Step 3: App.js
In this step, You will open the App.js file and put the code.
import React from 'react';
import { StatusBar, StyleSheet, Text, View } from 'react-native';
import { Dropdown } from 'react-native-element-dropdown';
import AntDesign from 'react-native-vector-icons/AntDesign';

const DATA = [
    { label: 'React Naive', value: '1' },
    { label: 'Javascript', value: '2' },
    { label: 'Laravel', value: '3' },
    { label: 'PHP', value: '4' },
    { label: 'jQuery', value: '5' },
    { label: 'Bootstrap', value: '6' },
    { label: 'HTML', value: '7' },
    { label: 'CSS', value: '8' },
];

const App = () => {
    const [value, setValue] = React.useState(null);
    const [Focus, setFocus] = React.useState(false);

    const renderLabelItem = () => {
        if (value || Focus) {
            return (
                <Text style={[styles.label, Focus && { color: 'blue' }]}>
                    Dropdown label
                </Text>
            );
        }
        return null;
    };

    return (
        <View style={styles.container}>
            {renderLabelItem()}
            <Dropdown
                data={DATA}
                style={[styles.dropdown, Focus && { borderColor: 'blue' }]}
                placeholderStyle={styles.placeholderStyle}
                selectedTextStyle={styles.selectedTextStyle}
                inputSearchStyle={styles.inputSearchStyle}
                iconStyle={styles.iconStyle}
                search
                maxHeight={300}
                labelField="label"
                valueField="value"
                placeholder={!Focus ? 'Select item' : '...'}
                searchPlaceholder="Search..."
                value={value}
                onFocus={() => setFocus(true)}
                onBlur={() => setFocus(false)}
                onChange={item => {
                    setValue(item.value);
                    setFocus(false);
                }}
                renderLeftIcon={() => (
                    <AntDesign
                        style={styles.icon}
                        color={Focus ? 'blue' : 'black'}
                        name="Safety"
                        size={20}
                    />
                )}
            />
            <StatusBar />
        </View>
    );
}

const styles = StyleSheet.create({
    container: {
        backgroundColor: 'white',
        paddingTop: 30,
    },
    dropdown: {
        height: 50,
        borderColor: 'gray',
        borderWidth: 0.5,
        borderRadius: 8,
        paddingHorizontal: 8,
    },
    icon: {
        marginRight: 5,
    },
    label: {
        position: 'absolute',
        backgroundColor: 'white',
        left: 22,
        top: 20,
        zIndex: 999,
        paddingHorizontal: 8,
        fontSize: 14,
    },
    placeholderStyle: {
        fontSize: 16,
    },
    selectedTextStyle: {
        fontSize: 16,
    },
    iconStyle: {
        width: 20,
        height: 20,
    },
    inputSearchStyle: {
        height: 40,
        fontSize: 16,
    },
});

export default App;
Run Project
In the last step run your project using the below command.
expo start
You can QR code scan in Expo Go Application on mobile.
Output :
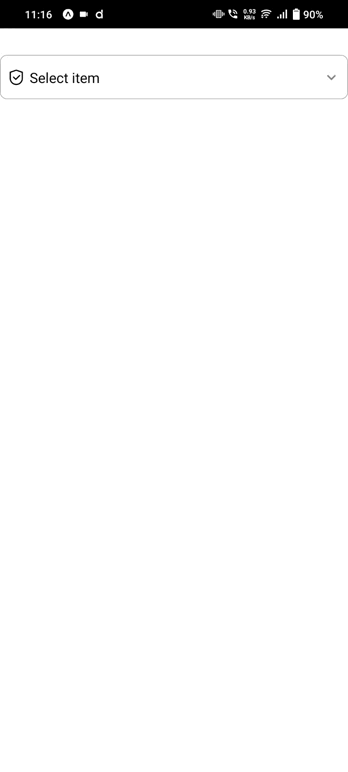
It will help you...
#React Native
