04-Apr-2023
.
Admin

Hi Guys,
This article will give you example of how to create keyboardavoiding view and request focus in react native. This tutorial will give you simple example of how to use keyboardavoiding view and request focus in react native. let’s discuss about how to implement keyboardavoiding view and request focus in react native. This article will give you simple example of react native keyboardavoiding view and request focus example. Here, Creating a basic example of keyboardavoiding view and request focus example in react native.
Let's start following example:
Step 1: Download Project
In the first step run the following command to create a project.
expo init ExampleApp
Step 2: App.js
In this step, You will open the App.js file and put the code.
import React, { useState, createRef } from 'react';
import {
    SafeAreaView,
    StyleSheet,
    TextInput,
    View,
    Text,
    KeyboardAvoidingView,
    Keyboard,
    TouchableOpacity,
    ScrollView,
    StatusBar,
} from 'react-native';

const App = () => {
    const [userName, setUserName] = useState('');
    const [userEmail, setUserEmail] = useState('');
    const [userAge, setUserAge] = useState('');
    const [userAddress, setUserAddress] = useState('');

    const userNameInputRef = createRef();
    const userEmailInputRef = createRef();
    const userAgeInputRef = createRef();
    const useraddressInputRef = createRef();

    const userRegisterFunction = () => {
        alert('User Registered');
    };

    return (
        <SafeAreaView style={styles.container}>
            <ScrollView keyboardShouldPersistTaps="handled">
                <View style={styles.container}>
                    <View>
                        <Text style={styles.titleStyle}>
                            React Native Keyboard Avoiding View and Request Focus
                        </Text>
                        <KeyboardAvoidingView enabled>
                            <View style={styles.textInputStyle}>
                                <TextInput
                                    style={{ flex: 1, color: '#413E4F' }}
                                    onChangeText={(UserName) => setUserName(UserName)}
                                    underlineColorAndroid="#413E4F"
                                    placeholder="Enter  Name"
                                    placeholderTextColor="#413E4F"
                                    autoCapitalize="sentences"
                                    ref={userNameInputRef}
                                    returnKeyType="next"
                                    onSubmitEditing={() =>
                                        userEmailInputRef.current &&
                                        userEmailInputRef.current.focus()
                                    }
                                    blurOnSubmit={false}
                                />
                            </View>
                            <View style={styles.textInputStyle}>
                                <TextInput
                                    style={{ flex: 1, color: '#413E4F' }}
                                    onChangeText={
                                        (UserEmail) => setUserEmail(UserEmail)
                                    }
                                    underlineColorAndroid="#413E4F"
                                    placeholder="Enter  Email"
                                    placeholderTextColor="#413E4F"
                                    autoCapitalize="sentences"
                                    keyboardType="email-address"
                                    ref={userEmailInputRef}
                                    returnKeyType="next"
                                    onSubmitEditing={() =>
                                        userAgeInputRef.current &&
                                        userAgeInputRef.current.focus()
                                    }
                                    blurOnSubmit={false}
                                />
                            </View>
                            <View style={styles.textInputStyle}>
                                <TextInput
                                    style={{ flex: 1, color: '#413E4F' }}
                                    onChangeText={
                                        (UserAge) => setUserAge(UserAge)
                                    }
                                    underlineColorAndroid="#413E4F"
                                    placeholder="Enter  Age"
                                    placeholderTextColor="#413E4F"
                                    autoCapitalize="sentences"
                                    keyboardType="numeric"
                                    ref={userAgeInputRef}
                                    onSubmitEditing={() =>
                                        useraddressInputRef.current &&
                                        useraddressInputRef.current.focus()
                                    }
                                    blurOnSubmit={false}
                                />
                            </View>
                            <View style={styles.textInputStyle}>
                                <TextInput
                                    style={{ flex: 1, color: '#413E4F' }}
                                    onChangeText={
                                        (UserAddress) => setUserAddress(UserAddress)
                                    }
                                    underlineColorAndroid="#413E4F"
                                    placeholder="Enter  Address"
                                    placeholderTextColor="#413E4F"
                                    autoCapitalize="sentences"
                                    ref={useraddressInputRef}
                                    returnKeyType="next"
                                    onSubmitEditing={Keyboard.dismiss}
                                    blurOnSubmit={false}
                                />
                            </View>
                            <TouchableOpacity
                                style={styles.buttonStyle}
                                activeOpacity={0.5}
                                onPress={userRegisterFunction}>
                                <Text style={styles.buttonTextStyle}>
                                    REGISTER
                                </Text>
                            </TouchableOpacity>
                        </KeyboardAvoidingView>
                    </View>
                </View>
            </ScrollView>
            <StatusBar />
        </SafeAreaView>
    );
}

const styles = StyleSheet.create({
    container: {
        flex: 1,
        backgroundColor: 'white',
    },
    titleStyle: {
        fontSize: 20,
        textAlign: 'center',
        margin: 10,
    },
    textInputStyle: {
        flexDirection: 'row',
        height: 40,
        marginTop: 20,
        marginLeft: 35,
        marginRight: 35,
        margin: 10,
    },
    buttonStyle: {
        backgroundColor: 'blue',
        borderWidth: 0,
        color: '#FFFFFF',
        borderColor: '#51D8C7',
        height: 40,
        alignItems: 'center',
        borderRadius: 5,
        marginLeft: 35,
        marginRight: 35,
        marginTop: 30,
    },
    buttonTextStyle: {
        color: '#FFFFFF',
        paddingVertical: 10,
        fontSize: 16,
    },
});

export default App;
Run Project
In the last step run your project using the below command.
expo start
You can QR code scan in Expo Go Application on mobile.
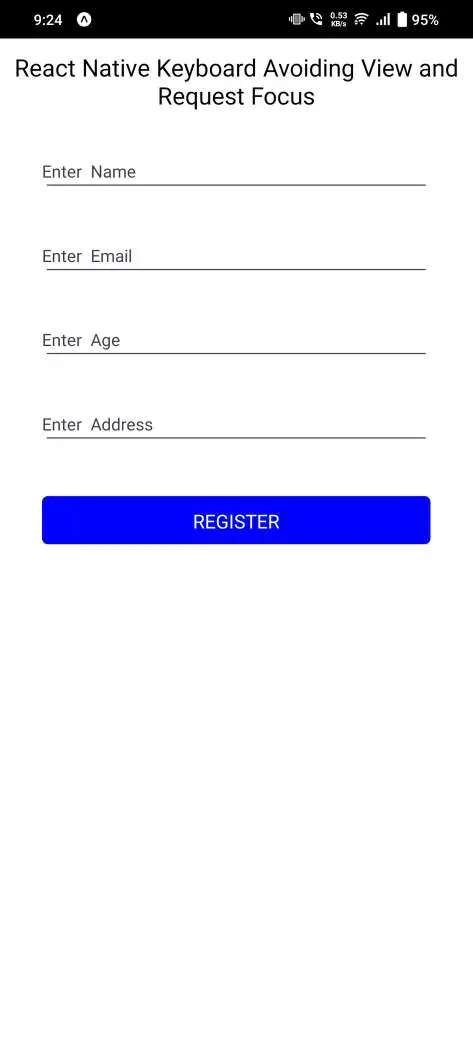
Output :
It will help you...
#React Native
