14-Apr-2023
.
Admin
Hi dev,
I'll give you an illustration of a custom validation rule in Laravel 10. You have come to the right place if you want to see an example of how to implement a custom validation rule in Laravel 10. The addition of a custom validation rule in Laravel 10 is covered in detail in this article. In Laravel 10, I'd want to demonstrate how to implement a custom validation rule. So, let's examine an example in more detail.
Laravel offers a variety of standard validation criteria, including email, needed, unique, date, and more. I can walk you through the process of building a custom validation rule in Laravel.
this example, we will create a custom validation rule called BirthYearRule. We will add an input text box for birth_year and validate that the user enters a year between 1980 and the current year using our custom validation.
So, let's see the step by step validation:
Step 1: Install Laravel
This step is not required; however, if you have not created the laravel app, then you may go ahead and execute the below command:
composer create-project laravel/laravel example-app
Step 2: Create Routes
In this step, we will create two routes GET and POST for custom validation rule example. so let's add it.
routes/web.php
<?php

use Illuminate\Support\Facades\Route;

use App\Http\Controllers\CustomValidationController;

/*
|--------------------------------------------------------------------------
| Web Routes
|--------------------------------------------------------------------------
|
| Here is where you can register web routes for your application. These
| routes are loaded by the RouteServiceProvider within a group which
| contains the "web" middleware group. Now create something great!
|
*/

Route::get('custom-validation', [CustomValidationController::class, 'create']);
Route::post('custom-validation', [CustomValidationController::class, 'store'])->name('custom.validation.post');
Step 3: Create Validation Rule
In this step, we will create new "BirthYearRule" validation rule that will check user enter valid year. so let's run below command and update rule validation file.
php artisan make:rule BirthYearRule
app/Rules/BirthYearRule.php
<?php

namespace App\Rules;

use Closure;
use Illuminate\Contracts\Validation\ValidationRule;

class BirthYearRule implements ValidationRule
{
    /**
     * Run the validation rule.
     *
     * @param  \Closure(string): \Illuminate\Translation\PotentiallyTranslatedString  $fail
     */
    public function validate(string $attribute, mixed $value, Closure $fail): void
    {
        if(!($value >= 1980 && $value <= date('Y'))){
            $fail('The :attribute must be between 1980 to '.date('Y').'.');
        }
    }
}
Step 4: Create Controller
In this step, we have to create new controller as CustomValidationController and we have also need to add two methods create() and store() on that controller. We will use BirthYearRule validation on store method. so let's update follow code:
app/Http/Controllers/CustomValidationController.php
<?php

namespace App\Http\Controllers;

use Illuminate\Http\Request;
use Illuminate\View\View;
use Illuminate\Http\RedirectResponse;
use App\Rules\BirthYearRule;

class CustomValidationController extends Controller
{
    /**
     * Show the application dashboard.
     *
     * @return \Illuminate\Http\Response
     */
    public function create(): View
    {
        return view('forms');
    }

    /**
     * Show the application dashboard.
     *
     * @return \Illuminate\Http\Response
     */
    public function store(Request $request): RedirectResponse
    {
        $validatedData = $request->validate([
                'name' => 'required',
                'birth_year' => [
                    'required',
                    new BirthYearRule()
                ]
            ]);

        /*
            $validatedData['password'] = bcrypt($validatedData['password']);
            $user = User::create($validatedData);
        */

        return back()->with('success', 'User created successfully.');
    }
}
Step 6: Create View File
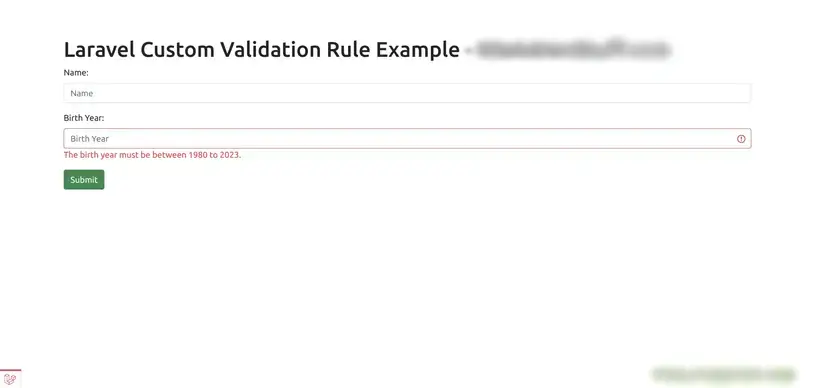
In Last step, let's create forms.blade.php(resources/views/forms.blade.php) for create form and put following code:
resources/views/forms.blade.php
<!DOCTYPE html>
<html>
<head>
    <title>Laravel Custom Validation Rule Example</title>
    <meta charset="utf-8">
    <meta http-equiv="X-UA-Compatible" content="IE=edge">
    <meta name="viewport" content="width=device-width, initial-scale=1">
    <link href="https://cdn.jsdelivr.net/npm/bootstrap@5.0.2/dist/css/bootstrap.min.css" rel="stylesheet">
</head>
<body>
    <div class="container">

        <h1>Laravel Custom Validation Rule Example</h1>

        <form method="POST" action="{{ route('custom.validation.post') }}">

            {{ csrf_field() }}

            <div class="mb-3">
                <label class="form-label" for="inputName">Name:</label>
                <input
                    type="text"
                    name="name"
                    id="inputName"
                    class="form-control @error('name') is-invalid @enderror"
                    placeholder="Name">

                @error('name')
                    <span class="text-danger">{{ $message }}</span>
                @enderror
            </div>

            <div class="mb-3">
                <label class="form-label" for="inputEmail">Birth Year:</label>
                <input
                    type="text"
                    name="birth_year"
                    id="inputEmail"
                    class="form-control @error('birth_year') is-invalid @enderror"
                    placeholder="Birth Year">

                @error('birth_year')
                    <span class="text-danger">{{ $message }}</span>
                @endif
            </div>

            <div class="mb-3">
                <button class="btn btn-success btn-submit">Submit</button>
            </div>
        </form>
    </div>
</body>
</html>
Run Laravel App:
All the required steps have been done, now you have to type the given below command and hit enter to run the Laravel app:
php artisan serve
Now, Go to your web browser, type the given URL and view the app output:
http://localhost:8000/custom-validation
Output: You Email Look Like This
I hope it can help you...
#Laravel 10
