11-Apr-2023
.
Admin

Hi Guys
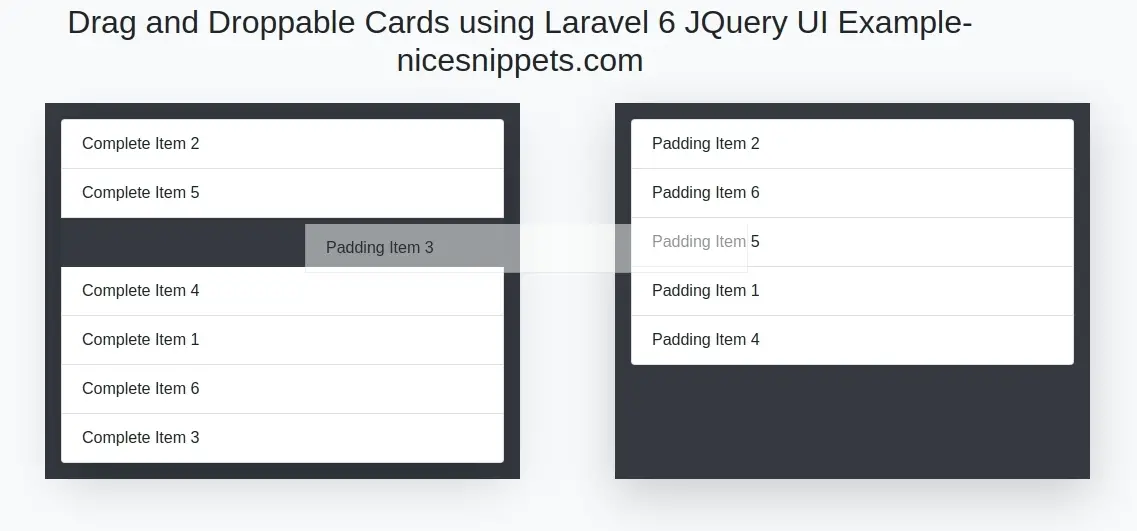
In this tutorial, I will explain how you can drag and droppable cards using laravel 7/6 jquery ui.we will show drag and droppable cards using laravel 7/6 jquery ui example. you can create drag and droppable cards using laravel 7/6 jquery ui.
Dynamic sorting or drag and drop list cards , it's amazing things for client or any user to understand flow. If you create sorting with drag and drop able cards or div for your Items/ product then it's awesome.
i would like to share with you how to create drag and drop cards using jquery ui and also we will make it dynamic using laravel 6. so basically we will save data into database using jquery ajax. we will use bootstrap for just make it better layout. we require to use jquery ui for make row. we will use cdn jquery ui or css.
So just follow below step to done this example.
Step 1 : Install Laravel 6 Application
we are going from scratch, So we require to get fresh Laravel application using bellow command, So open your terminal OR command prompt and run bellow command:
composer create-project --prefer-dist laravel/laravel blog
Database Configuration
In this step, we require to make database configuration, you have to add following details on your .env file.
1.Database Username
1.Database Password
1.Database Name
In .env file also available host and port details, you can configure all details as in your system, So you can put like as bellow:
following path: .env
DB_HOST=localhost
DB_DATABASE=homestead
DB_USERNAME=homestead
DB_PASSWORD=secret
Step 2: Create ajax Item Table and Model
In this step we have to create migration for Items table using Laravel 6 php artisan command, so first fire bellow command:
php artisan make:model Item -m
After this command you have to put bellow code in your migration file for create Item table.
following path:/database/migrations/2020_01_10_102325_create_items_table.php
<?php

use Illuminate\Database\Migrations\Migration;
use Illuminate\Database\Schema\Blueprint;
use Illuminate\Support\Facades\Schema;

class CreateItemsTable extends Migration
{
    /**
     * Run the migrations.
     *
     * @return void
     */
    public function up()
    {
        Schema::create('items', function (Blueprint $table) {
            $table->increments('id');
            $table->string('title');
            $table->integer('order');
            $table->tinyInteger('status');
            $table->timestamps();
        });
    }

    /**
     * Reverse the migrations.
     *
     * @return void
     */
    public function down()
    {
        Schema::dropIfExists('items');
    }
}
Now we require to run migration be bellow command:
php artisan migrate
After you have to put bellow code in your model file for create Item table.
following path:/app/Item.php
<?php

namespace App;

use Illuminate\Database\Eloquent\Model;

class Item extends Model
{
    /**
     * The attributes that are mass assignable.
     *
     * @var array
     */
    protected $fillable = [
        'title', 'order', 'status',
    ];
}
Step 4: Create Route
In this is step we need to create route for ajax update items status layout file and another one for post request.open following fille path
following path:/routes/web.php
Route::get('/', array('as'=> 'front.home', 'uses' => 'ItemController@itemView'));
Route::post('/update-items', array('as'=> 'update.items', 'uses' => 'ItemController@updateItems'));
Step 5: Create Controller
here this step now we should create new controller as ItemController,So run bellow command for generate new controller
php artisan make:controller ItemController
now this step, this controller will manage layout and ajax update items status layout with post request,bellow content in controller file.following fille path
following path:/app/Http/Controllers/ItemController.php
<?php

namespace App\Http\Controllers;

use Illuminate\Http\Request;
use App\Item;

class ItemController extends Controller
{

    public function itemView()
    {
    	$panddingItem = Item::where('status',0)->orderBy('order')->get();
    	$completeItem = Item::where('status',1)->orderBy('order')->get();

    	return view('dragAndDroppable',compact('panddingItem','completeItem'));
    }

    public function updateItems(Request $request)
    {
    	$input = $request->all();

    	foreach ($input['panddingArr'] as $key => $value) {
    		$key = $key+1;
    		Item::where('id',$value)->update(['status'=>0,'order'=>$key]);
    	}

    	foreach ($input['completeArr'] as $key => $value) {
    		$key = $key+1;
    		Item::where('id',$value)->update(['status'=>1,'order'=>$key]);
    	}

    	return response()->json(['status'=>'success']);
    }

}
Step 6: Create View
In Last step, let's create dragAndDroppable.blade.php(resources/views/dragAndDroppable.blade.php) for layout and we will write design code here and also Drag and Droppable Cards and ajax to store data items status, So put following code:
following path:resources/views/dragAndDroppable.blade.php
<!doctype html>
<html lang="en">
<head>
  <meta charset="utf-8">
  <meta name="viewport" content="width=device-width, initial-scale=1">
  <meta name="csrf-token" content="{{ csrf_token() }}">
  <title>jQuery UI Draggable - Default functionality-nicesnippets.com</title>

  <link rel="stylesheet" href="https://stackpath.bootstrapcdn.com/bootstrap/4.4.1/css/bootstrap.min.css" integrity="sha384-Vkoo8x4CGsO3+Hhxv8T/Q5PaXtkKtu6ug5TOeNV6gBiFeWPGFN9MuhOf23Q9Ifjh" crossorigin="anonymous">
  <link rel="stylesheet" href="//code.jquery.com/ui/1.12.1/themes/base/jquery-ui.css">

  <style>
    #draggable {
        width: 150px;
        height: 150px;
        padding: 0.5em;
    }
  </style>
</head>
<body class="bg-light">
<div class="container">
  <div class="row">
    <div class="col-md-12">
        <h2 class="text-center pb-3 pt-1">Drag and Droppable Cards using Laravel 6 JQuery UI Example <span class="bg-success p-1">nicesnippets.com</span></h2>
        <div class="row">
            <div class="col-md-5 p-3 bg-dark offset-md-1">
                <ul class="list-group shadow-lg connectedSortable" id="padding-item-drop">
                  @if(!empty($panddingItem) && $panddingItem->count())
                    @foreach($panddingItem as $key=>$value)
                      <li class="list-group-item" item-id="{{ $value->id }}">{{ $value->title }}</li>
                    @endforeach
                  @endif
                </ul>
            </div>
            <div class="col-md-5 p-3 bg-dark offset-md-1 shadow-lg complete-item">
                <ul class="list-group  connectedSortable" id="complete-item-drop">
                  @if(!empty($completeItem) && $completeItem->count())
                    @foreach($completeItem as $key=>$value)
                      <li class="list-group-item " item-id="{{ $value->id }}">{{ $value->title }}</li>
                    @endforeach
                  @endif
                </ul>
            </div>
        </div>
    </div>
  </div>
</div>
  <script src="https://code.jquery.com/jquery-3.4.1.js"></script>
  <script src="https://stackpath.bootstrapcdn.com/bootstrap/4.4.1/js/bootstrap.min.js" integrity="sha384-wfSDF2E50Y2D1uUdj0O3uMBJnjuUD4Ih7YwaYd1iqfktj0Uod8GCExl3Og8ifwB6" crossorigin="anonymous"></script>
  <script src="https://code.jquery.com/ui/1.12.1/jquery-ui.js"></script>

  <script>
  $( function() {
    $( "#padding-item-drop, #complete-item-drop" ).sortable({
      connectWith: ".connectedSortable",
      opacity: 0.5,
    }).disableSelection();

    $( ".connectedSortable" ).on( "sortupdate", function( event, ui ) {
        var panddingArr = [];
        var completeArr = [];

        $("#padding-item-drop li").each(function( index ) {
          panddingArr[index] = $(this).attr('item-id');
        });

        $("#complete-item-drop li").each(function( index ) {
          completeArr[index] = $(this).attr('item-id');
        });

        $.ajax({
            url: "{{ route('update.items') }}",
            method: 'POST',
            headers: {
                'X-CSRF-TOKEN': $('meta[name="csrf-token"]').attr('content')
            },
            data: {panddingArr:panddingArr,completeArr:completeArr},
            success: function(data) {
              console.log('success');
            }
        });

    });
  });
</script>
</body>
</html>
Now we are ready to run our example so run bellow command so quick run:
php artisan serve
Now you can open bellow URL on your browser:
http://localhost:8000/
It will help you...
#Laravel 7
#Jquery
#Laravel
#Laravel 6