01-Aug-2020
.
Admin
-0.jpg)
Hi Guys,
In this examplen, I will explain you how to use rest api example from scratch in codeigniter 4, we will show example of codeigniter 4 rest api example from scratch.
you will learn how to create rest API in PHP codeigniter 4 frameworks.If you want to exchange data between apps and servers. So at that time, you need to rest APIs for exchange data between server and apps.
So this Codeigniter rest API example tutorial will help you to create rest API in Codeigniter 4 framework. And how to create, read, update, and delete data from database table using these APIs.
So this Codeigniter rest API example tutorial will help you to create rest API in Codeigniter 4 framework. And how to create, read, update, and delete data from database table using these APIs.
Before creating a rest API and use it in codeigniter. You can see the architecture of the RESTful API:

Here, I will give you Setp by step for simply rest api example from scratch using codeigniter 4 as bellow.
Step 1: Create Database and Table
First of all, start your local server and start phpmyadin.
Then use the following command to create a database:
CREATE DATABASE demo;
After that, select your database and run the following sql query to create a Product table into your database:
CREATE TABLE product(
  product_id INT(11) PRIMARY KEY AUTO_INCREMENT,
  product_name VARCHAR(200),
  product_price DOUBLE
)ENGINE=INNODB;
Next, run the following query to insert some data into product table:
INSERT INTO product(product_name,product_price) VALUES
('Product 1','2000'),
('Product 2','5000'),
('Product 3','4000'),
('Product 4','6000'),
('Product 5','7000');
Step 2: Download Codeigniter Project
In this step, we will download the latest version of Codeigniter 4, Go to this link https://codeigniter.com/download Download Codeigniter 4 fresh new setup and unzip the setup in your local system xampp/htdocs/ . And change the download folder name “demo”
Step 3: Basic Configurations
Next, we will set some basic configuration on the app/config/app.php file, so let’s go to application/config/config.php and open this file on text editor.
Set Base URL like this
public $baseURL = 'http://localhost:8080';
To
public $baseURL = 'http://localhost/demo/';
Step 4: Setup Database Credentials
In this step, we need to connect our project to the database. we need to go app/Config/Database.php and open database.php file in text editor. After opening the file in a text editor, We need to set up database credentials in this file like below.
public $default = [
	'DSN'      => '',
	'hostname' => 'localhost',
	'username' => 'root',
	'password' => '',
	'database' => 'demo',
	'DBDriver' => 'MySQLi',
	'DBPrefix' => '',
	'pConnect' => false,
	'DBDebug'  => (ENVIRONMENT !== 'production'),
	'cacheOn'  => false,
	'cacheDir' => '',
	'charset'  => 'utf8',
	'DBCollat' => 'utf8_general_ci',
	'swapPre'  => '',
	'encrypt'  => false,
	'compress' => false,
	'strictOn' => false,
	'failover' => [],
	'port'     => 3306,
];
Step 5: Create Model
So go to app/Models/ and create here one model. And you need to create one model name ProductModel.php and update the following code into your ProductModel.php file:
<?php namespace App\Models;

use CodeIgniter\Model;

class ProductModel extends Model
{
    protected $table = 'product';
    protected $primaryKey = 'product_id';
    protected $allowedFields = ['product_name','product_price'];
}
Step 6: Create Controller
Now, Navigate app/Controllers and create a controller name Products.php. Then update the following method into Products.php controller file:
<?php namespace App\Controllers;

use CodeIgniter\RESTful\ResourceController;
use CodeIgniter\API\ResponseTrait;
use App\Models\ProductModel;

class Products extends ResourceController
{
    use ResponseTrait;
    // get all product
    public function index()
    {
        $model = new ProductModel();
        $data = $model->findAll();
        return $this->respond($data);
    }

    // get single product
    public function show($id = null)
    {
        $model = new ProductModel();
        $data = $model->getWhere(['product_id' => $id])->getResult();
        if($data){
            return $this->respond($data);
        }else{
            return $this->failNotFound('No Data Found with id '.$id);
        }
    }

    // create a product
    public function create()
    {
        $model = new ProductModel();
        $data = [
            'product_name' => $this->request->getVar('product_name'),
            'product_price' => $this->request->getVar('product_price')
        ];
        $model->insert($data);
        $response = [
            'status'   => 201,
            'error'    => null,
            'messages' => [
                'success' => 'Data Saved'
            ]
        ];
        return $this->respondCreated($response);
    }

    // update product
    public function update($id = null)
    {
        $model = new ProductModel();
        $input = $this->request->getRawInput();
        $data = [
            'product_name' => $input['product_name'],
            'product_price' => $input['product_price']
        ];
        $model->update($id, $data);
        $response = [
            'status'   => 200,
            'error'    => null,
            'messages' => [
                'success' => 'Data Updated'
            ]
        ];
        return $this->respond($response);
    }

    // delete product
    public function delete($id = null)
    {
        $model = new ProductModel();
        $data = $model->find($id);
        if($data){
            $model->delete($id);
            $response = [
                'status'   => 200,
                'error'    => null,
                'messages' => [
                    'success' => 'Data Deleted'
                ]
            ];
            return $this->respondDeleted($response);
        }else{
            return $this->failNotFound('No Data Found with id '.$id);
        }

    }

}
In the above controller method works as follow:
->Index() – This is used to fetch all product.
->create() – This method is used to insert product info into DB table.
->update() – This is used to validate the form data server-side and update it into the MySQL database.
->show() – This method is used to fetch single product info into DB table.
->delete() – This method is used to delete data from the MySQL database.
Now Navigate to App/Configuration folder. And Open the file “Routes.php”, then find the following code:
$Route->get('/', 'home :: index');
Then, change the following:
$Route->resource('product');
This configuration allows us to access the following EndPoint:
Step 7: Start Development server
Open your terminal and run the following command to start development server:
php spark serve
Next, Open the postman app to call above created APIs as follow:
1: Get all products info from DB table, you can call get all product info api in postman app as follow:
http://localhost:8080/products

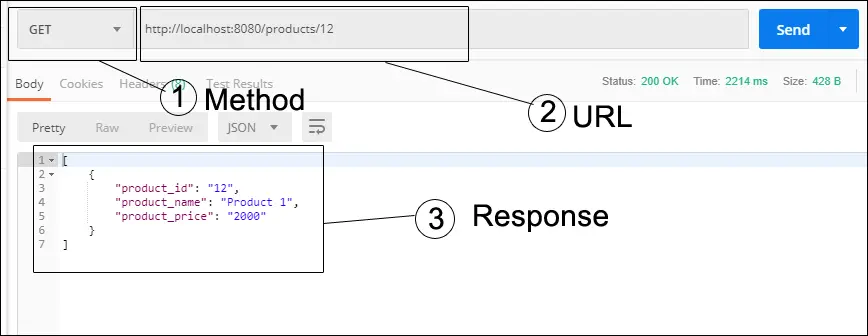
2: And if you want to get single product info, you can use the as follow in postman app:
http://localhost:8080/products/10
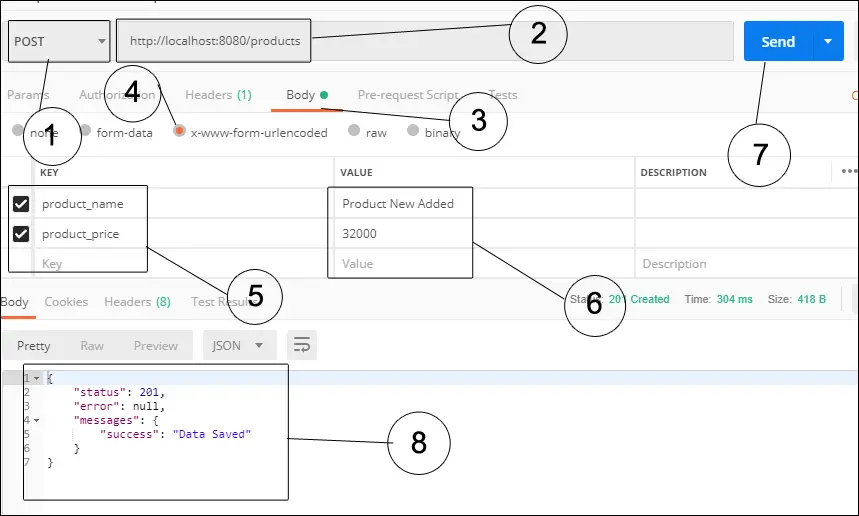
3: For insert new product info into DB table, you can call create apis as follow:
http://localhost:8080/products
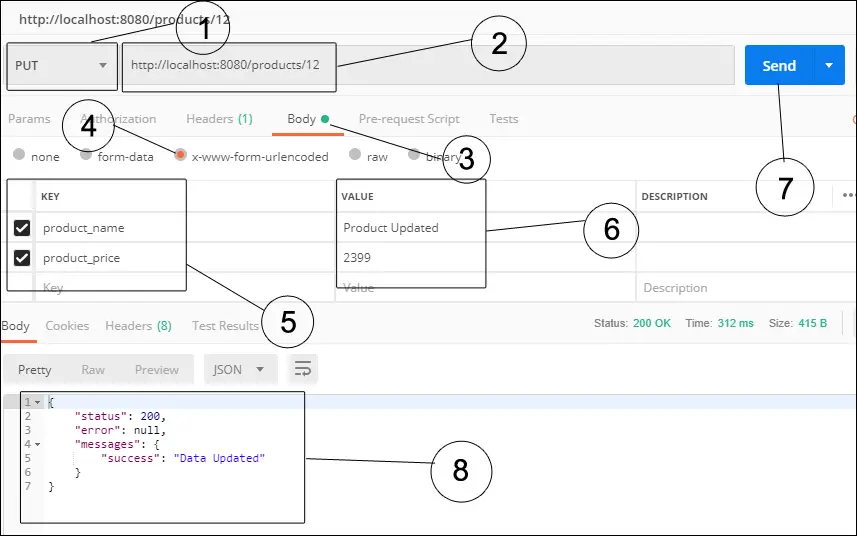
4: For update info into DB table using the update api, you can call update info api as follow:
5: For delete product info using codeigniter api, you can call delete api as follow:

In this Codeigniter 4 rest API example tutorial, you have learned how to create restful API in Codeigniter 4 framework.
It will help you...
#Codeigniter
