19-Mar-2021
.
Admin
Hi Guys,
Today, I will learn you how to use to retrieve data from any websites or web pages using the node js and cheerio. we will show example of web scraping in node.js. you can easliy use retrieve data from any websites or web pages using the node js and cheerio.
Web scraping is a technique used to retrieve data from websites using a script. Web scraping is the way to automate the laborious work of copying data from various websites.
Web Scraping is generally performed in the cases when the desirable websites don’t expose external API for public consumption. Some common web scraping scenarios are:
-Fetch trending posts on social media sites.
-Fetch email addresses from various websites for sales leads.
-Fetch news headlines from news websites.
For Example, if you may want to scrape medium.com blog post using the following url https://medium.com/search?q=node.js
After that, open the Inspector in chrome dev tools and see the DOM elements of it.
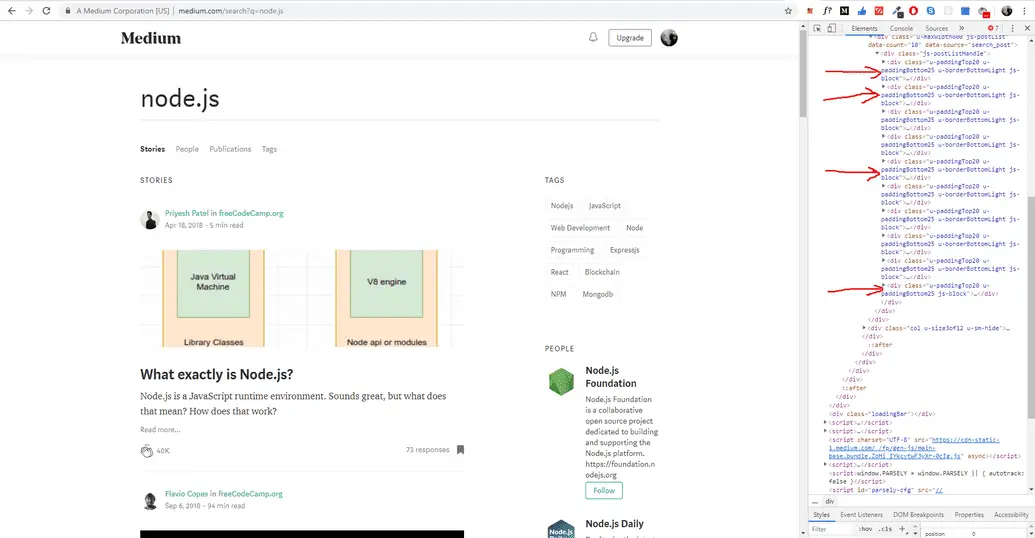
If you see it carefully, it has a pattern. we can scrap it using the element class names.
Web Scraping with Node js and Cheerio
Follow the here steps and retrieve or scrap blog posts data from the medium.com using node js and cheerio:
Step 1: Setup Node js Project
In this step,Let’s set up the project to scrape medium blog posts. Create a Project directory.
mkdir nodewebscraper
cd nodewebscraper
npm init --yes
Install all the dependencies mentioned above.
npm install express request cheerio express-handlebars
Step 2: Making Http Request
Now this step, making the http request to get the webpage elements:
request(`https://medium.com/search?q=${tag}`, (err, response, html) => {
  //returns all elements of the webpage
})
Step 3: Extract Data From Blog Posts
Here this step,Once you retrive all the blog posts from medium.com, you can use cheerio to scrap the data that you need.
const $ = cheerio.load(html)
This loads the data to the dollar variable. if you have used JQuery before, you know the reason why we are using \$ here(Just to follow some old school naming convention).
Now, you can traverse through the DOM tree.
Since you need only the title and link from scrapped blog posts on your web page. you will get the elements in the HTML using either the class name of it or class name of the parent element.
Firstly, we need to get all the blogs DOM which has .js-block as a class name.
$(".js-block").each((i, el) => {
  //This is the Class name for all blog posts DIV.
})
Most Importantly, each keyword loops through all the element which has the class name as js-block.
After, you scrap the title and link of each blog post from medium.com.
$(".js-block").each((i, el) => {
  const title = $(el)
    .find("h3")
    .text()
  const article = $(el)
    .find(".postArticle-content")
    .find("a")
    .attr("href")
  let data = {
    title,
    article,
  }
  console.log(data)
})
This will scrap the blog posts for a given tag.
The full source code of node js web scraping:
app.js
const cheerio = require('cheerio');
const express = require('express');
const exphbs = require('express-handlebars');
const bodyParser = require('body-parser');
const request = require('request');
const app = express();
app.use(bodyParser.json());
app.use(bodyParser.urlencoded({extended : false}));
app.engine('handlebars', exphbs({ defaultLayout : 'main'}));
app.set('view engine','handlebars');
app.get('/', (req, res) => res.render('index', { layout: 'main' }));
app.get('/search',async (req,res) => {
    const { tag } = req.query;
    let datas = [];
    request(`https://medium.com/search?q=${tag}`,(err,response,html) => {
     if(response.statusCode === 200){
        const $ = cheerio.load(html);
        $('.js-block').each((i,el) => {
            const title = $(el).find('h3').text();
            const article = $(el).find('.postArticle-content').find('a').attr('href');
            let data = {
                title,
                article
            }
            datas.push(data);
        })
     }
    console.log(datas);
    res.render('list',{ datas })
    })
})
app.listen(3000,() => {
    console.log("server is running on port 3000");
})
Step 4: Create Views
Next this step, you need to create one folder name layouts, so go to your nodewebscrap app and find views folder and inside this folder create new folder name layouts.
Inside a layout folder, create one views file name main.handlebars and update the following code into your views/layouts/main.handlebars file:
<!DOCTYPE html>
<html lang="en">
<head>
  <meta charset="UTF-8">
  <meta name="viewport" content="width=device-width, initial-scale=1.0">
  <meta http-equiv="X-UA-Compatible" content="ie=edge">
   <link rel="stylesheet" href="https://cdnjs.cloudflare.com/ajax/libs/semantic-ui/2.4.1/semantic.min.css">
  <title>Scraper</title>
</head>
<body>
  <div class="ui piled  segment">
    {{{body}}}
  </div>
</body>
</html>
After that, create one new view file name index.handlebars outside the layouts folder.
nodewebscraper/views/index.handlebars
Update the following code into your index.handlerbars:
<form class="ui form" action="/search">
    <input type="text" name="tag" placeholder="Search...">
    <input type="submit" class="ui button" value="Search">
</form>
After that, create one new view file name list.handlebars outside the layouts folder.
nodewebscraper/views/list.handlebars
Update the following code into your list.handlerbars:
<div class="ui list">
    {{#each datas}}
        <a class="item" href="{{article}}">{{title}}</a>
    {{/each}}
</div>
<a class="ui teal tag label" href="/">Back
Step 5: Run development server
npm install
npm run dev
It will help you....
#Node JS