10-Apr-2023
.
Admin
Hi Dev,
In this Article I will share something new about how actually work mail send to multiple user laravel 8.I will create a custom send mail to user in laravel 8.
Here, Laravel 8 provide mail class to send email. you can use several drivers for sending email in laravel 8. you can use smtp, Mailgun, Postmark, Amazon SES, and sendmail. you have to configure on env file what driver you want to use.
Sometimes You want to send email to multiple user in your laravel project to i hope useful this example so let's start this example follow below code.
Here,i will give you a simple and easy example how to use implement send email to multiple user in laravel 8 simply follow my all steps.
Step 1 - Install Laravel App
In this step, You can install laravel fresh app. So open the terminal and put the bellow command.
composer create-project --prefer-dist laravel/laravel sendMail
Step 2 - Setup Mail Configuration
After successfully install laravel app next we configure databse setup. We will open ".env" file and change your mail configurations.
.env
MAIL_DRIVER=smtp
MAIL_HOST=smtp.gmail.com
MAIL_PORT=587
MAIL_USERNAME=mygoogle@gmail.com
MAIL_PASSWORD=rrnnucvnqlbsl
MAIL_ENCRYPTION=tls
MAIL_FROM_ADDRESS=mygoogle@gmail.com
MAIL_FROM_NAME="${APP_NAME}"
Step 3 - Create Mail
In this second step we will create a mail class TestUserMail Here we will write code for which view will call and object of user. So let's run bellow command.
php artisan make:mail TestUserMail
app/Mail/TestUserMail.php
<?php

namespace App\Mail;

use Illuminate\Bus\Queueable;
use Illuminate\Contracts\Queue\ShouldQueue;
use Illuminate\Mail\Mailable;
use Illuminate\Queue\SerializesModels;

class TestUserMail extends Mailable
{
    use Queueable, SerializesModels;

    public $details;

    /**
     * Create a new message instance.
     *
     * @return void
     */
    public function __construct($details)
    {
        $this->details = $details;
    }

    /**
     * Build the message.
     *
     * @return $this
     */
    public function build()
    {
        return $this->view('email.testUserMail');
    }
}
Step 4 - Create Route
Now, in this step, we will create a two route one for user display and second one is post rout send mail to multiple user.
<?php

use Illuminate\Support\Facades\Route;
use App\Http\Controllers\UserController;

/*
|--------------------------------------------------------------------------
| Web Routes
|--------------------------------------------------------------------------
|
| Here is where you can register web routes for your application. These
| routes are loaded by the RouteServiceProvider within a group which
| contains the "web" middleware group. Now create something great!
|
*/

Route::get('users', [UserController::class, 'index'])->name('users.index');
Route::post('send-mail', [UserController::class, 'sendMail'])->name('send.mail');
Step 5 - Create UserController
Here, in this step now we should create a new controller as UserController. So run the below command and create a new controller.
php artisan make:controller UserController
app/http/controller/UserController.php
<?php
namespace App\Http\Controllers;
use Illuminate\Http\Request;
use App\Models\User;
use App\Mail\TestUserMail;
use Mail;
class UserController extends Controller
{
/**
* Write Your Code..
*
* @return string
*/
public function index()
{
$users = User::select('*')
->orderBy('id','DESC')
->paginate(10);
return view('users', compact('users'));
}
/**
* Write Your Code..
*
* @return string
*/
public function sendMail(Request $request)
{
$users = User::whereIn('id',$request->ids)->get();
if ($users->count() > 0) {
foreach($users as $key => $value){
if (!empty($value->email)) {
$details = [
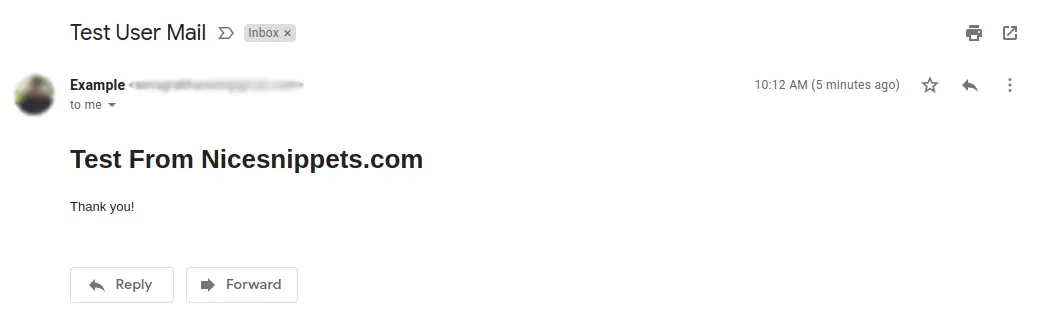
'subject' => 'Test From Nicesnippets.com',
];
Mail::to($value->email)->send(new TestUserMail($details));
}
}
}
return response()->json(['done']);
}
}
Step 6 - Create Blade File
In this step we have to create a blade file. So finally you have to create the following file and put bellow code:
/resources/views/users.blade.php
<!DOCTYPE html>
<html>
<head>
<meta charset="utf-8">
<meta http-equiv="X-UA-Compatible" content="IE=edge">
<title>Laravel Send Email to Multiple Users - Nicesnippets.com</title>
<meta name="csrf-token" content="{{ csrf_token() }}">
<link rel="stylesheet" href="https://cdnjs.cloudflare.com/ajax/libs/font-awesome/4.7.0/css/font-awesome.min.css" />
<link rel="stylesheet" href="https://maxcdn.bootstrapcdn.com/bootstrap/4.5.2/css/bootstrap.min.css">
<script src="https://ajax.googleapis.com/ajax/libs/jquery/3.5.1/jquery.min.js"></script>
<script src="https://cdnjs.cloudflare.com/ajax/libs/popper.js/1.16.0/umd/popper.min.js"></script>
<script src="https://maxcdn.bootstrapcdn.com/bootstrap/4.5.2/js/bootstrap.min.js"></script>
</head>
<body>
<div class="container mt-5">
<div class="row">
<div class="col-md-8">
<div class="row">
<div class="col-md-9 p-0">
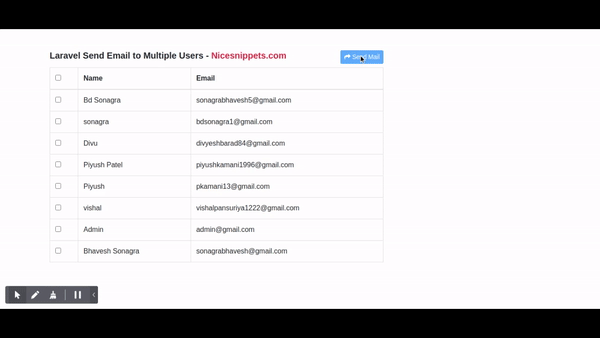
<h5><b>Laravel Send Email to Multiple Users - <span class="text-danger">Nicesnippets.com</span></b></h5>
</div>
<div class="col-md-3 text-right mb-2 p-0">
<button type="button" class="btn btn-primary send-mail btn-sm" disabled="disabled"> <i class="fa fa-share"></i> Send Mail</button>
</div>
<div class="col-md-12 success-mail p-0" style="display: none;">
<div class="alert alert-success">
Sent Mail Successfully.
</div>
</div>
</div>
<div class="row">
<table class="table table-bordered">
<thead>
<tr>
<th><input type="checkbox" value="1" name="user-all" class="user-all"></th>
<th>Name</th>
<th>Email</th>
</tr>
</thead>
<tbody>
@if($users->count() > 0)
@foreach($users as $key => $value)
<tr>
<td>
{{ Form::checkbox('ckeck_user', 1, false,['class'=>'ckeck_user','data-id' => $value->id ]) }}
</td>
<td>{{ $value->name }}</td>
<td>{{ $value->email }}</td>
</tr>
@endforeach
@endif
</tbody>
</table>
</div>
</div>
</div>
</div>
</body>
<script>
$('.user-all').change(function (e) {
var value = $('.user-all:checked').val();
if (value == 1) {
$('input[name="ckeck_user"]').prop('checked',true);
$('.send-mail').removeAttr('disabled');
}else{
$('input[name="ckeck_user"]').prop('checked',false);
$('.send-mail').attr('disabled','disabled');
}
});
$("input[name='ckeck_user']").change(function () {
if ($("input[name='ckeck_user']:checked").length > 0) {
$('.send-mail').removeAttr('disabled');
}else{
$('.send-mail').attr('disabled','disabled');
}
});
$('.send-mail').click(function (e) {
e.preventDefault();
var ids = [];
$.each($('input[name="ckeck_user"]:checked'),function(){
ids.push($(this).data('id'));
});
if (ids != '') {
$(this).attr("disabled", true);
$(this).html('<i class="fa fa-spinner fa-spin"></i> Send Mail');
$.ajax({
url: '{{ route('send.mail') }}',
type: 'POST',
data: {
_token:$('meta[name="csrf-token"]').attr('content'),
ids:ids
},
success: function (data) {
$('.success-mail').css('display','block');
$('.send-mail').attr("disabled", false);
$('.send-mail').html('<i class="fa fa-share"></i> Send Mail');
}
});
}
});
</script>
</html>
Step 7 - Create Send Mail Blade
/resources/views/email/testUserMail.blade.php
<!DOCTYPE html>
<html>
<head>
    <title>Nicesnippets.com</title>
</head>
<body>
    <h1>{{ $details['subject'] }}</h1>

    <p>Thank you!</p>
</body>
</html>
Now we are ready to run our example so run bellow command for quick run:
php artisan serve
Now you can open bellow URL on your browser:
http://localhost:8000/users
Output:
It will help you...
#Css
#Html
#Bootstrap 4
#Laravel
