10-Apr-2023
.
Admin
Hi Friends,
This article will give you example of laravel mail markdown components list example. i explained simply about mail markdown components in laravel. This tutorial will give you simple example of laravel mail markdown components example in laravel. you'll learn markdown components used in laravel mail.
In this post, i will show you how to markdown components used in laravel mail. we need to add so you laravel markdown mail component list code and mail screenshot.
So let's see bellow solution:
Step 1 - Install Laravel Fresh Application
Use this command then download laravel project setup :
composer create-project --prefer-dist laravel/laravel blog
Step 2 - Set Mail Configuration
You have to add your gmail smtp configuration, open your .env file and add your configration.
.env
MAIL_DRIVER=smtp
MAIL_HOST=smtp.gmail.com
MAIL_PORT=587
MAIL_USERNAME=your_username
MAIL_PASSWORD=your_password
MAIL_ENCRYPTION=tls
Step 3 - Create Mailable Class with Markdown
php artisan make:mail SendEmailComponent --markdown=emails.sendEmailComponent
app/Mail/SendEmailComponent.php
<?php

namespace App\Mail;

use Illuminate\Bus\Queueable;
use Illuminate\Contracts\Queue\ShouldQueue;
use Illuminate\Mail\Mailable;
use Illuminate\Queue\SerializesModels;

class SendEmailComponent extends Mailable
{
    use Queueable, SerializesModels;

    public $maildata;

    /**
     * Create a new message instance.
     *
     * @return void
     */
    public function __construct($maildata)
    {
        $this->maildata = $maildata;
    }

    /**
     * Build the message.
     *
     * @return $this
     */
    public function build()
    {
        return $this->markdown('emails.sendEmailComponent')->with('maildata', $this->maildata);
    }
}
Step 4 - Add Route
routes/web.php
<?php

use Illuminate\Support\Facades\Route;
use App\Http\Controllers\MailController;

Route::get('send-mail', [MailController::class, 'sendMail']);
Route::get('send-mail-component', [MailController::class, 'sendMailComponent'])->name('send-mail-component')
Step 5 - Create Controller
php artisan make:controller MailController
app/Http/Controllers/MailController.php
<?php

namespace App\Http\Controllers;

use Illuminate\Http\Request;
use App\Mail\SendEmailComponent;
use Mail;

class MailController extends Controller
{
     /**
     * Show the application dashboard.
     *
     * @return \Illuminate\Contracts\Support\Renderable
    */
    public function sendMail()
    {
        $email = 'aatmaninfotech@gmail.com';

        $maildata = [
            'title' => 'Laravel Mail Markdown SendEmailComponent',
        ];

        Mail::to($email)->send(new SendEmailComponent($maildata));

        dd("Mail has been sent successfully");
    }

    /**
     * Show the application dashboard.
     *
     * @return \Illuminate\Contracts\Support\Renderable
    */
    public function sendMailComponent()
    {
        dd('Nicesnippets.com');
    }
}
Step 6 - Add View File
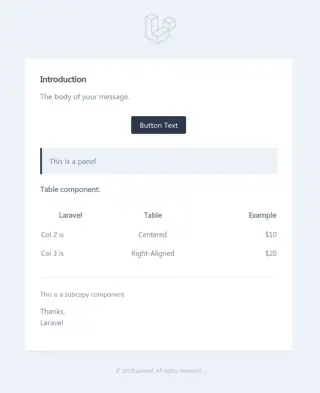
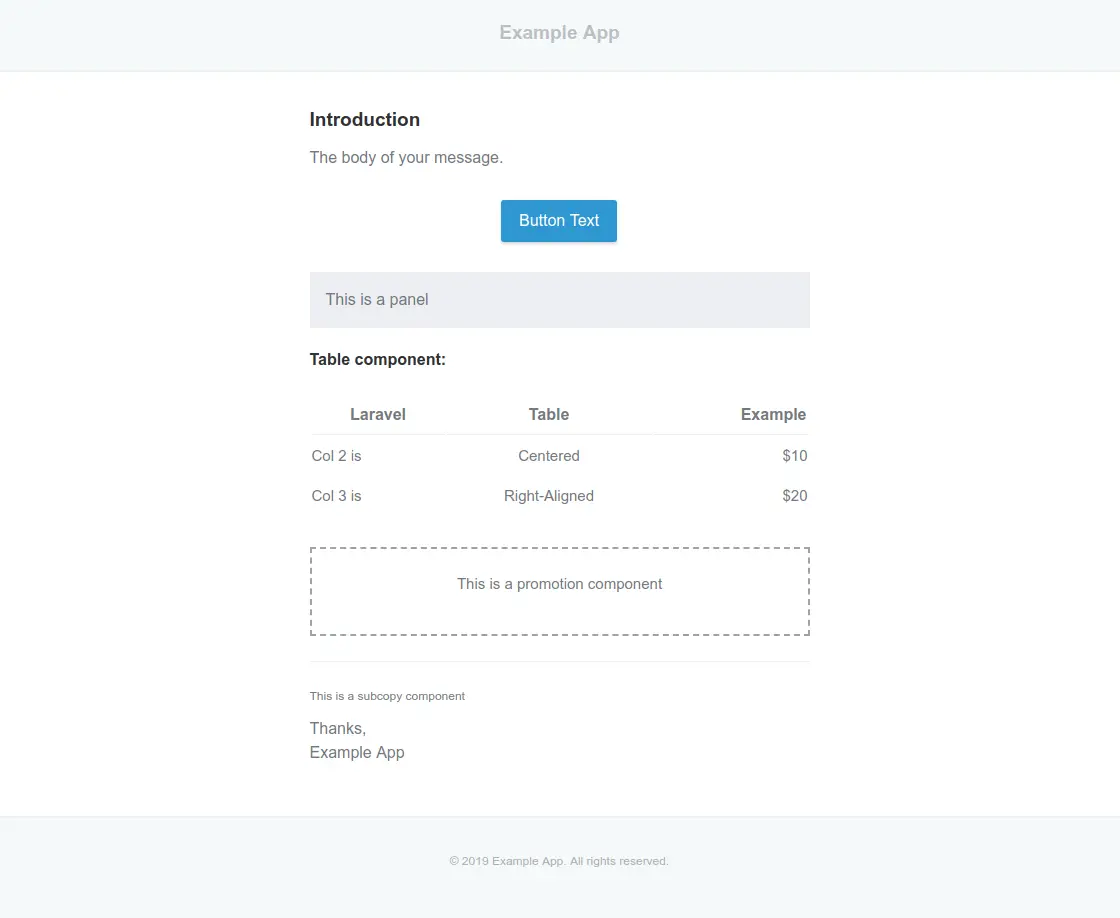
resources/views/emails/sendMailComponent.blade.php
@component('mail::message')
# Introduction

The body of your message.

# Button component:
@component('mail::button', ['url' => ''])
    Button Text
@endcomponent

# Panel component:
@component('mail::panel')
    This is a panel
@endcomponent

# Table component:
@component('mail::table')
    | Laravel       | Table         | Example  |
    | ------------- |:-------------:| --------:|
    | Col 2 is      | Centered      | $10      |
    | Col 3 is      | Right-Aligned | $20      |
@endcomponent

# Promotion component:
@component('mail::promotion')
    This is a promotion component
@endcomponent

# Subcopy component:
@component('mail::subcopy')
    This is a subcopy component
@endcomponent

Thanks,

{{ config('app.name') }}
@endcomponent
Included components
1. button
2. message
3. panel
4. promotion
5. subcopy
6. table
You can run your project by using following command:
php artisan serve
Now open this url:
http://localhost:8000/send-mail
Output:
I hope it can help you...
#Laravel