10-Apr-2023
.
Admin
Hi Dev,
In this article Laravel Dynamic database connection tutorial. Sometimes we need multiple databases in our system to work with and laravel is capable of doing this.
With no more complexity, in this article is pretty easy to implement you will find the exact changes you want to make in your system.
Let’s start implementing dynamic database connection tutorial laravel.
Please follow steps to integrate the laravel database connection.
Step 1 : Create Laravel application
First of all, we need to create fresh Laravel application using Composer command.
So open your terminal OR command prompt and run below command:
composer create-project laravel/laravel demo --prefer-dist
Step 2 : env File
.env File
DB_CONNECTION=mysql
DB_HOST=127.0.0.1
DB_PORT=3306
DB_DATABASE=here your database name(demo)
DB_USERNAME=here database username(root)
DB_PASSWORD=here database password(root)
Step 3 : Database config file
Open this file and you will find this below code.
config/database.php
'mysql' => [
    'driver' => 'mysql',
    'url' => env('DATABASE_URL'),
    'host' => env('DB_HOST', '127.0.0.1'),
    'port' => env('DB_PORT', '3306'),
    'database' => env('DB_DATABASE', 'forge'),
    'username' => env('DB_USERNAME', 'forge'),
    'password' => env('DB_PASSWORD', ''),
    'unix_socket' => env('DB_SOCKET', ''),
    'charset' => 'utf8mb4',
    'collation' => 'utf8mb4_unicode_ci',
    'prefix' => '',
    'prefix_indexes' => true,
    'strict' => true,
    'engine' => null,
    'options' => extension_loaded('pdo_mysql') ? array_filter([
        PDO::MYSQL_ATTR_SSL_CA => env('MYSQL_ATTR_SSL_CA'),
    ]) : [],
],

'mysql2' => [
    'driver' => 'mysql',
    'url' => env('DATABASE_URL'),
    'host' => env('DB_HOST', '127.0.0.1'),
    'port' => env('DB_PORT', '3306'),
    'database' => env('DB_DATABASE', 'forge'),
    'username' => env('DB_USERNAME', 'forge'),
    'password' => env('DB_PASSWORD', ''),
    'unix_socket' => env('DB_SOCKET', ''),
    'charset' => 'utf8mb4',
    'collation' => 'utf8mb4_unicode_ci',
    'prefix' => '',
    'strict' => true,
],
Step 4 : Add Column In Users Table
Run this Command in composer.
php artisan make:migration add_db_name_in_users_table
database/migrations/2021_12_08_071913_add_db_name_in_users_table.php
<?php

use Illuminate\Database\Migrations\Migration;
use Illuminate\Database\Schema\Blueprint;
use Illuminate\Support\Facades\Schema;

class AddDbNameInUsersTable extends Migration
{
    public function up()
    {
        Schema::table('users', function (Blueprint $table) {
            $table->string('db_name');
        });
    }

    public function down()
    {
        Schema::table('users', function (Blueprint $table) {
            $table->dropColumn('db_name');
        });
    }
}
Step 5 : Model
Your application in already create user model simply add this code.
app/Models/Users.php
<?php

namespace App\Models;

use Illuminate\Contracts\Auth\MustVerifyEmail;
use Illuminate\Database\Eloquent\Factories\HasFactory;
use Illuminate\Foundation\Auth\User as Authenticatable;
use Illuminate\Notifications\Notifiable;
use Laravel\Sanctum\HasApiTokens;

class User extends Authenticatable
{
    use HasApiTokens, HasFactory, Notifiable;

    protected $fillable = [
        'name',
        'email',
        'password',
        'db_name',
    ];
}
Step 6 : Add Route
Add code in the route.
routes/web.php
<?php

use Illuminate\Support\Facades\Route;
use App\Http\Controllers\TestController;

Route::get('user', [TestController::class, 'user'])->name('user');
Step 7 : Controller Code
<?php

namespace App\Http\Controllers;

use Illuminate\Http\Request;
use App\Models\User;
use Config;
use Hash;
use DB;

class TestController extends Controller
{
    public function user(Request $request)
    {
        $name = $request->name;
        $user = User::create([
            'name' => $name,
            'email' => $name.'@gmail.com',
            'password' => Hash::make('12345678'),
            'db_name' => $name,
        ]);

        $preDatabase = Config::get('database.connections.mysql.database');
        DB::statement("CREATE DATABASE IF NOT EXISTS $name");

        $new = Config::set('database.connections.mysql.database', $user->db_name);
        DB::purge('mysql');
        DB::reconnect('mysql');
        \Artisan::call('migrate');

        Config::set('database.connections.mysql.database', $preDatabase);
        return dd('create database and user data');
    }
}
step 8 : Run Laravel Development Server
Finally, we need to run the laravel development server, which will help us start the app on the browser. Ensure that you execute the given below command through the command prompt.
php artisan serve
Add the following url on the browser’s address bar and test the app recklessly.
http://localhost:8000/user?name=first_database
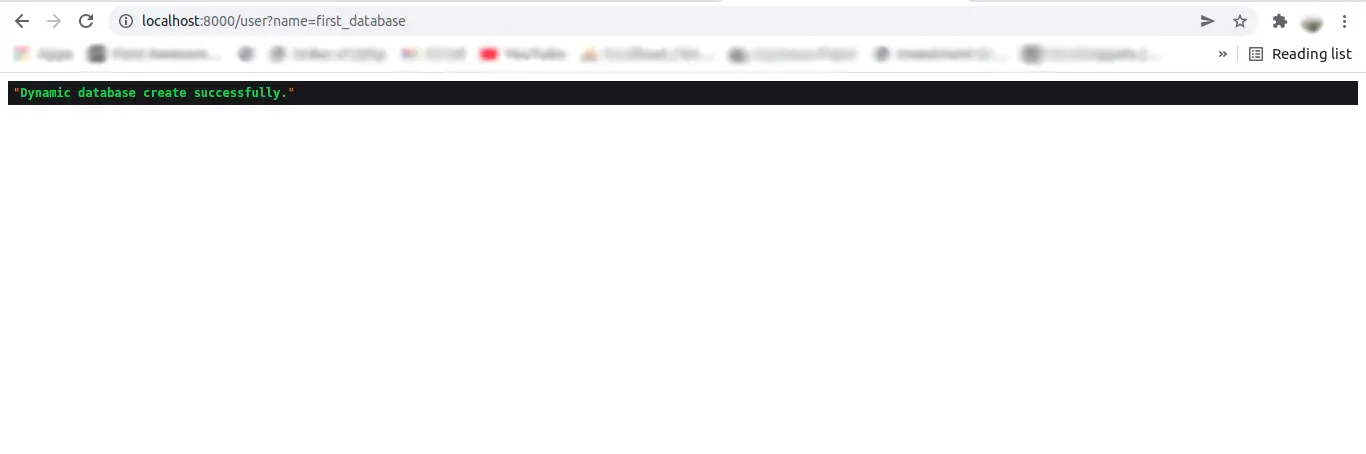
Output :
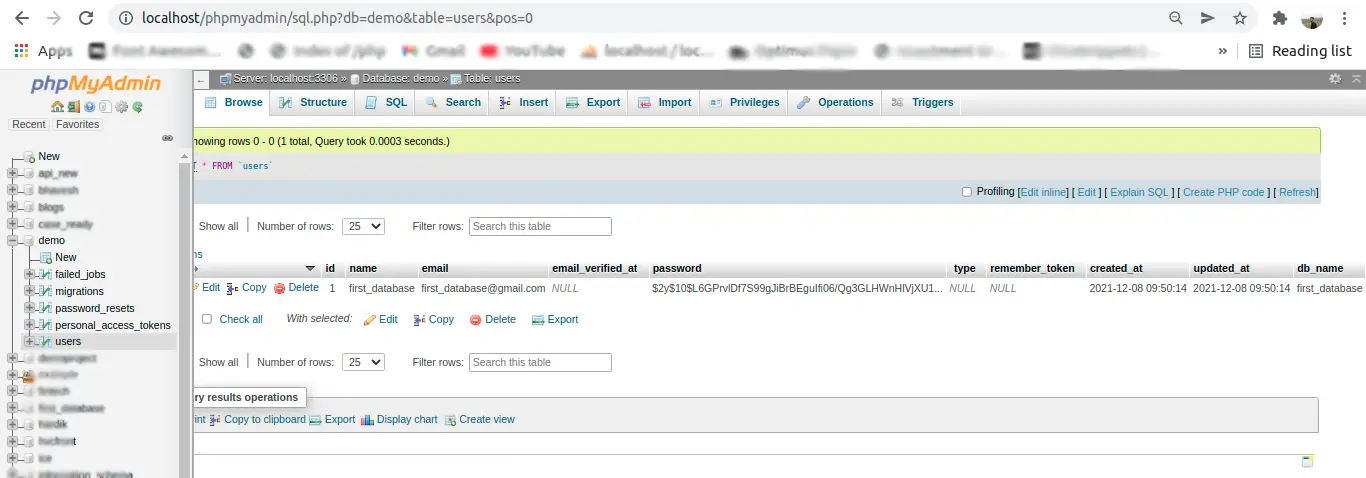
Main database in users table.
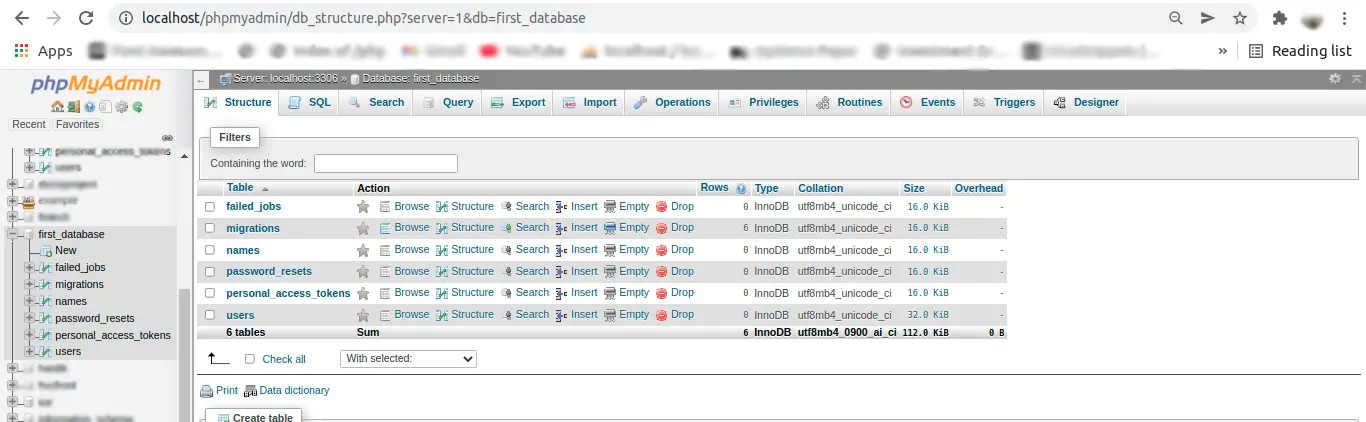
Second database.
I hope it help you...
#Laravel 8
#Laravel 7
#Laravel
#Laravel 6
