10-Apr-2023
.
Admin

Hello Friend,
In this blog, I will show you bootstrap modal form validation in laravel app.We will create a simple ajax form validation using a bootstrap modal in Laravel app. Laravel provides an easy way to validate without ajax.
We all are very familiar with laravel simple validation on post request and handale all validation error after any validation false it is vary easy and very simple. but manage laravel validation in popoup or model without page refresh is little bit hard for new commer in laravel.
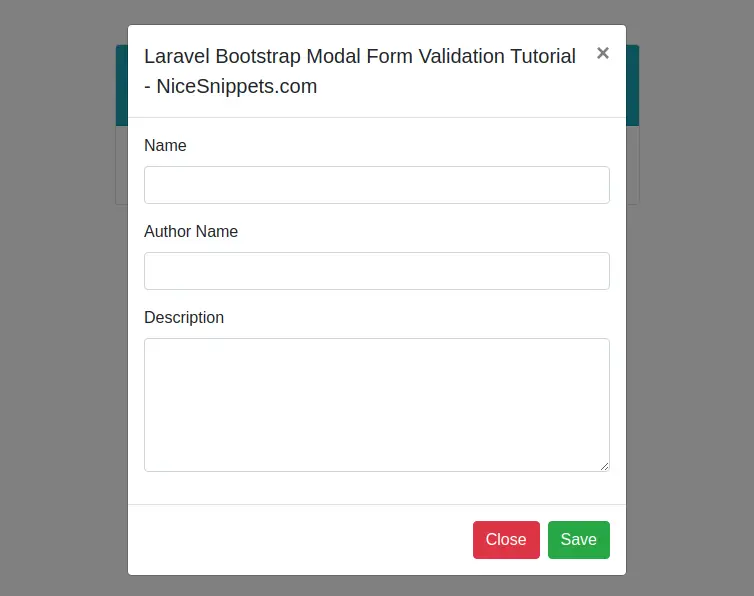
Here, I will full example for laravel bootstrap modal form validation. So Let's see the bellow step and follow step by step.
Step 1 : Install Laravel App
In this step, You can install laravel fresh app. So open terminal and put the bellow command.
composer create-project --prefer-dist laravel/laravel blog
Step 2 : Setup Database Configuration
After successfully install laravel app thenafter configure databse setup. We will open ".env" file and change the database name, username and password in the env file.
DB_CONNECTION=mysql
DB_HOST=127.0.0.1
DB_PORT=3306
DB_DATABASE=Enter_Your_Database_Name
DB_USERNAME=Enter_Your_Database_Username
DB_PASSWORD=Enter_Your_Database_Password
Step 3 : Create Table Migration and Model
In this step we have to create migration for books table and book Model using Laravel php artisan command, so first fire bellow command:
php artisan make:model Book -m
After this command you have to put bellow code in your migration file for create bookd table.
/database/migrations/2020_05_27_100722_create_books_table.php
<?php

use Illuminate\Database\Migrations\Migration;
use Illuminate\Database\Schema\Blueprint;
use Illuminate\Support\Facades\Schema;

class CreateBooksTable extends Migration
{
    /**
     * Run the migrations.
     *
     * @return void
     */
    public function up()
    {
        Schema::create('books', function (Blueprint $table) {
            $table->id();
            $table->string('name');
            $table->string('auther_name');
            $table->longText('description');
            $table->timestamps();
        });
    }

    /**
     * Reverse the migrations.
     *
     * @return void
     */
    public function down()
    {
        Schema::dropIfExists('books');
    }
}
Now we require to run migration be bellow command:
php artisan migrate
After you have to put bellow code in your Book model file for create books table.
app/Book.php
<?php

namespace App;

use Illuminate\Database\Eloquent\Model;

class Book extends Model
{
    protected $fillable = ['name','description','auther_name'];
}
Step 3 : Create Route
now, we need to add route for book controller in laravel application. so open your "routes/web.php" file and add following route.
app/Book.php
Route::get('books','BookController@index');
Route::post('books','BookController@store')->name(books.store);
Step 4 : Create Controller
Here this step now we should create new controller as BookController. So run bellow command and create new controller.
php artisan make:controller BookController
After successfully run above command . So, let's copy bellow code and put on BookController.php file.
app/http/controller/BookController.php
<?php

namespace App\Http\Controllers;

use Illuminate\Http\Request;
use App\Book;

class BookController extends Controller
{
    /**
     * Display a listing of the resource.
     *
     * @return \Illuminate\Http\Response
     */
    public function index()
    {
        return view('book.create');
    }

    /**
     * Store a newly created resource in storage.
     *
     * @param  \Illuminate\Http\Request  $request
     * @return \Illuminate\Http\Response
     */
    public function store(Request $request)
    {
        $validator = \Validator::make($request->all(), [
            'name' => 'required',
            'auther_name' => 'required',
            'description' => 'required',
        ]);

        if ($validator->fails())
        {
            return response()->json(['errors'=>$validator->errors()->all()]);
        }

        $input = $request->all();

        Book::create($input);
        return response()->json(['success'=>'Data is successfully added']);
    }
}
Step 5 : Create Blade File
In last step. In this step we have to create blade file. So mainly we have to create book folder in view directory. So finally you have to create following file and put bellow code:
/resources/views/book/create.blade.php
<!DOCTYPE html>
<html>
<head>
    <title>Laravel Bootstrap Modal Form Validation Example - NiceSnippets.com</title>
    <meta name="_token" content="{{csrf_token()}}" />
    <link rel="stylesheet" href="https://cdnjs.cloudflare.com/ajax/libs/twitter-bootstrap/4.5.0/css/bootstrap.min.css" integrity="sha256-aAr2Zpq8MZ+YA/D6JtRD3xtrwpEz2IqOS+pWD/7XKIw=" crossorigin="anonymous" />
    <script src="https://cdnjs.cloudflare.com/ajax/libs/jquery/3.5.1/jquery.min.js" integrity="sha256-9/aliU8dGd2tb6OSsuzixeV4y/faTqgFtohetphbbj0=" crossorigin="anonymous"></script>
    <script src="https://cdnjs.cloudflare.com/ajax/libs/twitter-bootstrap/4.5.0/js/bootstrap.min.js" integrity="sha256-OFRAJNoaD8L3Br5lglV7VyLRf0itmoBzWUoM+Sji4/8=" crossorigin="anonymous"></script>
</head>
<body>
    <div class="container">
        <div class="col-md-8 offset-2 mt-5">
            <div class="card">
                <div class="card-header bg-info">
                    <h5 class="text-white text-center">Laravel Bootstrap Modal Form Validation Example - NiceSnippets.com</h5>
                </div>
                <div class="card-body">
                    <button type="button" class="btn btn-primary" data-toggle="modal" data-target="#exampleModal">
                      Open Form
                    </button>
                </div>
            </div>
        </div>
    </div>
    <!-- Button trigger modal -->

    <!-- Modal -->
    <div class="modal fade" id="exampleModal" tabindex="-1" role="dialog" aria-labelledby="exampleModalLabel" aria-hidden="true">
        <div class="modal-dialog" role="document">
            <div class="modal-content">
                <div class="modal-header">
                    <h5 class="modal-title" id="exampleModalLabel">Laravel Bootstrap Modal Form Validation Example - NiceSnippets.com</h5>
                    <button type="button" class="close" data-dismiss="modal" aria-label="Close">
                        <span aria-hidden="true">×</span>
                    </button>
                </div>
                <div class="modal-body">
                    <div class="alert alert-danger" style="display:none"></div>
                    <form class="image-upload" method="post" action="{{ route('books.store') }}" enctype="multipart/form-data">
                        @csrf
                        <div class="form-group">
                            <label>Name</label>
                            <input type="text" name="name" id="name" class="form-control"/>
                        </div>
                        <div class="form-group">
                            <label>Author Name</label>
                            <input type="text" name="auther_name" id="auther_name" class="form-control"/>
                        </div>
                        <div class="form-group">
                            <label>Description</label>
                            <textarea name="description" class="textarea form-control" id="description" cols="40" rows="5"></textarea>
                        </div>
                    </form>
                </div>
                <div class="modal-footer">
                    <button type="button" class="btn btn-danger" data-dismiss="modal">Close</button>
                    <button type="button" class="btn btn-success" id="formSubmit">Save</button>
                </div>
            </div>
        </div>
    </div>
    <script>
        $(document).ready(function(){
            $('#formSubmit').click(function(e){
                e.preventDefault();
                $.ajaxSetup({
                    headers: {
                        'X-CSRF-TOKEN': $('meta[name="_token"]').attr('content')
                    }
                });
                $.ajax({
                    url: "{{ url('/books') }}",
                    method: 'post',
                    data: {
                        name: $('#name').val(),
                        auther_name: $('#auther_name').val(),
                        description: $('#description').val(),
                    },
                    success: function(result){
                        if(result.errors)
                        {
                            $('.alert-danger').html('');

                            $.each(result.errors, function(key, value){
                                $('.alert-danger').show();
                                $('.alert-danger').append('<li>'+value+'</li>');
                            });
                        }
                        else
                        {
                            $('.alert-danger').hide();
                            $('#exampleModal').modal('hide');
                        }
                    }
                });
            });
        });
    </script>
</body>
</html>
Now we are ready to run our example so run bellow command for quick run:
php artisan serve
Now you can open bellow URL on your browser:
http://localhost:8000/books
It will help you...
#Laravel 7
#Laravel
#Laravel 6