04-Apr-2023
.
Admin
Hi Guys,
I am going to show you example of react native material bottom tab navigation example. We will use how to implement material bottom tab navigation in react native. we will help you to give example of how to use material bottom tab navigation in react native. you will learn material bottom tab navigation example in react native. You just need to some steps to done how to create material bottom tab navigation in react native.
A material-design-themed tab bar on the bottom of the screen that lets you switch between different routes with animation. Routes are lazily initialized - their screen components are not mounted until they are first focused.
In this example, there are 3 screens (Home, Cart, and Images) defined using the Tab.Screen component. Similarly, you can define as many screens as you like.
Step 1: Download Project
In the first step run the following command to create a project.
expo init MaterialBottomTabNavigation
Step 2: Installation and Setup
First, you need to install them in your project:
npm install @react-navigation/native
after all you need to install material bottom tab navigation:
npm install @react-navigation/material-bottom-tabs react-native-paper
you can set material bottom tab icon to install vector icons:
npm i react-native-vector-icons
you have use any bundled Icon:
import this:
import Icon from 'react-native-vector-icons/FontAwesome5';
Step 3: App.js
Now, you need to wrap the whole app in NavigationContainer. Usually, you'd do this in your entry file, such as App.js:
In this step, You will open the App.js file and put the code.
import React from 'react';
import { NavigationContainer } from '@react-navigation/native';
import { createMaterialBottomTabNavigator } from '@react-navigation/material-bottom-tabs';
import { StyleSheet, Text, View } from 'react-native';
import Icon from 'react-native-vector-icons/FontAwesome5';

const HomeScreen = () => {
    return (
        <View style={styles.container}>
            <Text style={styles.text}>HomeScreen</Text>
        </View>
    );
}

const CartScreen = () => {
    return (
        <View style={styles.container}>
            <Text style={styles.text}>CartScreen</Text>
        </View>
    );
}

const ImageScreen = () => {
    return (
        <View style={styles.container}>
            <Text style={styles.text}>ImageScreen</Text>
        </View>
    );
}

const Tab = createMaterialBottomTabNavigator();

const App = () => {
    return (
        <NavigationContainer>
            <Tab.Navigator>
                <Tab.Screen
                    name='Home'
                    component={HomeScreen}
                    options={{
                        tabBarIcon: ({ color }) => (
                            <Icon name='home' color={color} size={20} />
                        ),
                    }}
                />
                <Tab.Screen
                    name='Cart'
                    component={CartScreen}
                    options={{
                        tabBarIcon: ({ color }) => (
                            <Icon name='shopping-cart' color={color} size={20} />
                        ),
                    }}
                />
                <Tab.Screen
                    name='Image'
                    component={ImageScreen}
                    options={{
                        tabBarIcon: ({ color }) => (
                            <Icon name='images' color={color} size={20} />
                        ),
                    }}
                />
            </Tab.Navigator>
        </NavigationContainer>
    );
}

const styles = StyleSheet.create({
    container: {
        flex: 1,
        justifyContent: 'center',
        alignItems: 'center',
    },
    text: {
        fontSize: 20,
    }
});

export default App;
Run Project
In the last step run your project using the below command.
expo start
You can QR code scan in Expo Go Application on mobile.
Output :
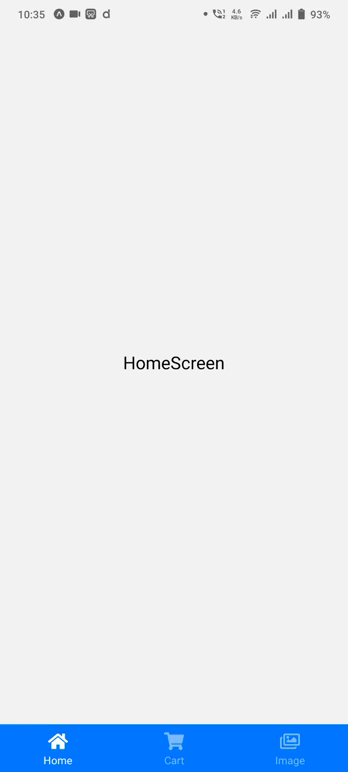
It will help you...
#React Native