10-Apr-2023
.
Admin
Hello Friends,
Today, I will let you know an example of the laravel botman chatbot tutorial example. I explained simply about the laravel chatbot tutorial. Here you will learn the laravel botman tutorial. This article will give you a simple example of building a chatbot with laravel and botman pdf. So, let's follow a few steps to create an example of botman chatbot laravel example.
In this tutorial, I would like to show you how to create a simple chatbot using botman in your existing laravel 5.8 application. we will install botman with laravel and you can easily use web driver, facebook driver, telegram driver, slack driver, hip chat driver, etc. we will use web driver for creating a very simple botman chatbot in laravel 5, laravel 6, laravel 7, laravel 8 and laravel 9 application.
Chatbots are popular in today's technology. everyone wants to put chatbots on his website because we can easily integrate command faq questions and users can ask simple questions regarding our website.
there are several bots are available in the market. some company has their own bot. but almost are paid so I will prefer to use botman which is an open-source chatbot with laravel. you can easily integrate with laravel too.
Bellow I listed some steps to create very simple examples to build a chatbot with your existing laravel application. so let's follow a few steps to get botman chatbot with your app.
Step 1: Install Laravel
first of all we need to get a fresh Laravel version application using the bellow command, So open your terminal OR command prompt and run the bellow command:
composer create-project laravel/laravel example-app
Step 2: Install Botman and Botman Driver
In this step we will install the botman composer package and also install the botman web driver. so we need to run the following commands to install botman.
Install Botman:
composer require botman/botman
Install Botman Driver:
composer require botman/driver-web
Step 3: Create Configuration File
This step is not required to follow. But you can create a configuration file for the driver and cache. so let's create a bot file on the config folder and write code like I gave you below:
config/botman/config.php
<?php

return [

    'conversation_cache_time' => 40,

    'user_cache_time' => 30,
];
config/botman/web.php
<?php

return [

    'matchingData' => [
        'driver' => 'web',
    ],
];
Step 4: Create Routes
Here, we need to add create routes for botman requests. so open your "routes/web.php" file and add the following route.
routes/web.php
<?php

use Illuminate\Support\Facades\Route;
use App\Http\Controllers\BotManController;

/*
|--------------------------------------------------------------------------
| Web Routes
|--------------------------------------------------------------------------
|
| Here is where you can register web routes for your application. These
| routes are loaded by the RouteServiceProvider within a group which
| contains the "web" middleware group. Now create something great!
|
*/

Route::get('/', function () {
    return view('welcome');
});

Route::match(['get', 'post'], '/botman', 'BotManController@handle');
Step 5: Create Controller
In this step, we need to create one controller as BotManController. in this controller we need to write the code of botman reply and conversation. you can also write your own logic later.
php artisan make:controller BotManController
app/Http/Controllers/BotManController.php
<?php

namespace App\Http\Controllers;

use BotMan\BotMan\BotMan;
use Illuminate\Http\Request;
use BotMan\BotMan\Messages\Incoming\Answer;

class BotManController extends Controller
{
    /**
     * Place your BotMan logic here.
     */
    public function handle()
    {
        $botman = app('botman');

        $botman->hears('{message}', function($botman, $message) {

            if ($message == 'hi') {
                $this->askName($botman);
            }
            else{
                $botman->reply("write 'hi' for testing...");
            }

        });

        $botman->listen();
    }

    /**
     * Place your BotMan logic here.
     */
    public function askName($botman)
    {
        $botman->ask('Hello! What is your Name?', function(Answer $answer) {

            $name = $answer->getText();

            $this->say('Nice to meet you '.$name);

        });
    }
}
Step 6: Update Blade File
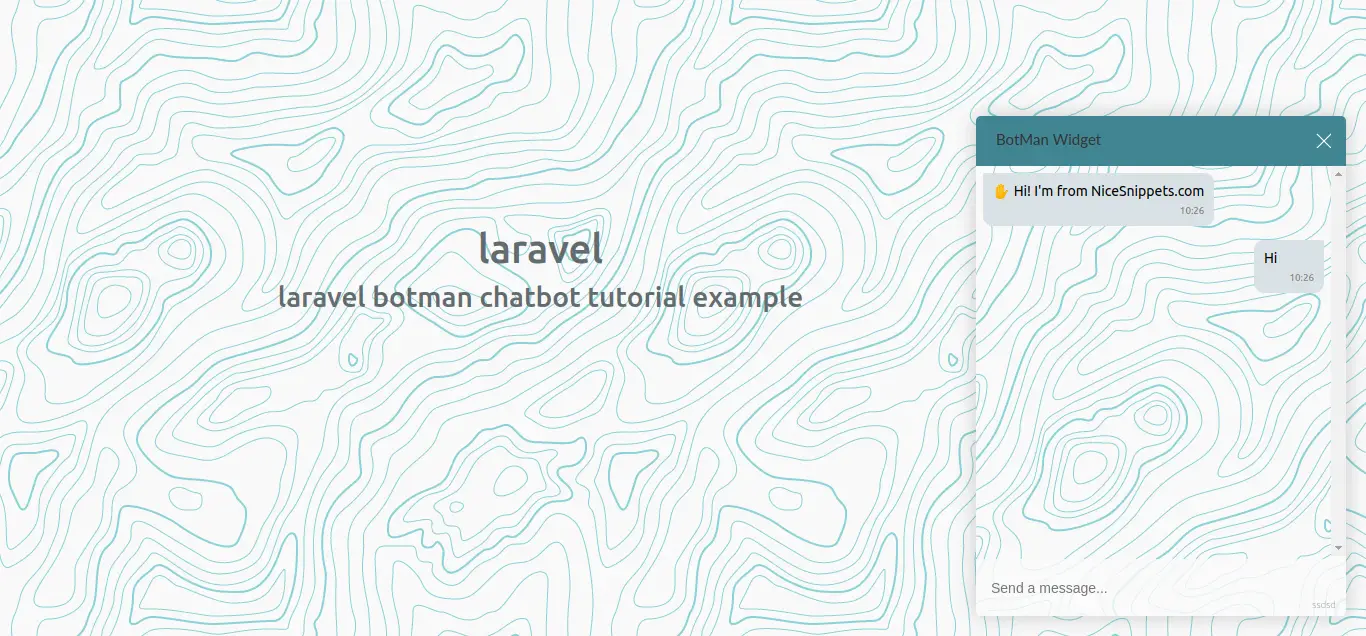
In this file, we need to update some code on the welcome blade file. we need to add the botman widget in the welcome.blade.php file.
resources/views/welcome.blade.php
<!doctype html>
<html>
    <head>
        <meta charset="utf-8">
        <meta name="viewport" content="width=device-width, initial-scale=1">
        <title>Laravel Botman Chatbot Tutorial Example - NiceSnippets.com</title>
        <link href="https://fonts.googleapis.com/css?family=Nunito:200,600" rel="stylesheet">
        <link href="https://cdn.jsdelivr.net/npm/bootstrap@5.0.2/dist/css/bootstrap.min.css" rel="stylesheet" integrity="sha384-EVSTQN3/azprG1Anm3QDgpJLIm9Nao0Yz1ztcQTwFspd3yD65VohhpuuCOmLASjC" crossorigin="anonymous">
        <style>
            html, body {
                background-color: #fff;
                color: #636b6f;
                font-family: 'Nunito', sans-serif;
                font-weight: 200;
                height: 100vh;
                margin: 0;
            }
            .title h1{
                font-size: 40px;
                padding-top: 225px;
            }
        </style>
    </head>
    <body>
        <div class="container">
            <div class="row">
                <div class="col-md-9 title text-center">
                    <h1>laravel</h1>
                    <h2>laravel botman chatbot tutorial example</h2>
                </div>
            </div>
        </div>
    </body>

    <link rel="stylesheet" type="text/css" href="https://cdn.jsdelivr.net/npm/botman-web-widget@0/build/assets/css/chat.min.css">
    <script>
        var botmanWidget = {
            aboutText: 'ssdsd',
            introMessage: "✋ Hi! I'm from NiceSnippets.com"
        };
    </script>

    <script src='https://cdn.jsdelivr.net/npm/botman-web-widget@0/build/js/widget.js'></script>

</html>
Start Development Server
Start the development server. Use the PHP artisan serve command and start your server:
php artisan serve
Now you are ready to run our example so run the below command to quick run.
http://localhost:8000
We can also use some tutorials from here: Botman.
You can download code from git:Download Code from Github
I hope it can help you...
#Laravel