10-Mar-2023
.
Admin
Hi Dev,
In this tutorial, I will explain you how to add TinyMCE editor in laravel app. One good thing about tinymce is that it is very light weight and can be easily used across any website.
TinyMCE is same as CKeditor different is layout and many features available in TinyMCE editor. Our laravel app support TinyMCE editor.It is very easy to integrate tinymce in laravel.
When we need to store long text, article content, product summary, and different tag content with the description in our database we use the WYSIWYG HTML editors.
Laravel provide free editor The WYSIWYG TinyMCE editor. So let’s follow the below steps through add TinyMCE in Laravel.
Step 1 : Install Laravel App
In this step, You can install laravel fresh app. So open terminal and put the bellow command.
composer create-project --prefer-dist laravel/laravel blog
Step 2 : Setup Database Configuration
After successfully install laravel app thenafter configure databse setup. We will open ".env" file and change the database name, username and password in the env file.
DB_CONNECTION=mysql
DB_HOST=127.0.0.1
DB_PORT=3306
DB_DATABASE=Enter_Your_Database_Name
DB_USERNAME=Enter_Your_Database_Username
DB_PASSWORD=Enter_Your_Database_Password
Step 3 : Create Table Migration and Model
In this step we have to create migration for books table and book Model using Laravel php artisan command, so first fire bellow command:
php artisan make:model Book -m
After this command you have to put bellow code in your migration file for create bookd table.
/database/migrations/2020_05_27_100722_create_books_table.php
<?php

use Illuminate\Database\Migrations\Migration;
use Illuminate\Database\Schema\Blueprint;
use Illuminate\Support\Facades\Schema;

class CreateBooksTable extends Migration
{
    /**
     * Run the migrations.
     *
     * @return void
     */
    public function up()
    {
        Schema::create('books', function (Blueprint $table) {
            $table->id();
            $table->string('name');
            $table->longText('description');
            $table->string('auther_name');
            $table->timestamps();
        });
    }

    /**
     * Reverse the migrations.
     *
     * @return void
     */
    public function down()
    {
        Schema::dropIfExists('books');
    }
}
Now we require to run migration be bellow command:
php artisan migrate
After you have to put bellow code in your Book model file for create books table.
app/Book.php
<?php

namespace App;

use Illuminate\Database\Eloquent\Model;

class Book extends Model
{
    protected $fillable = ['name','description','auther_name'];
}
Step 3 : Create Route
now, we need to add route for book controller in laravel application. so open your "routes/web.php" file and add following route.
app/Book.php
Route::get('books','BookController@index');
Route::post('books','BookController@store')->name(books.store);
Route::get('books/{id}','BookController@show')->name(books.show);
Step 4 : Create Controler
Here this step now we should create new controller as BookController. So run bellow command and create new controller.
php artisan make:controller BookController
After successfully run above command . So, let's copy bellow code and put on BookController.php file.
app/http/controller/BookController.php
<?php

namespace App\Http\Controllers;

use Illuminate\Http\Request;
use App\Book;

class BookController extends Controller
{
    /**
     * Display a listing of the resource.
     *
     * @return \Illuminate\Http\Response
     */
    public function index()
    {
        return view('book.create');
    }

    /**
     * Store a newly created resource in storage.
     *
     * @param  \Illuminate\Http\Request  $request
     * @return \Illuminate\Http\Response
     */
    public function store(Request $request)
    {
        $input = $request->all();
        Book::create($input);
        return redirect()->back();
    }

    /**
     * Display the specified resource.
     *
     * @param  int  $id
     * @return \Illuminate\Http\Response
     */
    public function show(Book $book)
    {
        return view('book.show',compact('book'));
    }
}
Step 5 : Create Blade File
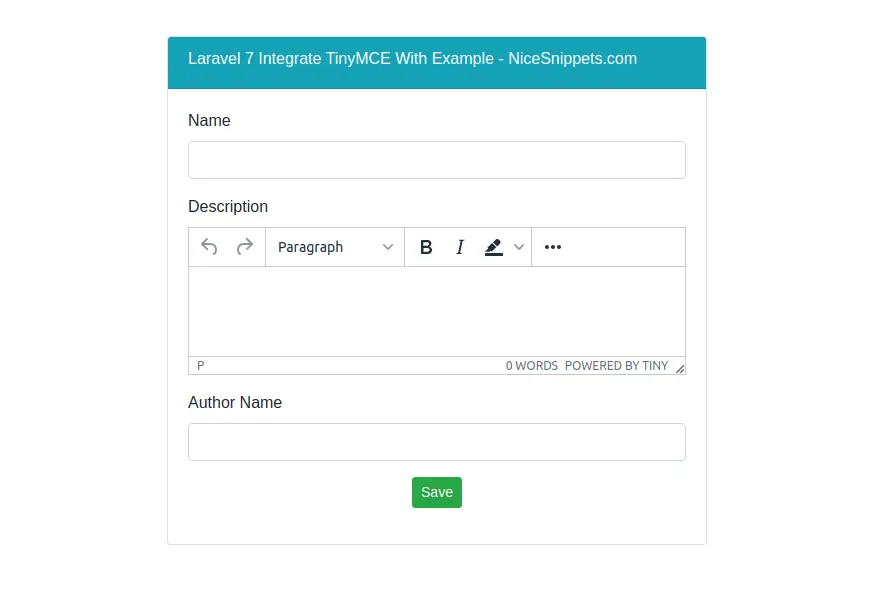
In last step. In this step we have to create two blade file. So mainly we have to create book folder in view directory. First file is create and second one is show file. So finally you have to create following file and put bellow code:
/resources/views/book/create.blade.php
<!DOCTYPE html>
<html>
<head>
    <title>How To Use TinyMCE Editor In Laravel ? - NiceSnippets.com</title>
    <script src="https://cdnjs.cloudflare.com/ajax/libs/jquery/3.5.1/jquery.min.js" integrity="sha256-9/aliU8dGd2tb6OSsuzixeV4y/faTqgFtohetphbbj0=" crossorigin="anonymous"></script>
    <link rel="stylesheet" href="https://cdnjs.cloudflare.com/ajax/libs/twitter-bootstrap/4.5.0/css/bootstrap.min.css" integrity="sha256-aAr2Zpq8MZ+YA/D6JtRD3xtrwpEz2IqOS+pWD/7XKIw=" crossorigin="anonymous" />
    <script src="https://cdnjs.cloudflare.com/ajax/libs/twitter-bootstrap/4.5.0/js/bootstrap.min.js" integrity="sha256-OFRAJNoaD8L3Br5lglV7VyLRf0itmoBzWUoM+Sji4/8=" crossorigin="anonymous"></script>
</head>
<body>
    <div class="container">
        <div class="row">
            <div class="col-md-12">
                <div id="showimages"></div>
            </div>
            <div class="col-md-6 offset-3 mt-5">
                <div class="card">
                    <div class="card-header bg-info">
                        <h6 class="text-white">How To Use TinyMCE Editor In Laravel ? - NiceSnippets.com</h6>
                    </div>
                    <div class="card-body">
                        <form class="image-upload" method="post" action="{{ route('books.store') }}" enctype="multipart/form-data">
                            @csrf
                            <div class="form-group">
                                <label>Name</label>
                                <input type="text" name="name" class="form-control"/>
                            </div>
                            <div class="form-group">
                                <label>Description</label>
                                <textarea name="description" rows="5" cols="40" class="form-control tinymce-editor"></textarea>
                            </div>
                            <div class="form-group">
                                <label>Author Name</label>
                                <input type="text" name="auther_name" class="form-control"/>
                            </div>
                            <div class="form-group text-center">
                                <button type="submit" class="btn btn-success btn-sm">Save</button>
                            </div>
                        </form>
                    </div>
                </div>
            </div>
        </div>
    </div>
    <script src="https://code.jquery.com/jquery-3.2.1.min.js"></script>
    <script src="https://maxcdn.bootstrapcdn.com/bootstrap/4.0.0-beta/js/bootstrap.min.js" type="text/javascript"></script>
    <script src="https://cdn.tiny.cloud/1/no-api-key/tinymce/5/tinymce.min.js" referrerpolicy="origin"></script>
    <script type="text/javascript">
        tinymce.init({
            selector: 'textarea.tinymce-editor',
            height: 100,
            menubar: false,
            plugins: [
                'advlist autolink lists link image charmap print preview anchor',
                'searchreplace visualblocks code fullscreen',
                'insertdatetime media table paste code help wordcount'
            ],
            toolbar: 'undo redo | formatselect | ' +
                'bold italic backcolor | alignleft aligncenter ' +
                'alignright alignjustify | bullist numlist outdent indent | ' +
                'removeformat | help',
            content_css: '//www.tiny.cloud/css/codepen.min.css'
        });
    </script>
</body>
</html>
/resources/views/book/show.blade.php
<!DOCTYPE html>
<html>
<head>
    <title>How To Use TinyMCE Editor In Laravel ? - NiceSnippets.com</title>
    <script src="https://cdnjs.cloudflare.com/ajax/libs/jquery/3.5.1/jquery.min.js" integrity="sha256-9/aliU8dGd2tb6OSsuzixeV4y/faTqgFtohetphbbj0=" crossorigin="anonymous"></script>
    <link rel="stylesheet" href="https://cdnjs.cloudflare.com/ajax/libs/twitter-bootstrap/4.5.0/css/bootstrap.min.css" integrity="sha256-aAr2Zpq8MZ+YA/D6JtRD3xtrwpEz2IqOS+pWD/7XKIw=" crossorigin="anonymous" />
    <script src="https://cdnjs.cloudflare.com/ajax/libs/twitter-bootstrap/4.5.0/js/bootstrap.min.js" integrity="sha256-OFRAJNoaD8L3Br5lglV7VyLRf0itmoBzWUoM+Sji4/8=" crossorigin="anonymous"></script>
</head>
<body>
    <div class="container">
        <div class="row">
            <div class="col-md-12">
                <div id="showimages"></div>
            </div>
            <div class="col-md-6 offset-3 mt-5">
                <div class="card">
                    <div class="card-header bg-info">
                        <h6 class="text-white">How To Use TinyMCE Editor In Laravel ? - NiceSnippets.com</h6>
                    </div>
                    <div class="card-body">
                        <table class="table table-bordered">
                            <tr>
                                <th>No.</th>
                                <th>Name</th>
                                <th>Author Name</th>
                                <th>Description</th>
                            </tr>
                            <tr>
                                <td>{{ $book->id }}</td>
                                <td>{{ $book->name }}</td>
                                <td>{{ $book->auther_name }}</td>
                                <td>{!! $book->description !!}</td>
                            </tr>
                        </table>
                    </div>
                </div>
            </div>
        </div>
    </div>
</body>
</html>
Now we are ready to run our example so run bellow command for quick run:
php artisan serve
Now you can open bellow URL on your browser:
http://localhost:8000/books
It will help you...
#Laravel 7
#Laravel
#Laravel 6