04-Apr-2023
.
Admin

Hi Guys,
This simple article demonstrates of how to create stack with bottom tab navigation in react native. I would like to share with you how to use stack with bottom tab navigation in react native. you can understand a concept of react native stack with bottom tab navigation example. you can understand a concept of stack with bottom tab navigation example in react native. Follow bellow tutorial step of react native navigation example.
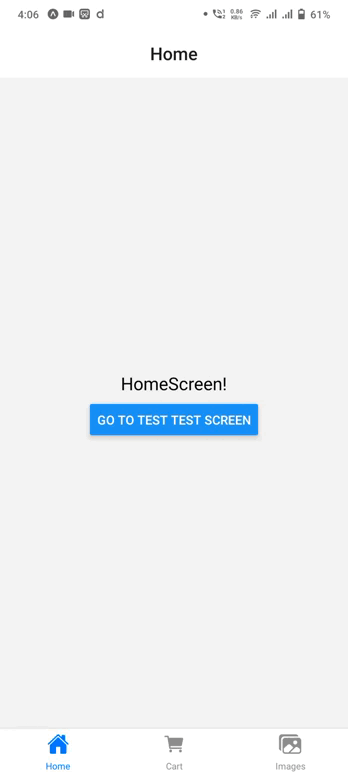
In this example, there are 3 screens (Home, Cart, and Images ) defined using the Tab.Screen component and 1 screen (Test) defined using the Stack.screen component. Similarly, you can define as many screens as you like.
Step 1: Download Project
In the first step run the following command to create a project.
expo init BottomTabStack
Step 2: Installation and Setup
First, you need to install them in your project:
npm install @react-navigation/native @react-navigation/stack @react-navigation/bottom-tabs
You also need to install react-native-gesture-handler.
npm install react-native-gesture-handler
you can set drawer icon to install vector icons:
npm i react-native-vector-icons
you have use any bundled Icon:
import this:
import Icon from 'react-native-vector-icons/Ionicons';
Step 3: HomeScreen.js
first of all you have create Screens folder inside your project.in this folder create HomeScreen.js file
In this step, You will open the HomeScreen.js file and put the code.
Screens/HomeScreen.js
import React from 'react';
import { StyleSheet, Text, View, Button } from 'react-native';

const HomeScreen = (props) => {

    const gotoTestStackScreen = () => {
        props.navigation.navigate('Test');
    };

    return (
        <View style={styles.container}>
            <View>
                <Text style={styles.text}>HomeScreen!</Text>
            </View>
            <Button title="Go to test test screen" onPress={gotoTestStackScreen} />
        </View>
    );
}

const styles = StyleSheet.create({
    container: {
        flex: 1,
        justifyContent: 'center',
        alignItems: 'center',
    },
    text: {
        fontSize: 20,
        marginBottom: 10,
    },
});

export default HomeScreen;
Step 4: CartScreen.js
Next,create CartScreen.js file inside Screens folder
In this step, You will open the CartScreen.js file and put the code.
Screens/CartScreen.js
import React from 'react';
import { StyleSheet, Text, View } from 'react-native';

const CartScreen = () => {
    return (
        <View style={styles.container}>
            <Text style={styles.text}>CartScreen</Text>
        </View>
    );
}

const styles = StyleSheet.create({
    container: {
        flex: 1,
        justifyContent: 'center',
        alignItems: 'center',
    },
    text: {
        fontSize: 20,
    },
});

export default CartScreen;
Step 5: ImageScreen.js
Next,create ImageScreen.js file inside Screens folder
In this step, You will open the ImageScreen.js file and put the code.
Screens/ImageScreen.js
import React from 'react';
import { StyleSheet, Text, View } from 'react-native';

const ImageScreen = () => {
    return (
        <View style={styles.container}>
            <Text style={styles.text}>ImageScreen</Text>
        </View>
    );
}

const styles = StyleSheet.create({
    container: {
        flex: 1,
        justifyContent: 'center',
        alignItems: 'center',
    },
    text: {
        fontSize: 20,
    },
});

export default ImageScreen;
Step 6: TestScreen.js
Next,create TestScreen.js file inside Screens folder
In this step, You will open the TestScreen.js file and put the code.
import React from 'react';
import { StyleSheet, Text, View } from 'react-native';

const TestScreen = () => {
    return (
        <View style={styles.container}>
            <Text style={styles.text}>TestScreen</Text>
        </View>
    );
}

const styles = StyleSheet.create({
    container: {
        flex: 1,
        justifyContent: 'center',
        alignItems: 'center',
    },
    text: {
        fontSize: 20,
    },
});

export default TestScreen;
Step 7: App.js
Now, you need to wrap the whole app in NavigationContainer. Usually, you'd do this in your entry file, such as App.js:
In this step, You will open the App.js file and put the code.
import * as React from 'react';
import { NavigationContainer } from '@react-navigation/native';
import { createStackNavigator } from '@react-navigation/stack';
import { createBottomTabNavigator } from '@react-navigation/bottom-tabs';
import Icon from 'react-native-vector-icons/Ionicons';

import HomeScreen from './Screens/HomeScreen';
import CartScreen from './Screens/CartScreen';
import ImageScreen from './Screens/ImageScreen';
import TestScreen from './Screens/TestScreen';

const Tab = createBottomTabNavigator();

const MyTabs = () => {
    return (
        <Tab.Navigator
            screenOptions={{
                headerTitleAlign: 'center',
            }}
        >
            <Tab.Screen
                name="Home"
                component={HomeScreen}
                options={{
                    tabBarIcon:({ size, color }) => (
                        <Icon name='home' size={size} color={color}  />
                    ),
                }}
            />
            <Tab.Screen
                name="Cart"
                component={CartScreen}
                options={{
                    tabBarIcon:({ size, color }) => (
                        <Icon name='cart' size={size}  color={color} />
                    ),
                }}
            />
            <Tab.Screen
                name="Images"
                component={ImageScreen}
                options={{
                    tabBarIcon:({ size, color }) => (
                        <Icon name='images' size={size}  color={color} />
                    ),
                }}
            />
        </Tab.Navigator>
    );
}

const Stack = createStackNavigator();

const App = () => {
    return (
        <NavigationContainer>
            <Stack.Navigator
                initialRouteName="Tabs"
                screenOptions={{
                    headerShown: false,
                }}
            >
                <Stack.Screen
                    name="Test"
                    component={TestScreen}
                    options={{
                        headerShown: true,
                    }}
                />
                <Stack.Screen name="Tabs" component={MyTabs} />
            </Stack.Navigator>
        </NavigationContainer>
    );
}

export default App;
Run Project
In the last step run your project using the below command.
expo start
You can QR code scan in Expo Go Application on mobile.
Output :
It will help you...
#React Native