04-Apr-2023
.
Admin
Hi Guys,
In this example, you will learn how to create dynamic dropdown in react native. we will help you to give example of react native dynamic dropdown example. I would like to show you how to implement dynamic dropdown in react native. this example will help you dynamic dropdown example in react native. You just need to some step to done how to use dynamic dropdown in react native.
Let's start following example:
Step 1: Download Project
In the first step run the following command to create a project.
expo init ExampleApp
Step 2: Install Axios
First, you need to install axois them in your project:
npm install axios
Step 3: Install Dropdown
In this step, you need to install dropdown them in your project:
npm install react-native-element-dropdown --save
You install vector icons to set the icon in the Dropdown:
npm i react-native-vector-icons
You have use any bundled Icon:
import this:
import AntDesign from 'react-native-vector-icons/AntDesign';
Step 4: App.js
In this step, You will open the App.js file and put the code.
import React, { useState, useEffect } from 'react';
import { Button, ScrollView, StatusBar, StyleSheet, Text, View } from 'react-native';
import { Dropdown } from 'react-native-element-dropdown';
import { TextInput } from 'react-native-paper';
import AntDesign from 'react-native-vector-icons/AntDesign';
import axios from 'axios';

const App = () => {

    // TextInput Field Hooks
    const [title, setTitle] = useState('');
    const [category_id, setCategoryId] = useState('');
    const [description, setDescription] = useState('');
    const [category, setCategory] = useState([]);
    const [Focus, setFocus] = useState(false);
    const [loading, setLoading] = useState(true);

    // Store Data
    const [post, setPost] = useState([]);
    const [sucessMsg, setSucessMsg] = useState('');

    // Validation Error Hooks
    const [categoryIdErr, setCategoryIdErr] = useState(null);
    const [titleErr, setTitleErr] = useState(null);
    const [descriptionErr, setDescriptionErr] = useState(null);

    useEffect(() => {
        setLoading(true);
        axios.get('//nicesnippets.com/api/post/create')
            .then(response => {
                var count = Object.keys(response.data).length;
                let dropDownData = [];
                for (var i = 0; i < count; i++) {
                    dropDownData.push({ value: response.data[i].id, label: response.data[i].name }); // Create your array of data
                }
                setCategory(dropDownData);
            }).catch(error => {
                console.log(error.response);
            }).finally(() => setLoading(false));
    }, []);

    const createPostHandler = () => {
        setLoading(true);
        axios.post('//nicesnippets.com/api/post', {
            category_id,
            title,
            description,
        }).then(response => {
            console.log(response.data);
            setPost(response.data.post);
            setSucessMsg(response.data.message);
        }).catch(error => {
            setCategoryIdErr(error.response.data.errors.category_id);
            setTitleErr(error.response.data.errors.title);
            setDescriptionErr(error.response.data.errors.description);
            console.log(error.response);
        }).finally(() => setLoading(false));
    }

    return (
        <ScrollView style={styles.container}>
            <View style={styles.container}>
                <View style={styles.innerContainer}>
                    <Text style={[styles.success, sucessMsg ? styles.bgSuccess: null  ]}>{sucessMsg}</Text>
                    <Dropdown
                        data={category}
                        style={[styles.dropdown, Focus && { borderColor: 'blue' }]}
                        placeholderStyle={styles.placeholderStyle}
                        selectedTextStyle={styles.selectedTextStyle}
                        inputSearchStyle={styles.inputSearchStyle}
                        iconStyle={styles.iconStyle}
                        search
                        maxHeight={300}
                        labelField="label"
                        valueField="value"
                        placeholder={!Focus ? 'Select Category' : '...'}
                        searchPlaceholder="Search..."
                        value={category_id}
                        onFocus={() => setFocus(true)}
                        onBlur={() => setFocus(false)}
                        onChange={item => {
                            setCategoryId(item.value);
                            setFocus(false);
                        }}
                        renderLeftIcon={() => (
                            <AntDesign
                                style={styles.icon}
                                color={Focus ? 'blue' : 'black'}
                                name="Safety"
                                size={20}
                            />
                        )}
                    />
                    {categoryIdErr &&
                        <Text style={{ color: 'red' }}>{categoryIdErr}</Text>
                    }
                    <View style={styles.inputContainer}>
                        <Text style={styles.inputLabel}>Title:<Text style={{ color: 'red' }}>*</Text></Text>
                        <TextInput
                            label='Enter Title'
                            mode='outlined'
                            onChangeText={text => setTitle(text)}
                            value={title}
                        />
                        {titleErr &&
                            <Text style={{ color: 'red' }}>{titleErr}</Text>
                        }
                    </View>
                    <View style={styles.inputContainer}>
                        <Text style={styles.inputLabel}>Description: <Text style={{ color: 'red' }}>*</Text></Text>
                        <TextInput
                            label='Enter Description'
                            mode='outlined'
                            multiline
                            style={{ minHeight: 150 }}
                            onChangeText={text => setDescription(text)}
                            value={description}
                        />
                        {descriptionErr &&
                            <Text style={{ color: 'red' }}>{descriptionErr}</Text>
                        }
                    </View>
                    <View style={styles.inputContainer}>
                        <Button
                            title='submit'
                            onPress={createPostHandler}
                        />
                    </View>
                    <StatusBar />
                </View>
            </View>
        </ScrollView>
    );
}

const styles = StyleSheet.create({
    container: {
        paddingTop: 70,
        paddingHorizontal: 5,
        flex: 1,
        backgroundColor: '#40d6ea'
    },
    innerContainer: {
        borderRadius: 20,
        paddingVertical: 60,
        paddingHorizontal: 20,
        backgroundColor: 'white'
    },
    dropdown: {
        height: 50,
        borderColor: 'gray',
        borderWidth: 0.5,
        borderRadius: 8,
        paddingHorizontal: 8,
        backgroundColor: 'white'
    },
    icon: {
        marginRight: 5,
    },
    label: {
        position: 'absolute',
        backgroundColor: 'white',
        left: 22,
        top: 20,
        zIndex: 999,
        paddingHorizontal: 8,
        fontSize: 14,
    },
    placeholderStyle: {
        fontSize: 16,
    },
    selectedTextStyle: {
        fontSize: 16,
    },
    iconStyle: {
        width: 20,
        height: 20,
    },
    inputSearchStyle: {
        height: 40,
        fontSize: 16,
    },
    inputContainer: {
        marginTop: 10,
    },
    inputLabel: {
        fontSize: 17,
    },
    success: {
        textAlign:'center',
        marginBottom:10,
        padding:10,
        color:'white',
        borderRadius:10,
    },
    bgSuccess: {
        backgroundColor:'#228822d6',
    }
});

export default App;
Run Project
In the last step run your project using the below command.
expo start
You can QR code scan in Expo Go Application on mobile.
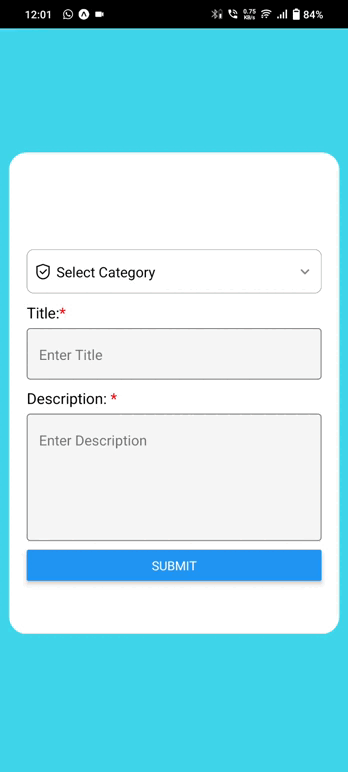
Output :
It will help you...
#React Native