04-Apr-2023
.
Admin

Hi Guys,
In this article we will cover on how to implement how to create camera pick image save to gallery in react native. This tutorial will give you simple example of react native pick image from camera and gallery example. I explained simply about how to implement camera pick image save to gallery in react native. you will learn react native camera save image to gallery example. Follow bellow tutorial step of how to use camera pick image save to gallery using react native.
Let's start following example:
Step 1: Download Project
In the first step run the following command to create a project.
expo init ExampleApp
Step 2: Install and Setup
You can install expo-camera to create camera:
expo install expo-camera
You can install expo-sharing to allows you to share files directly with other compatible applications:
expo install expo-sharing
You can install expo-media-library to provides access to the user's media library, allowing them to access their existing images and videos from your app, as well as save new ones. You can also subscribe to any updates made to the user's media library.
expo install expo-media-library
Step 3: App.json
In this step, You will open the App.json file and set the config.
{
  "expo": {
    "plugins": [
      [
        "expo-media-library",
        {
          "photosPermission": "Allow $(PRODUCT_NAME) to access your photos.",
          "savePhotosPermission": "Allow $(PRODUCT_NAME) to save photos.",
          "isAccessMediaLocationEnabled": true
        }
      ]
    ]
  }
}
Step 4: App.js
In this step, You will open the App.js file and put the code.
import React, { useEffect, useState, useRef } from 'react';
import { Button, ToastAndroid, StatusBar, StyleSheet, Text, View, SafeAreaView, Image, Pressable } from 'react-native';
import { Camera } from 'expo-camera';
import { shareAsync } from 'expo-sharing';
import * as MediaLibrary from 'expo-media-library';

const App = () => {
    const [hasCameraPermission, setHasCameraPermission] = useState();
    const [hasMediadLibraryPermission, setHasMediadLibraryPermission] = useState();
    const [photo, setPhoto] = useState();
    const cameraRef = useRef();

    const setToastMsg = msg => {
        ToastAndroid.showWithGravity(msg, ToastAndroid.SHORT, ToastAndroid.CENTER);
    }

    useEffect(() => {
        (async () => {
            const cameraPermission = await Camera.requestCameraPermissionsAsync();
            const mediaLibraryPermission = await MediaLibrary.requestPermissionsAsync();

            setHasCameraPermission(cameraPermission.status === 'granted');
            setHasMediadLibraryPermission(mediaLibraryPermission.status === 'granted');

        })();

    }, []);

    if (hasCameraPermission === undefined) {
        return <Text>Requesting Permissions...</Text>;
    }else if (!hasCameraPermission) {
        return <Text>Permissions for camera not granted. Please change this in settings.</Text>;
    }

    const takePic = async () => {
        const options = {
            quality: 1,
            base64: true,
            exif: false,
        };

        const newPhoto = await cameraRef.current.takePictureAsync(options);
        setPhoto(newPhoto);
    }

    if (photo) {
        const sharePic = () => {
            shareAsync(photo.uri).then(() => {
                setPhoto(undefined);
            });
        }

        const savePhoto = () => {
            MediaLibrary.saveToLibraryAsync(photo.uri).then(() => {
                setPhoto(undefined);
            });
            setToastMsg('Image saved');
        }

        return (
            <SafeAreaView style={styles.saveContainer}>
                <Image
                    source={{ uri: 'data:image/jpg;base64,' + photo.base64 }}
                    style={styles.preview}
                />
                <View style={styles.shareButtonContainer}>
                    <Button
                        title='Share'
                        onPress={sharePic}
                    />
                    <View style={styles.saveButtonContainer}>
                        {hasMediadLibraryPermission ?
                            <Button
                                title='save'
                                onPress={savePhoto}
                            />
                            :
                            undefined
                        }
                    </View>
                    <Button
                        title='Discard'
                        onPress={() => setPhoto(undefined)}
                    />
                </View>
            </SafeAreaView>
        );
    }

    return (
        <Camera style={styles.container} ref={cameraRef} ratio='16:9'>
            <View style={styles.buttonContainer}>
            <Pressable style={styles.shootPhoto} onPress={takePic}>
                <View />
            </Pressable>
            </View>
            <StatusBar />
        </Camera>
    );
}

const styles = StyleSheet.create({
    container: {
        flex: 1,
        alignItems: 'center',
        justifyContent: 'flex-end',
    },
    buttonContainer: {
        backgroundColor: '#FFF',
        marginBottom:10,
        borderRadius:40,
    },
    preview: {
        width: '98%',
        height: 700,
    },
    saveContainer: {
        alignItems: 'center',
        justifyContent: 'flex-end',
        marginTop:10,
    },
    shareButtonContainer: {
        flexDirection: 'row',
        marginTop: 10,
    },
    saveButtonContainer: {
        marginHorizontal: 10,
    },
    shootPhoto: {
        padding:40,
        borderWidth:1,
        borderRadius:40,
    },
});

export default App;
Run Project
In the last step run your project using the below command.
expo start
You can QR code scan in Expo Go Application on mobile.
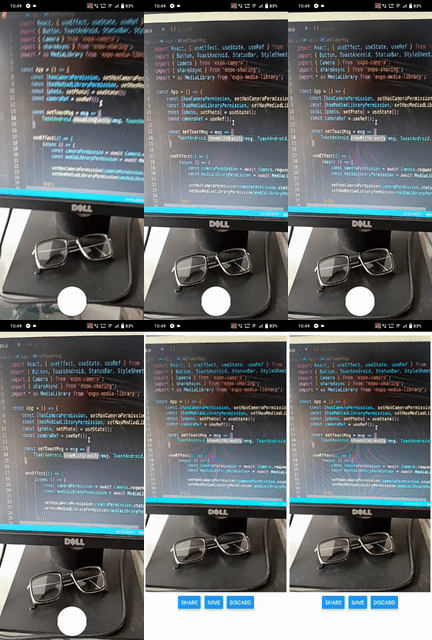
Output :

It will help you...
#React Native