10-Mar-2023
.
Admin
Hi Guys,
Today,I will learn you how to convert pdf to image in laravel. we will Pdf To Image Convert using imagick package. you can easyliy convert pdf to image any formate in laravel. if you want to convert pdf to image than you can use here example. we will show setp by step example laravel pdf to image convert.
Here, I will give you full example for pdf to image convert in laravel as below.
Step 1: Install Laravel
we are going from scratch, So we require to get fresh Laravel application using bellow command, So open your terminal OR command prompt and run bellow command:
composer create-project --prefer-dist laravel/laravel blog
Step 2: Installing Imagick PHP Extension And Configuration
Here In this step, I will install the Imagick PHP extension is available from the Ubuntu’s repositories. Like ImageMagick, to do an imagick php install we can simply run the apt install command.
sudo apt install php-imagick
If you require a previous version of php-imagick, you can list the version available from the Ubuntu repositories using the apt list command. This would be useful in the event that the latest patch introduces regressions, which is fairly uncommon.
sudo apt list php-magick -a
The -a flag tells apt to list all version of a package available from the repositories. The output will look similar to the following, and at the time of this writing, there was only a single version available.
php-imagick/bionic,now 3.4.3~rc2-2ubuntu4 amd64 [installed]
restart apache web server
Installing the module alone isn’t enough. In order for any new PHP extension to be used with your web application Apache must be restarted.
sudo systemctl restart apache2
Verify Installation
To verify the installation was successful and that the module is enabled properly, we can use php -m from the command line, and grep the results to limit the output to only the line that is important.
Run the following command to verify the installation.
php -m | grep imagick
If the installation was successful, the output of the command will simply show one line, and it will only contain the name of the module imagick.
imagick
For a much more detailed verification of whether the PHP module was installed correctly, use the phpinfo() method.
From the command line, run the following command
php -r 'phpinfo();' | grep imagick
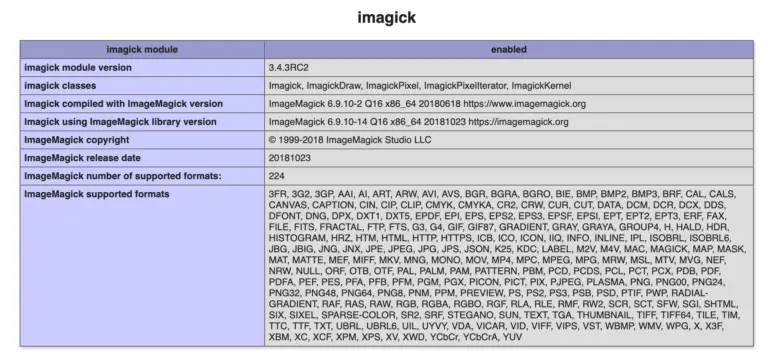
Which will output the following information, where the modules status is shown as enabled.
/etc/php/7.3/cli/conf.d/20-imagick.ini,
imagick
imagick module => enabled
imagick module version => 3.4.4
imagick classes => Imagick, ImagickDraw, ImagickPixel, ImagickPixelIterator, ImagickKernel
imagick.locale_fix => 0 => 0
imagick.progress_monitor => 0 => 0
imagick.set_single_thread => 1 => 1
imagick.shutdown_sleep_count => 10 => 10
imagick.skip_version_check => 1 => 1
Alternatively, by adding the phpinfo() function to a php script, and then accessing the script from a web browser, we are able to see the module is installed and enabled.
After some authorization change in fowling the path
/etc/ImageMagick-6/policy.xml
< policy domain="coder" rights="none" pattern="PDF" / >
To Convert
< policy domain="coder" rights="read|write" pattern="PDF" / >
Step 3: Create Route
Now, we need to add resource route for pdf to image convert in laravel application. so open your "routes/web.php" file and add following route.
<?php

use Illuminate\Support\Facades\Route;
use App\Http\Controllers\FromController;

Route::get('form', [FromController::class, 'index'])->name('form');
Step 3: Create Controller
here this step now we should create new controller as FromController,So run bellow command for generate new controller
php artisan make:controller FromController
At last step we need to update FromController.php.
<?php

namespace App\Http\Controllers;

use Imagick;
use Illuminate\Http\Request;
use Illuminate\Support\Facades\Blade;

class FromController extends Controller
{
    /**
     * Write code on Method
     *
     * @return response()
     */
    public function index()
    {
        $imagick = new Imagick();

        $imagick->readImage(public_path('dummy.pdf'));

        $imagick->writeImages('converted.jpg', true);

        dd("done");
    }
}
Now we are ready to run our custom validation rules example so run bellow command for quick run:
php artisan serve
Now you can open bellow URL on your browser:
http://localhost:8000/form
It will help you....
#Laravel 8
#Laravel 7
#Laravel
#Laravel 6