10-Apr-2023
.
Admin
Hi guys
Today, I will show you how to use form validation in laravel 7/6.we can use laravel default validation rules like required, email, unique, numeric, date, ip, in_array, it, ite, max, min, image, mimes etc. we will use laravel 7/6 form validation with display error messages on view file.
We wil define custom error messages in laravel 7/6 form validation. You can display error message with each field. I will use has() for checking is error message in laravel 7/6.
here i Will explain simple example of form validation.you can simply use in your laravel 7/6 project.
Step: 1 Create Route
Here we are easy example of validation in laravel 7/6 so just add following both route in your web.php file.we need to create route for Form Validation layout file
following path:/routes/web.php
Route::get('client/create', 'ClientController@create');
Route::post('client/store', 'ClientController@store')->name('client.store');
Step: 2 Create Controller
here this step now we should create new controller as ClientController,So run bellow command for generate new controller
php artisan make:controller ClientController
now this step, this controller will manage form validation layout bellow content in controller file.following fille path
following path:/app/Http/Controllers/ClientController.php
<?php

namespace App\Http\Controllers;

use Illuminate\Http\Request;
use App\Client;

class ClientController extends Controller
{  /**
  * Show the application dashboard.
  *
  * @return \Illuminate\Http\Response
  */
  public function create()
  {
  	return view('createClient');
  }
  /**
  * Show the application dashboard.
  *
  * @return \Illuminate\Http\Response
  */
  public function store(Request $request)
  {
  	  $request->validate([
	        'name' => 'required',
	        'password' => 'required|min:5',
	        'email' => 'required|email|unique:users'
	    ], [
	        'name.required' => 'Name is required',
	        'password.required' => 'Password is required'
	    ]);

  	  $input = $request->all();
  	  $input['password'] = bcrypt($input['password']);
  	  Client::create($input);

  	  return back()->with('success', 'User created successfully.');
  }
}
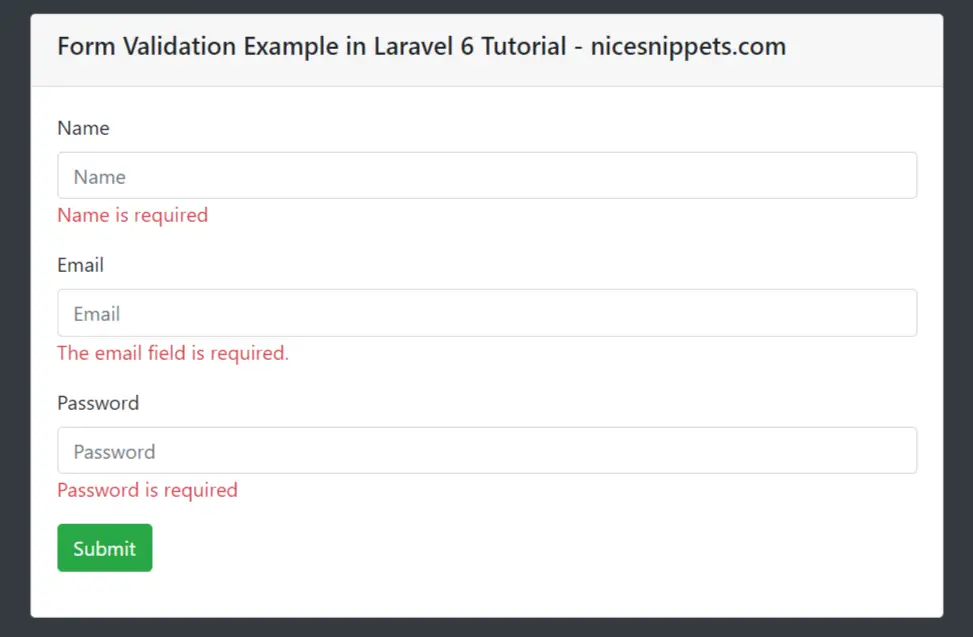
Step: 3 Create Blade Files
In Last step, let's create createClient.blade.php (resources/views/createClient.blade.php) for layout and Form Validation design code here and put following code
following path:/resources/views/createClient.blade.php
<!DOCTYPE html>
<html>
<head>
   <title>Form Validation Example in Laravel 6 Tutorial - nicesnippets.com</title>
   <link rel="stylesheet" href="https://cdnjs.cloudflare.com/ajax/libs/twitter-bootstrap/4.1.3/css/bootstrap.min.css" />
</head>
<body class="bg-dark">
<div class="container">
   <div class="row">
      <div class="col-md-8 offset-md-2">
         <div class="card mt-5">
            <div class="card-header">
               <h5>Form Validation Example in Laravel 6 Tutorial - nicesnippets.com </h5>
            </div>
            <div class="card-body">
               <form action="{{ route('client.store') }}" method="post">
                  @csrf
                  <div class="row">
                     <div class="col-md-12">
                        <div class="form-group">
                           <label>Name</label>
                           <input type="text" name="name" class="form-control"  placeholder="Name">
                           @if ($errors->has('name'))
                                  <span class="text-danger">{{ $errors->first('name') }}</span>
                              @endif
                        </div>
                     </div>
                  </div>
                  <div class="row">
                     <div class="col-md-12">
                        <div class="form-group">
                           <label>Email</label>
                           <input type="email" name="email" class="form-control" placeholder="Email">
                           @if ($errors->has('email'))
                                <span class="text-danger">{{ $errors->first('email') }}</span>
                           @endif
                        </div>
                     </div>
                  </div>
                  <div class="row">
                     <div class="col-md-12">
                        <div class="form-group">
                           <label>Password</label>
                           <input type="password" name="password" class="form-control" placeholder="Password">
                           @if ($errors->has('password'))
                                <span class="text-danger">{{ $errors->first('password') }}</span>
                            @endif
                        </div>
                     </div>
                  </div>
                  <div class="row">
                     <div class="col-md-12">
                        <div class="form-group">
                           <button class="btn btn-success" type="submit">Submit</button>
                        </div>
                     </div>
                  </div>
               </form>
            </div>
         </div>
      </div>
   </div>
</div>
</body>
</html>
Now we are ready to run our example so run bellow command for quick run:
php artisan serve
Now you can open bellow URL on your browser:
http://localhost:8000/client/create
It will help you...
#Laravel 7
#Laravel
#Laravel 6